🧠 What is Event Handling?
Event handling in Swing is the mechanism that allows a program to respond to user-generated events like button clicks, checkbox selections, text input, and mouse/keyboard actions.
It follows the event delegation model, which consists of:
Event Source – the component that generates the event (e.g.,
JButton)Event Listener – the interface that receives and handles the event
Event Object – contains information about the event (e.g.,
ActionEvent)
🔄 Event Handling Flow
A user interacts with a component (e.g., clicks a button)
The component generates an event object
The event is passed to a listener object registered for that event
The listener's callback method is executed to handle the event
🔌 Common Listener Interfaces in Swing
Listener Interface | Triggered By | Method to Implement |
|---|---|---|
|
|
|
|
|
|
| Mouse click, enter, exit, press, release |
|
| Keyboard input |
|
| Window events |
|
|
|
|
🧷 Attaching a Listener to a Component
Use
.add<ListenerName>Listener()method to register a listener with a component.Example:
button.addActionListener(...)
You can handle events using:
Anonymous inner classes
Lambda expressions (Java 8+)
Separate listener classes
🖱️ ActionListener – Most Common Use Case
Used with buttons and menu items.
Method to override:
actionPerformed(ActionEvent e)Triggered when the button is clicked.
✅ Benefits of Event Handling
Enables interactive and dynamic UI
Makes applications event-driven and responsive
Decouples UI components from behavior logic
🧪 Best Practices
Keep listener logic short and efficient
Use lambda expressions for simple actions (Java 8+)
Group reusable listeners into separate classes
For complex UI: avoid placing all logic in
main()– use MVC structure
✅ Java Code: Using .addActionListener()
import javax.swing.*;
import java.awt.event.*;

public class EventExample {
    public static void main(String[] args) {
        // Create a frame
        JFrame frame = new JFrame("Event Listener Example");

        // Create a button
        JButton button = new JButton("Click Me");
        button.setBounds(100, 100, 120, 40);

        // Add ActionListener using the .add<ListenerName>Listener() pattern
        button.addActionListener(new ActionListener() {
            public void actionPerformed(ActionEvent e) {
                // Code to execute when the button is clicked
                JOptionPane.showMessageDialog(frame, "Button Clicked!");
            }
        });

        // Add button to frame
        frame.add(button);

        // Frame settings
        frame.setSize(300, 250);
        frame.setLayout(null);
        frame.setDefaultCloseOperation(JFrame.EXIT_ON_CLOSE);
        frame.setVisible(true);
    }
}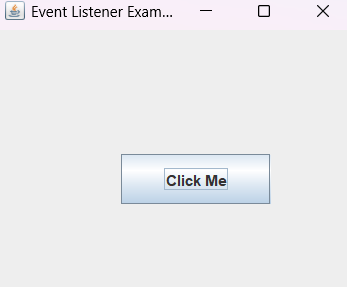
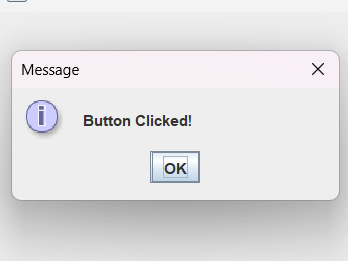
⚙️ What this shows:
The pattern:
button.addActionListener(...)The listener type:
ActionListenerThe action method:
actionPerformed()Event output: Popup message shown when the button is clicked
🧠Explanation of the code:
📥 Import Statements
import javax.swing.*;➤ Imports all Swing components like
JFrame,JButton, andJOptionPane.import java.awt.event.*;➤ Imports event-handling classes such as
ActionEventandActionListener.
🧱 Class and Entry Point
public class EventExample➤ Declares the main class of the application.
public static void main(String[] args)➤ Main method where the GUI is created and the event logic is defined.
🪟 Creating the Frame
JFrame frame = new JFrame("Event Listener Example");➤ Creates a new window titled "Event Listener Example".
➤ This serves as the main container for the button.
🔘 Creating a Button
JButton button = new JButton("Click Me");➤ Creates a button labeled "Click Me".
button.setBounds(100, 100, 120, 40);➤ Sets the x, y position and width, height of the button manually.
⚡ Event Handling: Button Click
button.addActionListener(...)➤ Attaches an ActionListener to the button.
➤ Follows the
.add<ListenerName>Listener()pattern.Inside the
actionPerformed()method:JOptionPane.showMessageDialog(frame, "Button Clicked!");➤ Displays a popup dialog when the button is clicked.
🧩 Adding Button to Frame
frame.add(button);➤ Adds the button component to the frame.
🖼️ Frame Settings
frame.setSize(300, 250);➤ Sets the size of the window to 300x250 pixels.
frame.setLayout(null);➤ Disables layout managers, so components are placed manually using
setBounds().frame.setDefaultCloseOperation(JFrame.EXIT_ON_CLOSE);➤ Ensures the program exits when the user closes the window.
frame.setVisible(true);➤ Makes the window visible when the application starts.