📂 Project: Natours (Course Main Project)
🔹 Step 1: Get the Starter Project
⬇️ Download the repo from here course files
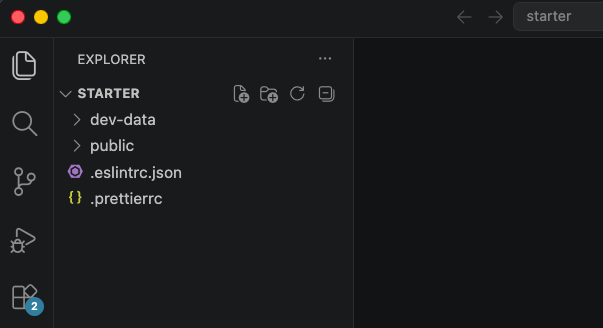
📖 Open
starterfolder from4-natours📦 Contains: prettier config, ESLint config (not set up yet — comes later), CSS/images folders, and some data files used later in the section.
🔹 Step 2: Create package.json
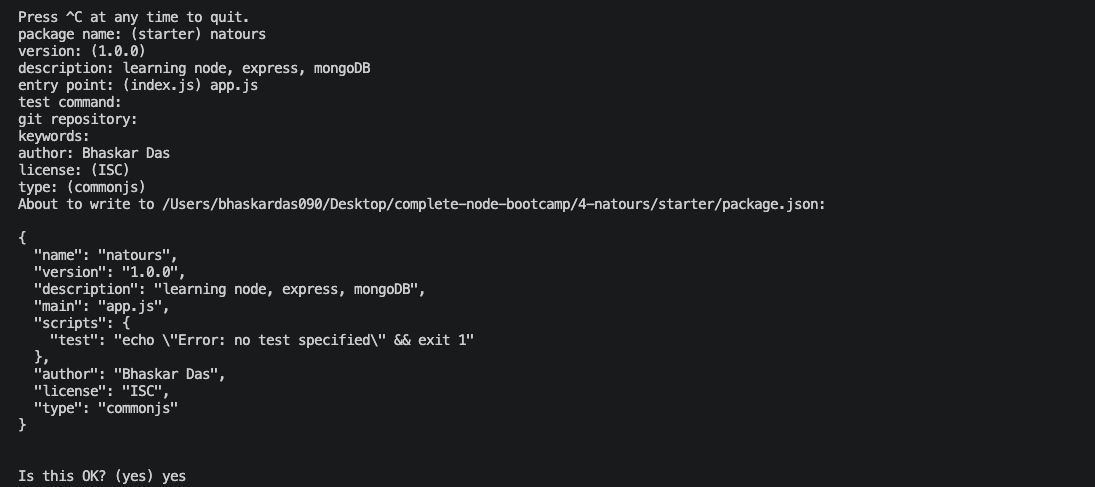
npm init
🏷️ Name:
natours(must be lowercase, no capital letters allowed by npm).🔢 Version:
1📝 Description: e.g. "learning node, express, mongoDB"
📄 Entry point:
app.js(instead of the defaultindex.js)⏭️ Skip test command, git, keywords — fill in author your name or any random name
🔹 Step 3: Install Express
npm i express@4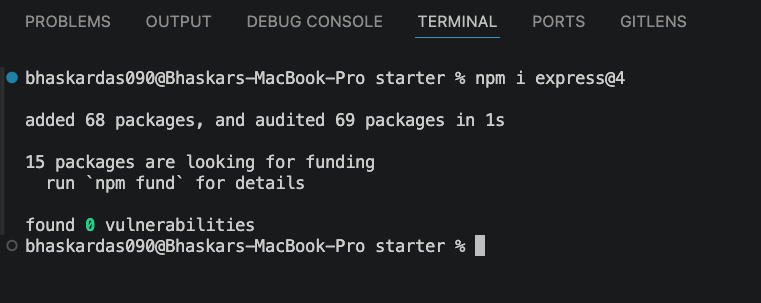
📦 Installs the latest version 4 of Express.
⚠️ Important: install version 4, not 5 — version 5 is a major version that could introduce breaking changes (even though not much actually changes).
🏷️
@4ensures the latest 4.x.x release (e.g.4.16.4) — any 4.x version is fine.📁 This creates the
node_modulesfolder.
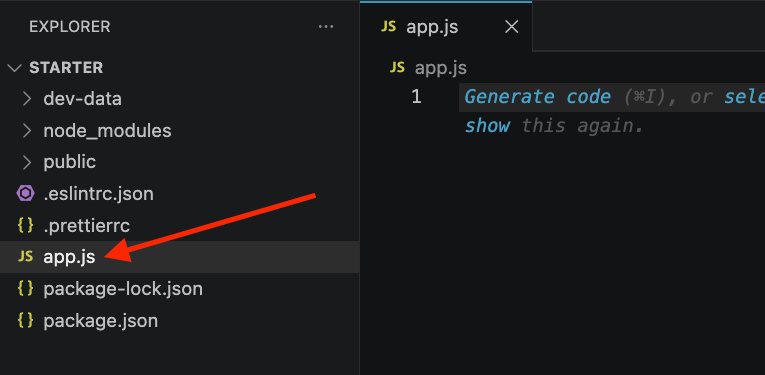
🔹 Step 4: Create app.js
📄 Convention: keep all Express configuration/setup in a file called
app.js.
🔹 Step 5: Import Express and Create the App
const express = require('express');
const app = express();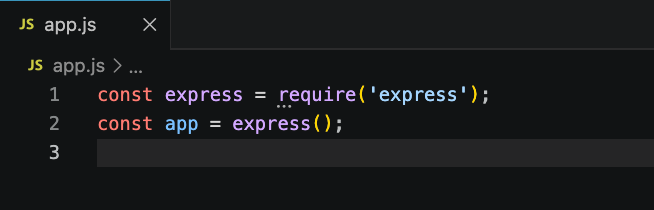
📥
expressis a function — calling it (express()) returns an object (app) with a bunch of built-in methods attached.
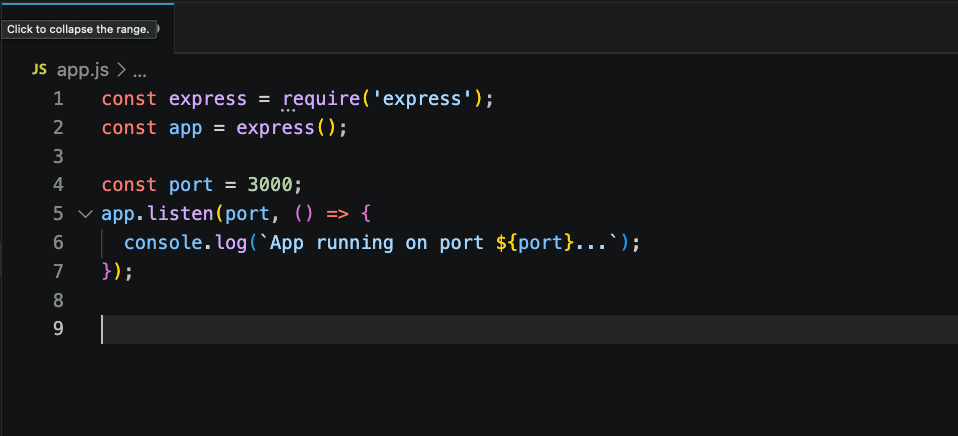
🔹 Step 6: Start the Server
const port = 3000;

app.listen(port, () => {
  console.log(`App running on port ${port}...`);
});
🚀
app.listen()is similar to thehttpmodule's.listen()used earlier — Express is 100% Node.js under the hood, just simplified.
🔹 Step 7: Define a Basic Route (GET)
app.get('/', (req, res) => {
  res.status(200).send('Hello from the server side');
});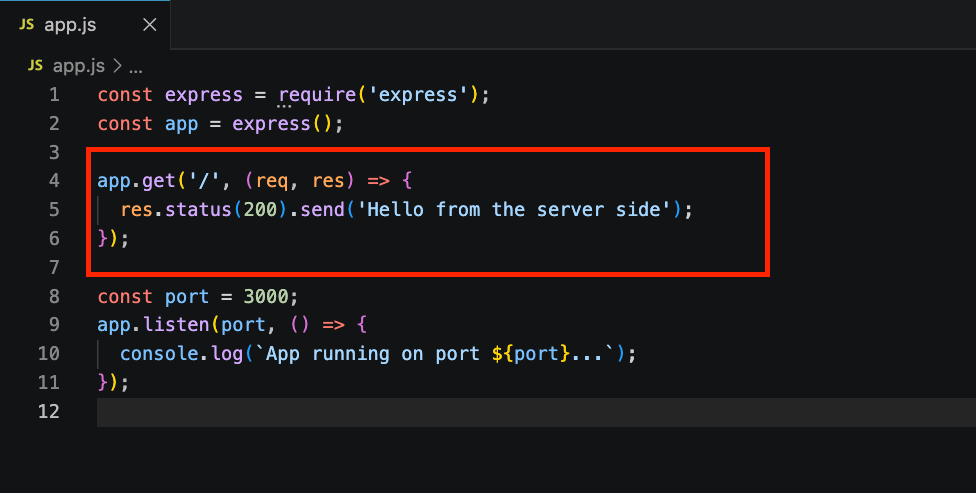
🛣️ Routing = defining how the app responds to a specific URL + HTTP method combination.
📥
app.get(url, callback)— responds to GET requests on that URL.📦 Callback receives
req(request) andres(response) — same concept as plain Node, but Express'sreq/resobjects come with a lot more built-in data and methods.🔢
res.status(code)sets the HTTP status code — chain it before.send().📤
res.send(data)sends a plain string response.
🔹 Step 8: Set Up Nodemon
Install nodemon as dev dependency:
npm i nodemon --save-dev
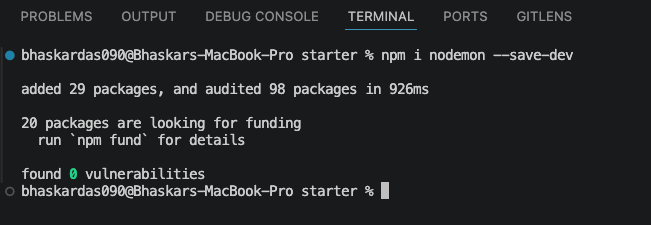
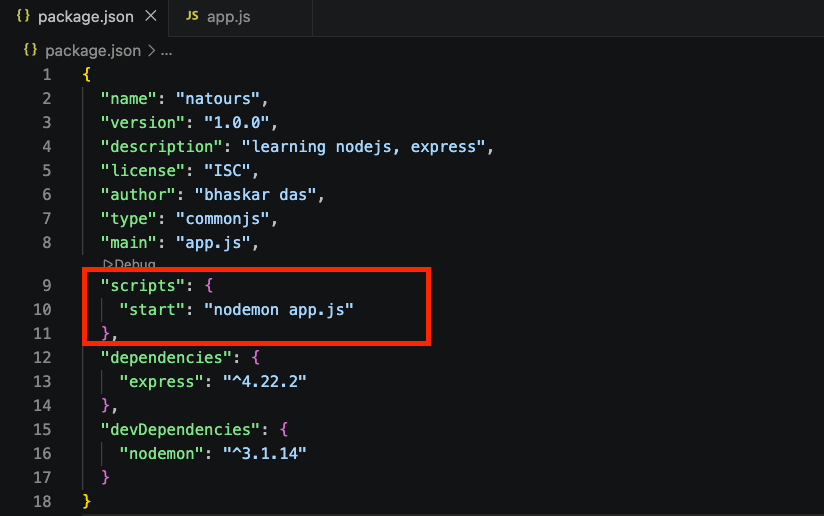
Setup
package.json: add starter script
 "scripts": {
    "start": "nodemon app.js"
  },
🔹 Step 9: Run the Server
‼️ Note: You can use nodemon app.js, but npm start is the preferred approach since it's already configured.
npm start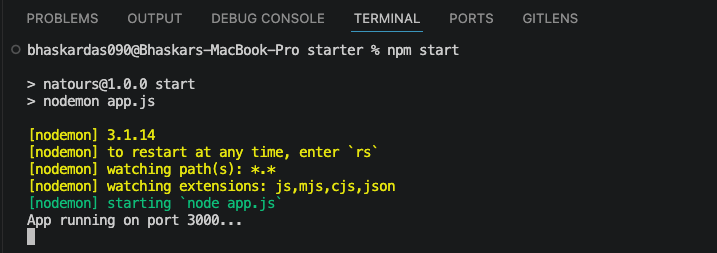
✅ Confirms:
"App running on port 3000"
🔹 Step 10: Test With Postman
📮 Set the URL to
127.0.0.1:3000(orlocalhost:3000), method GET, hit Send.📄 Response:
Hello from the server side🌐 Same result would show in a browser too — Postman is just more convenient for API testing going forward.
🔹 Step 11: Send JSON Instead of Plain Text
app.get('/', (req, res) => {
  res
    .status(200)
    .json({ message: 'Hello from the server side!', app: 'Natours' });
});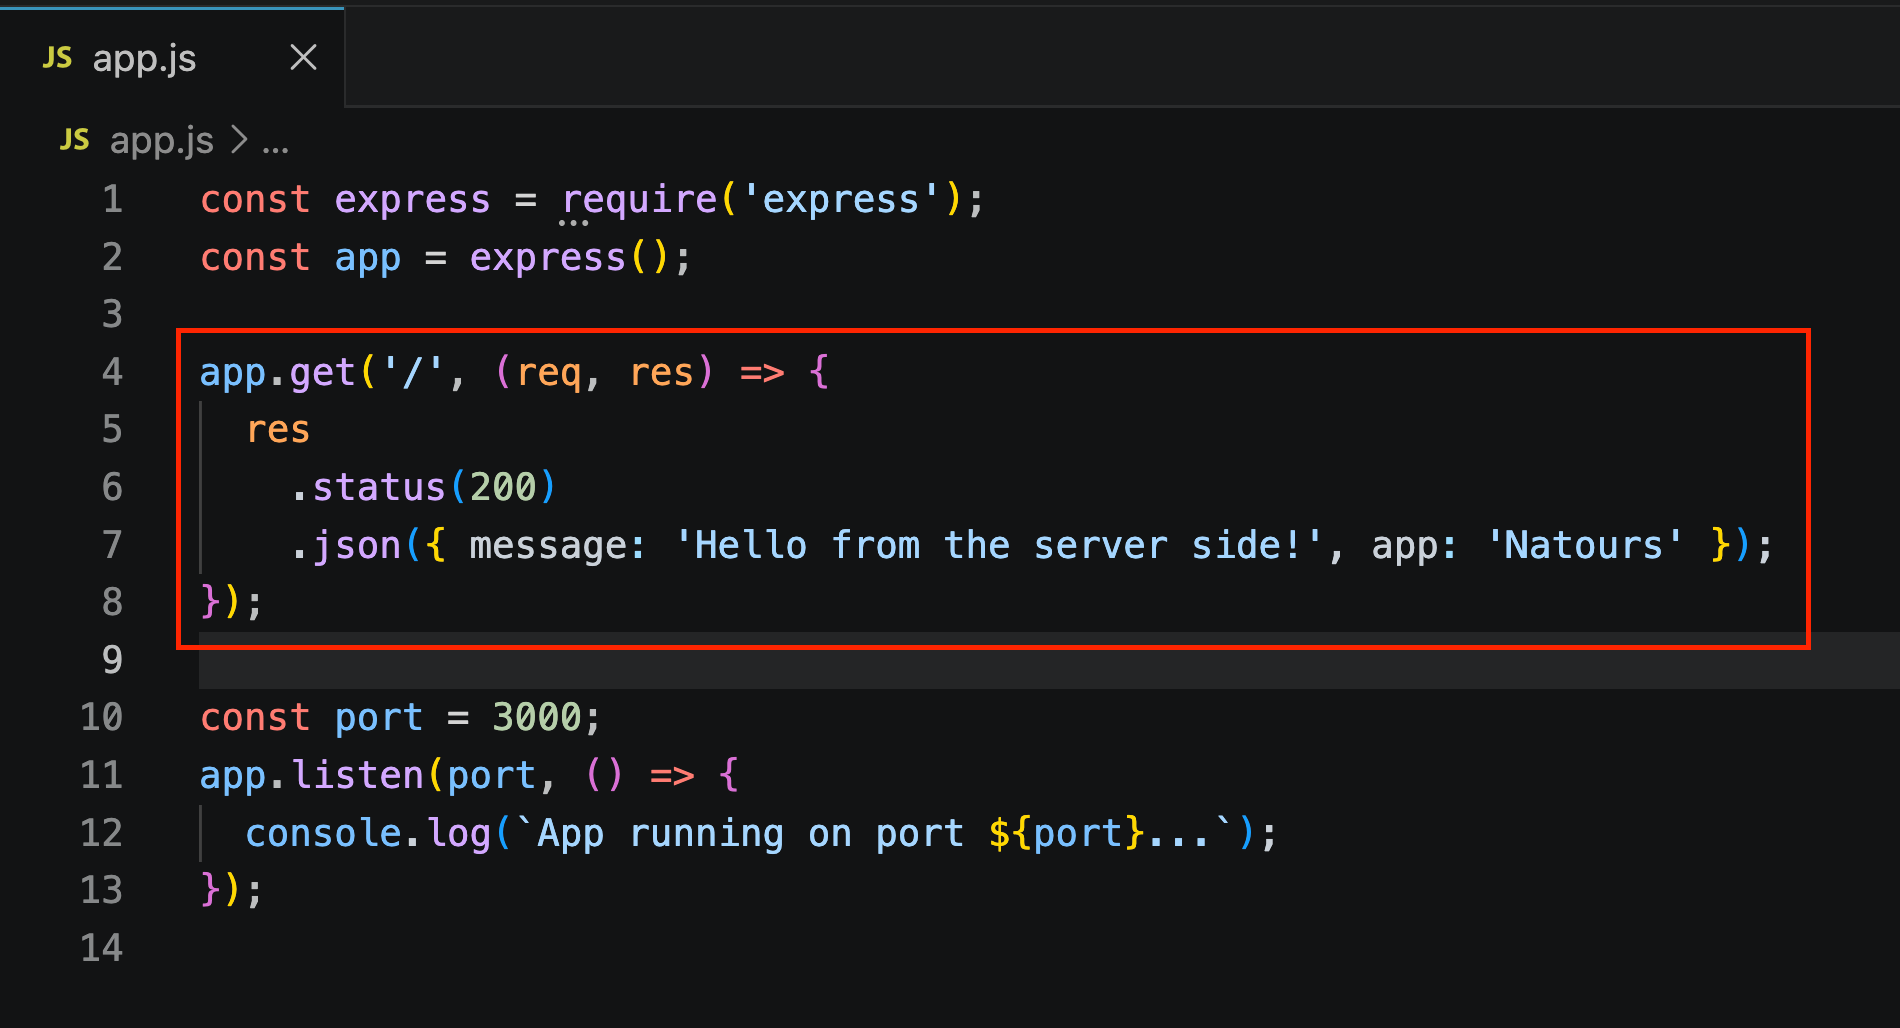
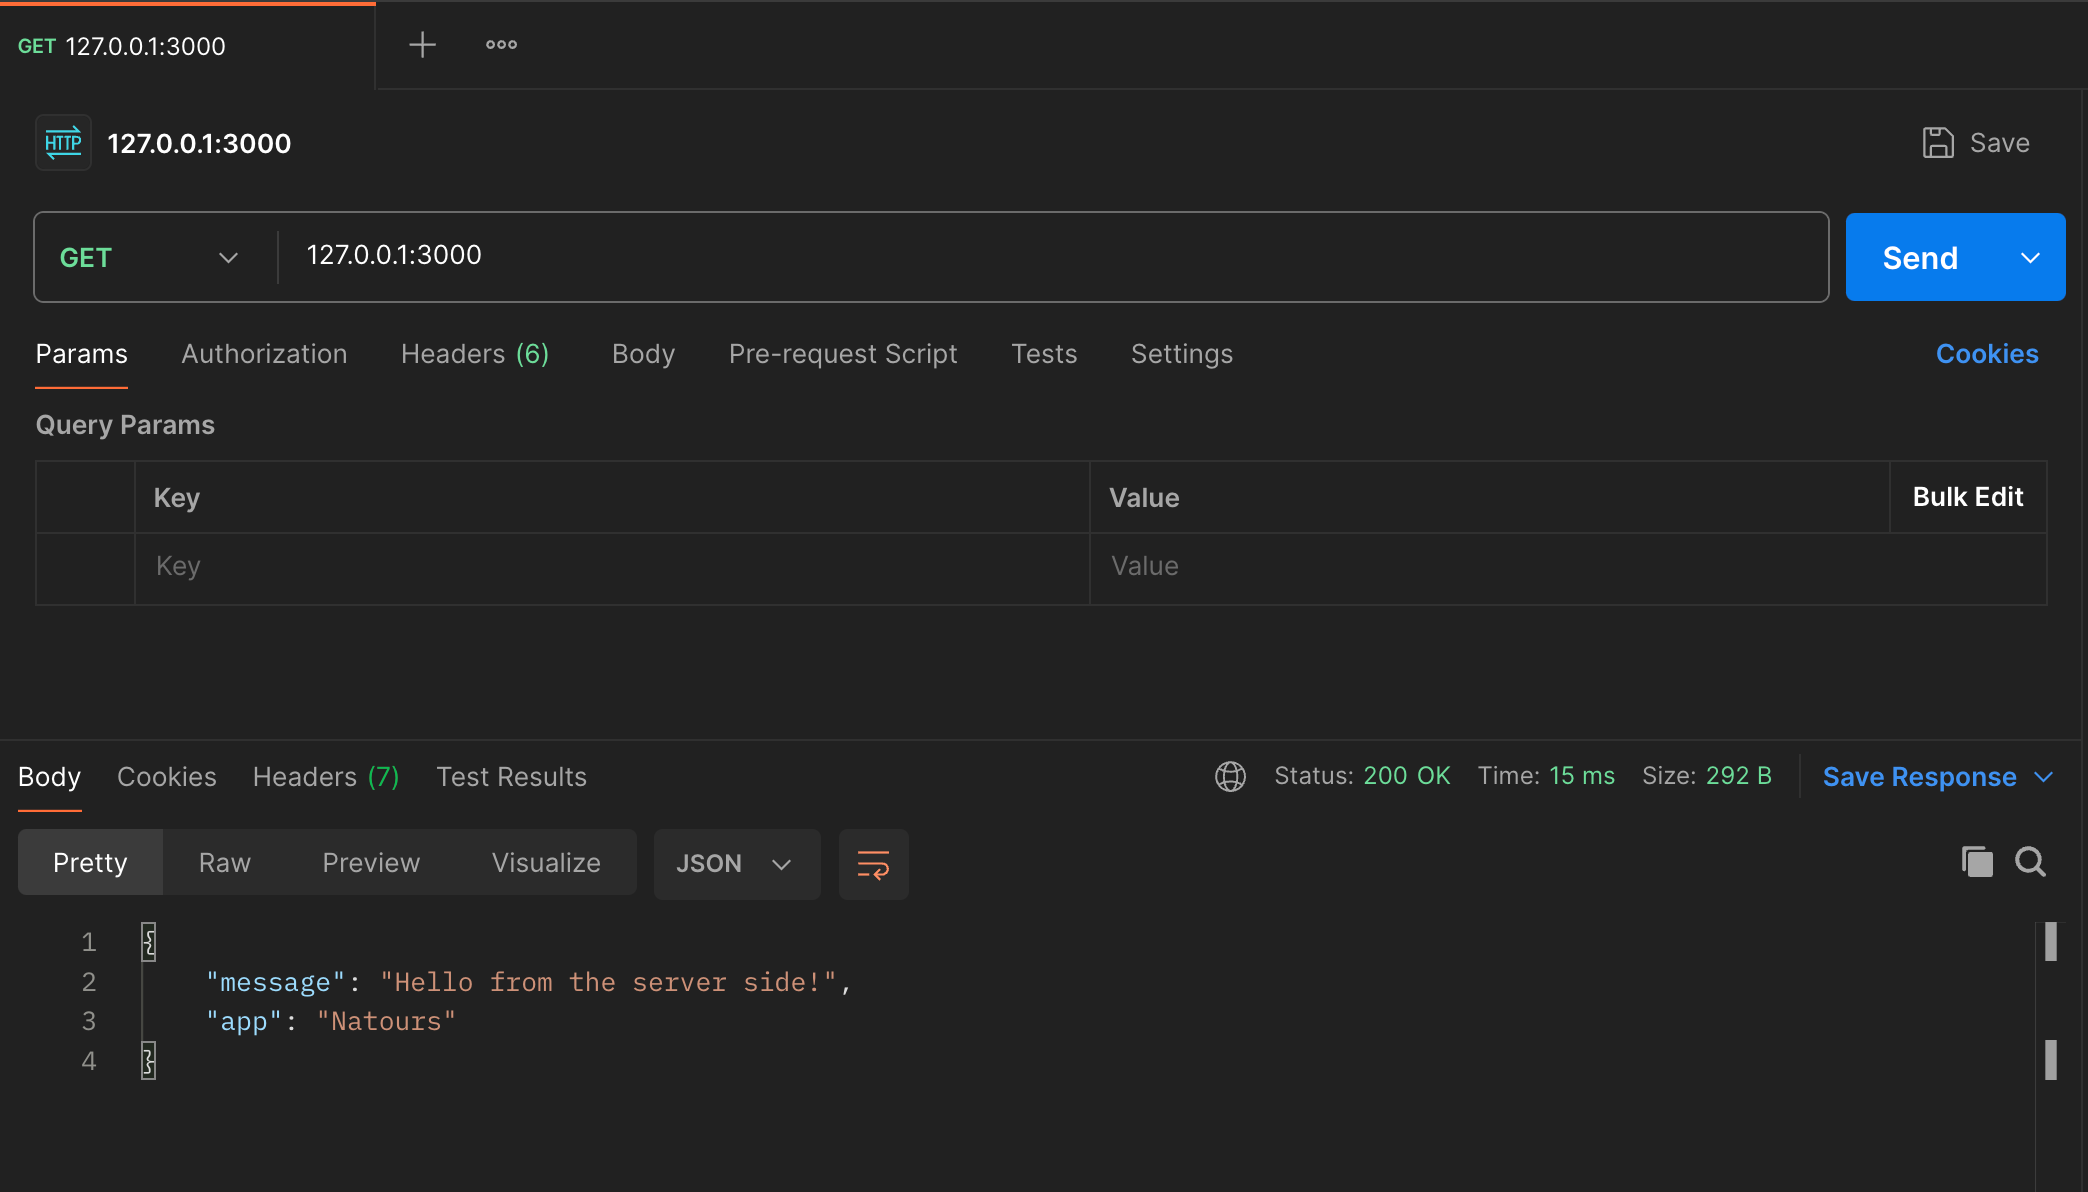
res.json(obj)sends a JSON response instead ofres.send().Postman displays it as nicely formatted, color-coded JSON, along with status code, response time, and response size.
Changing the status code (e.g. to
404) is as easy asres.status(404)— Postman will reflect that immediately.
🔹 Step 12: Test What Happens With an Undefined Route/Method
🧪 Sending a POST request to
/(with only a GET route defined) returns Express's default response:
Cannot POST /❌ With a
404status — because no route matches that URL + method combination.
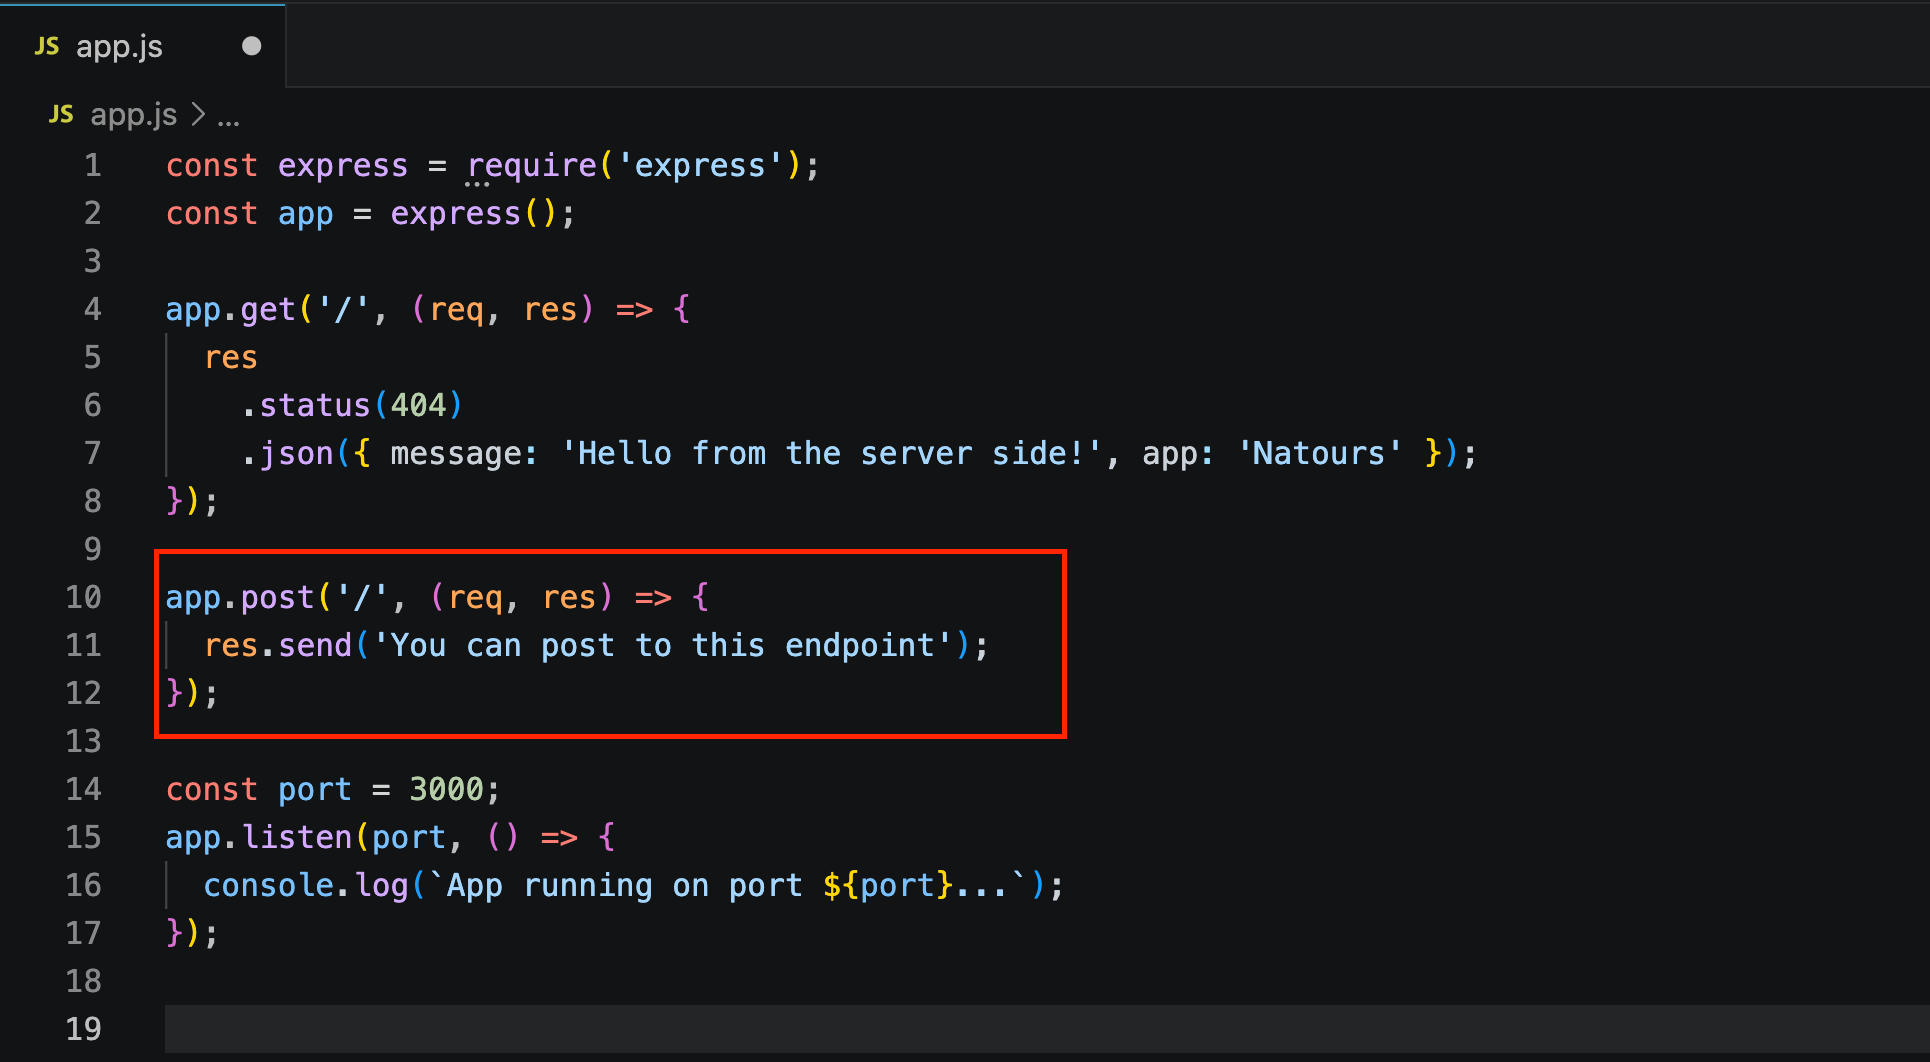
🔹 Step 13: Define a Route for POST
app.post('/', (req, res) => {
  res.send('You can post to this endpoint');
});
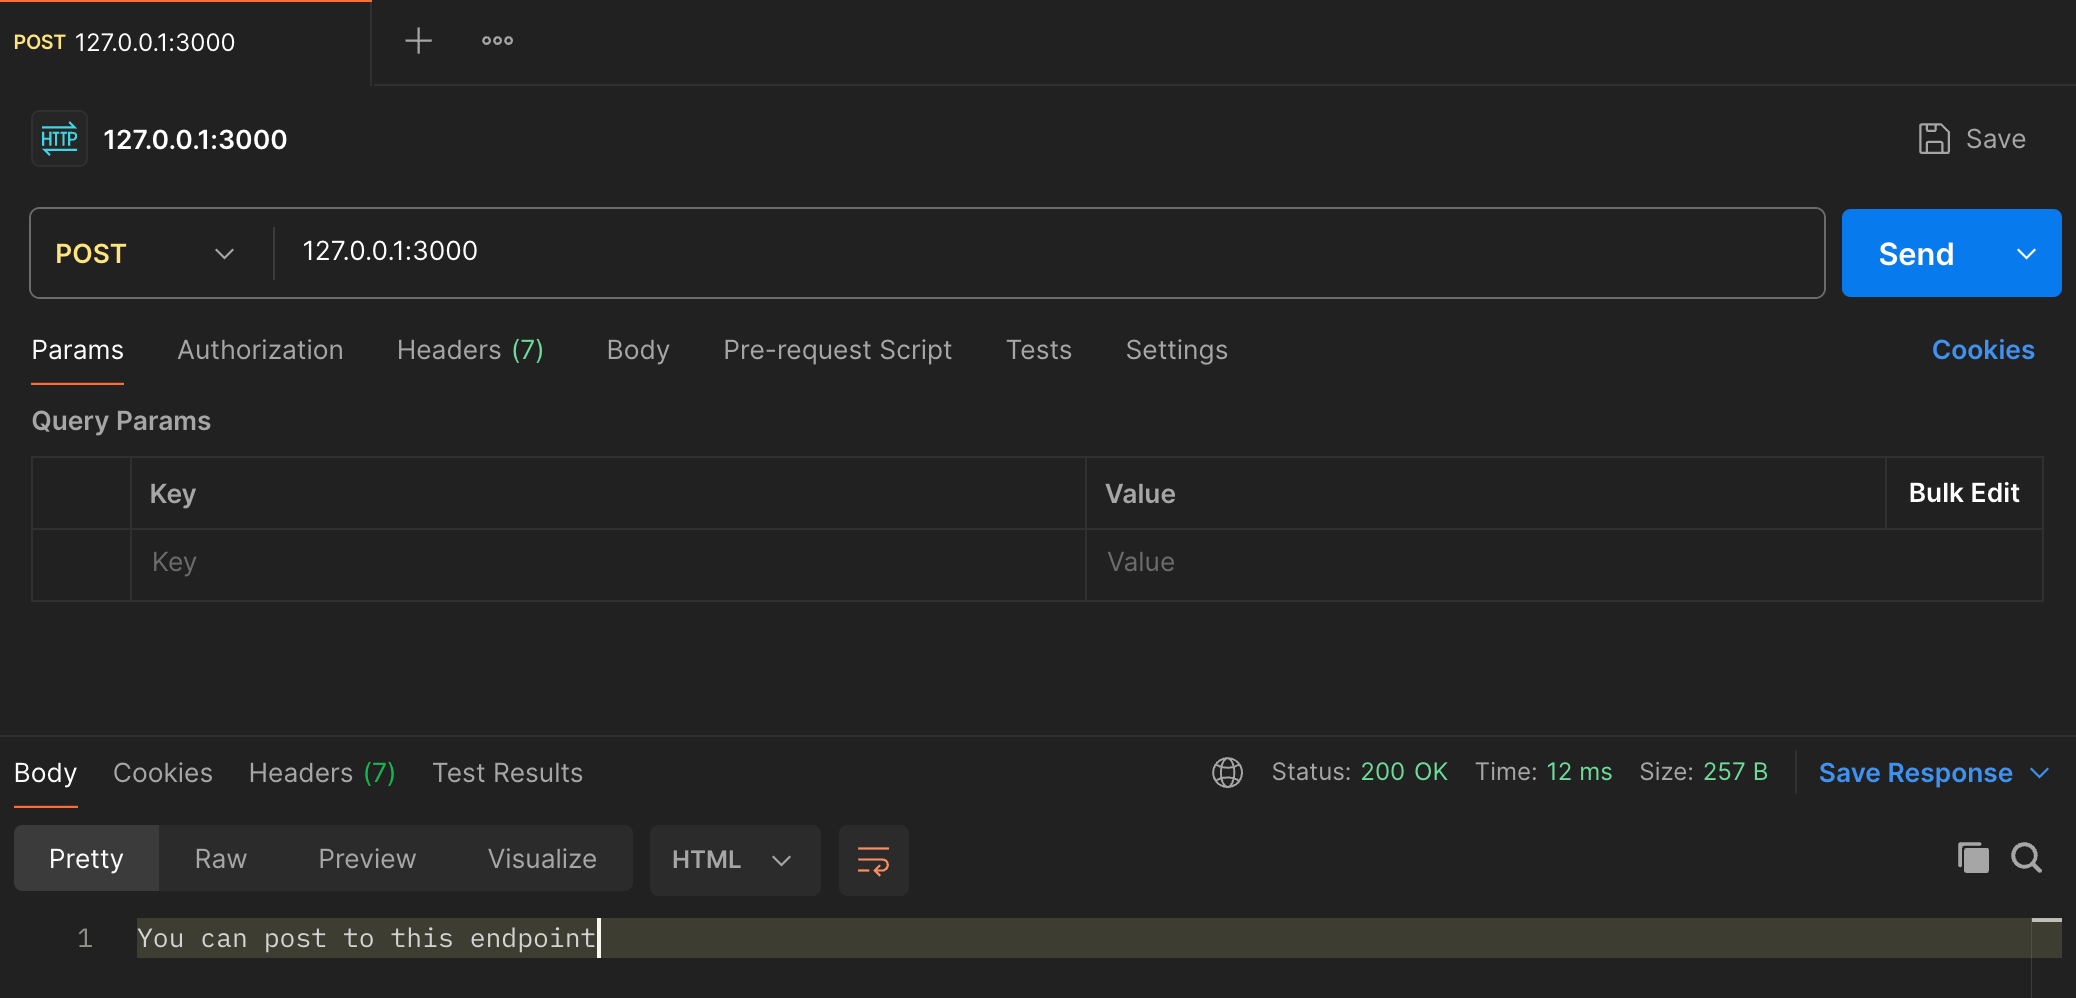
📤 Sending POST to
/now returns:"You can post to this endpoint"with status 200 (the default status when none is explicitly set).
🔹 Step 14: Automatic Headers
🏷️ Using
res.json(...)automatically sets theContent-Typeheader toapplication/json.⚙️ Express also automatically adds other headers like
X-Powered-By: Express,Date,Connection, etc. (covered in more detail later in the course).
✅ Key Takeaway
🚀
express()creates the app;app.listen()starts the server.🛣️ Routing in Express =
app.<method>(url, callback)— e.g.app.get(),app.post().📤
res.send()→ plain text/string response.📦
res.json()→ JSON response (also auto-sets the correctContent-Typeheader).🔢
res.status(code)→ sets the HTTP status code, chainable before.send()/.json().❌ Undefined route/method combinations automatically get a 404
"Cannot [METHOD] [URL]"response from Express.⚡ Compared to raw Node, Express drastically simplifies routing and response handling.
<div class="infographic-vscodeterm" id="vt">
<style>
.infographic-vscodeterm {
  --ink: #1a1a1a;
  --ink-soft: #5c5c5c;
  --paper: #ffffff;
  --paper-alt: #f0ece4;
  --accent: #2563eb;
  --accent-deep: #1942a8;
  --accent-soft: #e3ebfd;
  --line: #ddd6c9;
  --radius: 8px;
  --display-font: 'Fraunces', Georgia, serif;
  --body-font: 'Inter', system-ui, sans-serif;
  --mono-font: 'IBM Plex Mono', monospace;

  max-width: 880px;
  margin: 0 auto;
  box-sizing: border-box;
  background: transparent;
  color: var(--ink);
  font-family: var(--body-font);
}
.infographic-vscodeterm[data-theme="dark"] {
  --ink: #e8e6e1;
  --ink-soft: #9a968c;
  --paper: #13171f;
  --paper-alt: #1c212b;
  --accent: #5b8def;
  --accent-deep: #8fb4ff;
  --accent-soft: #20293f;
  --line: #2c313d;
}
.infographic-vscodeterm * { box-sizing: border-box; min-width: 0; }

.vt-eyebrow {
  font-family: var(--mono-font); font-size: 0.72rem; letter-spacing: 0.1em;
  text-transform: uppercase; color: var(--accent); margin: 0 0 0.45rem;
  display: flex; align-items: center; justify-content: center; gap: 0.4rem;
}
.vt-eyebrow::before { content: ""; width: 14px; height: 2px; background: var(--accent); display: inline-block; }
.vt-title {
  font-family: var(--display-font); font-size: clamp(1.5rem, 4vw, 2.3rem); text-align: center;
  margin: 0 0 0.5rem; line-height: 1.14; letter-spacing: -0.01em;
}
.vt-sub { color: var(--ink-soft); font-size: 0.95rem; text-align: center; margin: 0 0 1.7rem; }

/* ===== VS Code window — fixed dark theme regardless of page mode ===== */
.vt-window { border-radius: 8px; overflow: hidden; box-shadow: 0 16px 40px -14px rgba(0,0,0,0.45); border: 1px solid #1e1e1e; font-family: var(--mono-font); }
.vt-titlebar { background: #323233; display: flex; align-items: center; padding: 0.5rem 0.8rem; position: relative; }
.vt-dots { display: flex; gap: 0.4rem; }
.vt-dots span { width: 10px; height: 10px; border-radius: 50%; display: block; }
.vt-dots span:nth-child(1) { background: #ff5f56; }
.vt-dots span:nth-child(2) { background: #ffbd2e; }
.vt-dots span:nth-child(3) { background: #27c93f; }
.vt-titlebar-text { position: absolute; left: 50%; transform: translateX(-50%); font-size: 0.72rem; color: #cccccc; }

.vt-body { display: flex; height: 416px; }
.vt-resize-h { width: 5px; cursor: col-resize; background: transparent; flex-shrink: 0; transition: background 0.15s; touch-action: none; }
.vt-resize-h:hover, .vt-resize-h.is-dragging { background: #0078d4; }
.vt-resize-v { height: 5px; cursor: row-resize; background: transparent; flex-shrink: 0; transition: background 0.15s; touch-action: none; }
.vt-resize-v:hover, .vt-resize-v.is-dragging { background: #0078d4; }
.vt-window-resize {
  height: 9px; background: #252526; cursor: row-resize; display: flex; align-items: center;
  justify-content: center; border-top: 1px solid #1e1e1e; touch-action: none;
}
.vt-window-resize span { width: 30px; height: 3px; border-radius: 2px; background: #4a4a52; }
.vt-window-resize:hover span, .vt-window-resize.is-dragging span { background: #0078d4; }
.vt-toggle-btn {
  background: none; border: none; color: #9a9a9a; cursor: pointer; display: flex; align-items: center;
  padding: 0.3rem; border-radius: 3px; flex-shrink: 0;
}
.vt-toggle-btn:hover { background: #2a2d2e; color: #fff; }
.vt-toggle-btn svg { width: 13px; height: 13px; }
.vt-sidebar.is-hidden { width: 0 !important; overflow: hidden; border-right: none; }
.vt-terminal.is-collapsed { height: auto !important; }
.vt-terminal.is-collapsed .vt-term-body { display: none; }
.vt-terminal.is-collapsed .vt-term-toggle svg { transform: rotate(-90deg); }
.vt-activitybar { width: 40px; background: #333333; display: flex; flex-direction: column; align-items: center; padding-top: 0.7rem; gap: 1.1rem; flex-shrink: 0; }
.vt-activitybar svg { width: 18px; height: 18px; opacity: 0.55; }
.vt-activitybar svg.is-on { opacity: 1; }

.vt-sidebar { width: 180px; background: #252526; flex-shrink: 0; overflow-y: auto; border-right: 1px solid #1e1e1e; }
.vt-sidebar-head { font-size: 0.65rem; font-weight: 700; letter-spacing: 0.06em; color: #bbbbbb; padding: 0.6rem 0.8rem 0.3rem; }
.vt-sidebar-root { font-size: 0.74rem; color: #cccccc; padding: 0.2rem 0.7rem; display: flex; align-items: center; gap: 0.3rem; }
.vt-sidebar-folder { font-size: 0.74rem; color: #cccccc; padding: 0.2rem 0.7rem 0.2rem 1.4rem; display: flex; align-items: center; gap: 0.3rem; }
.vt-sidebar-folder.lvl2 { padding-left: 2.6rem; }
.vt-row {
  display: flex; align-items: center; gap: 0.35rem; width: 100%; background: none; border: none;
  color: #cccccc; font: inherit; font-size: 0.74rem; padding: 0.24rem 0.7rem 0.24rem 2.1rem;
  cursor: pointer; text-align: left; border-left: 2px solid transparent;
}
.vt-row.lvl2 { padding-left: 3.4rem; }
.vt-row:hover { background: #2a2d2e; }
.vt-row.is-selected { background: #37373d; border-left-color: #0078d4; }
.vt-row-disabled { cursor: default; opacity: 0.78; }
.vt-row-disabled:hover { background: none; }
.vt-badge { width: 15px; height: 15px; border-radius: 3px; flex-shrink: 0; display: flex; align-items: center; justify-content: center; font-size: 0.44rem; font-weight: 700; color: #1a1a1a; background: #29b6f6; }
.vt-badge.json { background: #cbcb41; font-size: 0.5rem; }

.vt-main { flex: 1; display: flex; flex-direction: column; min-width: 0; }
.vt-tabbar { display: flex; background: #252526; border-bottom: 1px solid #1e1e1e; overflow-x: auto; }
.vt-tab {
  display: flex; align-items: center; gap: 0.35rem; background: #1e1e1e; color: #808080; font: inherit;
  font-size: 0.72rem; padding: 0.45rem 0.8rem; border: none; border-right: 1px solid #1e1e1e;
  border-top: 2px solid transparent; cursor: pointer; white-space: nowrap;
}
.vt-tab.is-active { color: #d4d4d4; border-top-color: #0078d4; background: #1e1e1e; }
.vt-tab .vt-badge { width: 13px; height: 13px; font-size: 0.4rem; }

.vt-code-wrap { flex: 1; background: #1e1e1e; overflow: auto; padding: 0.85rem 1rem; }
.vt-code-wrap pre { margin: 0; }
.vt-code-wrap code { font-family: var(--mono-font); font-size: 0.72rem; line-height: 1.7; color: #d4d4d8; white-space: pre; }

.tok-kw   { color: #c678dd; }
.tok-tag  { color: #e06c75; }
.tok-type { color: #61afef; }
.tok-attr { color: #d19a66; }
.tok-str  { color: #98c379; }
.tok-expr { color: #56b6c2; }
.tok-punc { color: #6b7280; }
.vt-flash { background: rgba(220,38,38,0.22); }

/* ===== terminal ===== */
.vt-terminal { background: #181818; border-top: 1px solid #2c2c2c; display: flex; flex-direction: column; height: 150px; flex-shrink: 0; }
.vt-term-head { display: flex; align-items: center; gap: 0.4rem; font-size: 0.62rem; letter-spacing: 0.05em; color: #9a9a9a; padding: 0.35rem 0.8rem; border-bottom: 1px solid #262626; text-transform: uppercase; }
.vt-term-body { flex: 1; overflow-y: auto; padding: 0.5rem 0.9rem; font-size: 0.72rem; line-height: 1.65; }
.vt-term-line { color: #d4d4d4; white-space: pre; opacity: 0; transform: translateY(2px); animation: vt-line-in 0.25s ease forwards; }
@keyframes vt-line-in { to { opacity: 1; transform: none; } }
.vt-term-line.is-cmd { color: #7ee787; }
.vt-term-line.is-ok { color: #7ee787; font-weight: 600; }
.vt-term-prompt { color: #7ee787; }
.vt-run-row { display: flex; align-items: center; gap: 0.5rem; margin-top: 0.2rem; }
.vt-run-btn {
  font: inherit; font-size: 0.68rem; font-weight: 600; color: #1a1a1a; background: #7ee787;
  border: none; border-radius: 4px; padding: 0.3rem 0.7rem; cursor: pointer; display: flex; align-items: center; gap: 0.3rem;
}
.vt-run-btn:disabled { opacity: 0.5; cursor: default; }
.vt-run-btn svg { width: 9px; height: 9px; }
.vt-run-hint { color: #6b7280; font-size: 0.68rem; }

@media (max-width: 620px) {
  .vt-sidebar { width: 140px; }
  .vt-body { height: 442px; }
}
@media (max-width: 480px) { .vt-activitybar { display: none; } }

/* ===== browser output ===== */
.vt-output-label {
  font-family: var(--mono-font); font-size: 0.68rem; letter-spacing: 0.1em; text-transform: uppercase;
  color: var(--ink-soft); text-align: center; margin: 1.5rem 0 0.7rem;
}
.vt-browser {
  border: 1px solid var(--line); border-radius: var(--radius); overflow: hidden; max-width: 420px; margin: 0 auto;
  box-shadow: 0 10px 24px -12px rgba(26,26,26,0.18);
  opacity: 0; transform: translateY(8px); transition: opacity 0.4s ease, transform 0.4s ease; pointer-events: none;
}
.vt-browser.is-shown { opacity: 1; transform: none; pointer-events: auto; }
.vt-browser-bar { background: #e9e9e9; padding: 0.5rem 0.7rem; display: flex; align-items: center; gap: 0.5rem; }
.vt-browser-bar .vt-dots span { width: 8px; height: 8px; }
.vt-method-group { display: flex; gap: 0.3rem; flex-shrink: 0; }
.vt-method-btn {
  font-family: var(--mono-font); font-size: 0.6rem; font-weight: 700; letter-spacing: 0.03em;
  border: 1px solid transparent; border-radius: 4px; padding: 0.18rem 0.4rem; cursor: pointer;
  background: #fff; color: #888;
}
.vt-method-btn[data-method="get"].is-active { background: #e3ebfd; color: #1942a8; border-color: #b7cbfa; }
.vt-method-btn[data-method="post"].is-active { background: #ffe9d6; color: #b5540a; border-color: #f6c393; }
.vt-browser-url { font-family: var(--mono-font); font-size: 0.65rem; color: #555; background: #fff; border-radius: 4px; padding: 0.2rem 0.5rem; flex: 1; }
.vt-browser-page { background: #fff; padding: 1rem 1.1rem; text-align: left; font-family: var(--mono-font); }
.vt-resp { display: none; }
.vt-resp.is-active { display: block; }
.vt-text-resp { margin: 0; font-size: 0.8rem; line-height: 1.6; color: #1a1a1a; white-space: pre-wrap; word-break: break-word; }
.vt-json-pre { margin: 0; font-size: 0.76rem; line-height: 1.65; white-space: pre-wrap; word-break: break-word; }
.vt-json-key { color: #881391; }
.vt-json-str { color: #c41a16; }
.vt-json-punc { color: #1a1a1a; }
.vt-output-placeholder { text-align: center; font-size: 0.82rem; color: var(--ink-soft); }

.vt-takeaway {
  margin-top: 1.7rem; padding: 0.95rem 1.2rem; background: var(--accent-soft); border-left: 3px solid var(--accent);
  border-radius: 4px; font-size: 0.9rem; color: var(--ink); line-height: 1.5; max-width: 660px; margin-left: auto; margin-right: auto;
}
.vt-takeaway b { color: var(--accent-deep); }

@media (prefers-reduced-motion: reduce) {
  .infographic-vscodeterm *, .infographic-vscodeterm *::before, .infographic-vscodeterm *::after {
    transition-duration: 0.001ms !important; animation-duration: 0.001ms !important;
  }
}
</style>

<div class="vt-window">
  <div class="vt-titlebar">
    <div class="vt-dots"><span></span><span></span><span></span></div>
    <div class="vt-titlebar-text">starter — Visual Studio Code</div>
  </div>
  <div class="vt-body">
    <div class="vt-activitybar">
      <svg class="is-on" viewBox="0 0 24 24" fill="none" aria-hidden="true"><rect x="3" y="4" width="7" height="7" rx="1" stroke="#fff" stroke-width="1.6"/><rect x="14" y="4" width="7" height="7" rx="1" stroke="#fff" stroke-width="1.6"/><rect x="3" y="15" width="7" height="7" rx="1" stroke="#fff" stroke-width="1.6"/><rect x="14" y="15" width="7" height="7" rx="1" stroke="#fff" stroke-width="1.6"/></svg>
      <svg viewBox="0 0 24 24" fill="none" aria-hidden="true"><circle cx="10" cy="10" r="6.5" stroke="#fff" stroke-width="1.6"/><line x1="15" y1="15" x2="20" y2="20" stroke="#fff" stroke-width="1.6" stroke-linecap="round"/></svg>
    </div>

    <div class="vt-sidebar">
      <div class="vt-sidebar-head">EXPLORER</div>
      <div class="vt-sidebar-root">▾ STARTER</div>
      <div class="vt-sidebar-folder">▸ dev-data</div>
      <div class="vt-sidebar-folder">▸ node_modules</div>
      <div class="vt-sidebar-folder">▸ public</div>
      <button class="vt-row vt-row-disabled" type="button"><span class="vt-badge json">{}</span><span>.eslintrc.json</span></button>
      <button class="vt-row vt-row-disabled" type="button"><span class="vt-badge json">{}</span><span>.prettierrc</span></button>
      <button class="vt-row is-selected" data-file="app" type="button"><span class="vt-badge">JS</span><span>app.js</span></button>
      <button class="vt-row vt-row-disabled" type="button"><span class="vt-badge json">{}</span><span>package-lock.json</span></button>
      <button class="vt-row vt-row-disabled" type="button"><span class="vt-badge json">{}</span><span>package.json</span></button>
    </div>
    <div class="vt-resize-h" id="vtSidebarHandle" title="Drag to resize sidebar"></div>

    <div class="vt-main">
      <div class="vt-tabbar">
        <button class="vt-toggle-btn" id="vtToggleSidebar" type="button" aria-label="Toggle sidebar" title="Toggle sidebar">
          <svg viewBox="0 0 16 16" fill="none" aria-hidden="true"><rect x="1.5" y="2" width="13" height="12" rx="1.5" stroke="currentColor" stroke-width="1.3"/><line x1="6" y1="2" x2="6" y2="14" stroke="currentColor" stroke-width="1.3"/></svg>
        </button>
        <button class="vt-tab is-active" data-file="app" type="button"><span class="vt-badge">JS</span><span>app.js</span></button>
      </div>

      <div class="vt-code-wrap">
        <pre><code id="vtCode"></code></pre>
      </div>

      <div class="vt-resize-v" id="vtTerminalHandle" title="Drag to resize terminal"></div>
      <div class="vt-terminal">
        <div class="vt-term-head">
          <button class="vt-toggle-btn vt-term-toggle" id="vtToggleTerminal" type="button" aria-label="Toggle terminal" title="Toggle terminal">
            <svg viewBox="0 0 16 16" fill="none" aria-hidden="true"><path d="M4 6l4 4 4-4" stroke="currentColor" stroke-width="1.6" stroke-linecap="round" stroke-linejoin="round"/></svg>
          </button>
          <span>Terminal</span>
        </div>
        <div class="vt-term-body">
          <div id="vtTermLines"><div class="vt-term-line" style="animation-delay:0s;"><span class="vt-term-prompt">$</span> </div></div>
          <div class="vt-run-row">
            <button class="vt-run-btn" id="vtRunBtn" type="button">
              <svg viewBox="0 0 12 12" aria-hidden="true"><path d="M2.5 1.5v9l7-4.5z" fill="currentColor"/></svg>
              <span id="vtRunLabel">npm start</span>
            </button>
            <span class="vt-run-hint" id="vtRunHint">runs the server</span>
          </div>
        </div>
      </div>
    </div>
  </div>
  <div class="vt-window-resize" id="vtWindowHandle" title="Drag to resize window"><span></span></div>
</div>

<div class="vt-output-label">Output</div>
<div id="vtOutputArea">
  <p class="vt-output-placeholder">Run <code style="font-family:var(--mono-font)">npm start</code> above, then visit <code style="font-family:var(--mono-font)">localhost:3000</code>.</p>
  <div class="vt-browser" id="vtBrowser">
    <div class="vt-browser-bar">
      <div class="vt-method-group">
        <button class="vt-method-btn is-active" id="vtMethodGet" data-method="get" type="button">GET</button>
        <button class="vt-method-btn" id="vtMethodPost" data-method="post" type="button">POST</button>
      </div>
      <div class="vt-browser-url">localhost:3000/</div>
    </div>
    <div class="vt-browser-page">
      <div class="vt-resp is-active" id="vtRespGet">
        <pre class="vt-json-pre"><span class="vt-json-punc">{</span>
  <span class="vt-json-key">"message"</span><span class="vt-json-punc">:</span> <span class="vt-json-str">"Hello from the server side!"</span><span class="vt-json-punc">,</span>
  <span class="vt-json-key">"app"</span><span class="vt-json-punc">:</span> <span class="vt-json-str">"Natours"</span>
<span class="vt-json-punc">}</span></pre>
      </div>
      <div class="vt-resp" id="vtRespPost">
        <p class="vt-text-resp">You can post to this endpoint...</p>
      </div>
    </div>
  </div>
</div>


</div>

<link rel="preconnect" href="https://fonts.googleapis.com">
<link href="https://fonts.googleapis.com/css2?family=Fraunces:wght@500;600&family=Inter:wght@400;500;600;700&family=IBM+Plex+Mono:wght@400;500&display=swap" rel="stylesheet">

<script>
(function () {
  var root = document.getElementById('vt');
  if (!root) return;

  /* --- dark mode detection: body attribute > cookie > postMessage > light --- */
  function applyDark(dark) {
    if (dark) root.setAttribute('data-theme', 'dark');
    else root.removeAttribute('data-theme');
  }
  var bodyAttr = document.body.getAttribute('data-darkmode');
  var dark;
  if (bodyAttr === 'true') dark = true;
  else if (bodyAttr === 'false') dark = false;
  else {
    var match = document.cookie.match(/(?:^|;\s*)darkMode=([^;]+)/);
    dark = match ? match[1] === 'true' : false;
  }
  applyDark(dark);
  window.addEventListener('message', function (e) {
    if (e.data && e.data.type === 'darkMode') applyDark(!!e.data.value);
  });

  /* --- file switching --- */
  var files = {
    app:
      '<span class="tok-kw">const</span> express <span class="tok-punc">=</span> require<span class="tok-punc">(</span><span class="tok-str">\'express\'</span><span class="tok-punc">);</span>\n' +
      '<span class="tok-kw">const</span> app <span class="tok-punc">=</span> express<span class="tok-punc">();</span>\n\n' +
      'app<span class="tok-punc">.</span><span class="tok-attr">get</span><span class="tok-punc">(</span><span class="tok-str">\'/\'</span><span class="tok-punc">, (</span>req<span class="tok-punc">,</span> res<span class="tok-punc">) => {</span>\n' +
      '  res\n' +
      '    <span class="tok-punc">.</span><span class="tok-attr">status</span><span class="tok-punc">(</span>200<span class="tok-punc">)</span>\n' +
      '    <span class="tok-punc">.</span><span class="tok-attr">json</span><span class="tok-punc">({</span> message<span class="tok-punc">:</span> <span class="tok-str">\'Hello from the server side!\'</span><span class="tok-punc">,</span> app<span class="tok-punc">:</span> <span class="tok-str">\'Natours\'</span> <span class="tok-punc">});</span>\n' +
      '<span class="tok-punc">});</span>\n\n' +
      'app<span class="tok-punc">.</span><span class="tok-attr">post</span><span class="tok-punc">(</span><span class="tok-str">\'/\'</span><span class="tok-punc">, (</span>req<span class="tok-punc">,</span> res<span class="tok-punc">) => {</span>\n' +
      '  res<span class="tok-punc">.</span><span class="tok-attr">send</span><span class="tok-punc">(</span><span class="tok-str">\'You can post to this endpoint...\'</span><span class="tok-punc">);</span>\n' +
      '<span class="tok-punc">});</span>\n\n' +
      '<span class="tok-kw">const</span> port <span class="tok-punc">=</span> 3000<span class="tok-punc">;</span>\n' +
      'app<span class="tok-punc">.</span><span class="tok-attr">listen</span><span class="tok-punc">(</span>port<span class="tok-punc">, () => {</span>\n' +
      '  console<span class="tok-punc">.</span><span class="tok-attr">log</span><span class="tok-punc">(</span><span class="tok-expr">`App running on port ${port}...`</span><span class="tok-punc">);</span>\n' +
      '<span class="tok-punc">});</span>',
    pkg:
      '<span class="tok-punc">{</span>\n' +
      '  <span class="tok-attr">"name"</span><span class="tok-punc">:</span> <span class="tok-str">"starter"</span><span class="tok-punc">,</span>\n' +
      '  <span class="tok-attr">"version"</span><span class="tok-punc">:</span> <span class="tok-str">"1.0.0"</span><span class="tok-punc">,</span>\n' +
      '  <span class="tok-attr">"scripts"</span><span class="tok-punc">:</span> <span class="tok-punc">{</span>\n' +
      '    <span class="tok-attr">"start"</span><span class="tok-punc">:</span> <span class="tok-str">"node app.js"</span>\n' +
      '  <span class="tok-punc">},</span>\n' +
      '  <span class="tok-attr">"dependencies"</span><span class="tok-punc">:</span> <span class="tok-punc">{</span>\n' +
      '    <span class="tok-attr">"express"</span><span class="tok-punc">:</span> <span class="tok-str">"^4.18.2"</span>\n' +
      '  <span class="tok-punc">}</span>\n' +
      '<span class="tok-punc">}</span>'
  };

  var codeEl = root.querySelector('#vtCode');
  var rows = root.querySelectorAll('.vt-row[data-file]');
  var tabs = root.querySelectorAll('.vt-tab[data-file]');

  function selectFile(id) {
    codeEl.innerHTML = files[id];
    rows.forEach(function (r) { r.classList.toggle('is-selected', r.getAttribute('data-file') === id); });
    tabs.forEach(function (t) { t.classList.toggle('is-active', t.getAttribute('data-file') === id); });
  }
  rows.forEach(function (r) { r.addEventListener('click', function () { selectFile(r.getAttribute('data-file')); }); });
  tabs.forEach(function (t) { t.addEventListener('click', function () { selectFile(t.getAttribute('data-file')); }); });
  selectFile('app');

  /* --- GET / POST response toggle --- */
  var methodBtns = root.querySelectorAll('.vt-method-btn');
  var respGet = root.querySelector('#vtRespGet');
  var respPost = root.querySelector('#vtRespPost');
  methodBtns.forEach(function (btn) {
    btn.addEventListener('click', function () {
      var method = btn.getAttribute('data-method');
      methodBtns.forEach(function (b) { b.classList.toggle('is-active', b === btn); });
      respGet.classList.toggle('is-active', method === 'get');
      respPost.classList.toggle('is-active', method === 'post');
    });
  });

  /* --- terminal run simulation --- */
  var termLines = root.querySelector('#vtTermLines');
  var runBtn = root.querySelector('#vtRunBtn');
  var runLabel = root.querySelector('#vtRunLabel');
  var runHint = root.querySelector('#vtRunHint');
  var browser = root.querySelector('#vtBrowser');
  var placeholder = root.querySelector('.vt-output-placeholder');
  var running = false;

  var lines = [
    { text: '$ npm start', cls: 'is-cmd', delay: 0 },
    { text: '> starter@1.0.0 start', cls: '', delay: 500 },
    { text: '> node app.js', cls: '', delay: 800 },
    { text: 'App running on port 3000...', cls: 'is-ok', delay: 1500 }
  ];

  runBtn.addEventListener('click', function () {
    if (running) return;
    running = true;
    runBtn.disabled = true;
    runLabel.textContent = 'running\u2026';
    browser.classList.remove('is-shown');
    placeholder.style.display = 'block';
    termLines.innerHTML = '';
    methodBtns.forEach(function (b) { b.classList.toggle('is-active', b.getAttribute('data-method') === 'get'); });
    respGet.classList.add('is-active');
    respPost.classList.remove('is-active');

    lines.forEach(function (line) {
      setTimeout(function () {
        var div = document.createElement('div');
        div.className = 'vt-term-line ' + line.cls;
        div.textContent = line.text;
        termLines.appendChild(div);
      }, line.delay);
    });

    setTimeout(function () {
      placeholder.style.display = 'none';
      browser.classList.add('is-shown');
      runBtn.disabled = false;
      runLabel.textContent = 'npm start';
      runHint.textContent = 'server running \u2014 rerun anytime';
      running = false;
    }, 2200);
  });

  /* --- resize handles (pointer-capture drag) --- */
  function makeResizable(handle, opts) {
    var dragging = false, startPos = 0, startSize = 0;
    handle.addEventListener('pointerdown', function (e) {
      dragging = true;
      handle.classList.add('is-dragging');
      startPos = opts.axis === 'x' ? e.clientX : e.clientY;
      startSize = opts.target.getBoundingClientRect()[opts.axis === 'x' ? 'width' : 'height'];
      handle.setPointerCapture(e.pointerId);
      e.preventDefault();
    });
    handle.addEventListener('pointermove', function (e) {
      if (!dragging) return;
      var pos = opts.axis === 'x' ? e.clientX : e.clientY;
      var delta = pos - startPos;
      if (opts.invert) delta = -delta;
      var size = Math.min(opts.max, Math.max(opts.min, startSize + delta));
      opts.target.style[opts.prop] = size + 'px';
      if (opts.onResize) opts.onResize(size);
    });
    function stop() { dragging = false; handle.classList.remove('is-dragging'); }
    handle.addEventListener('pointerup', stop);
    handle.addEventListener('pointercancel', stop);
  }

  var sidebar = root.querySelector('.vt-sidebar');
  var sidebarHandle = root.querySelector('#vtSidebarHandle');
  var lastSidebarWidth = sidebar.getBoundingClientRect().width || 180;
  makeResizable(sidebarHandle, {
    axis: 'x', target: sidebar, prop: 'width', min: 110, max: 300, invert: false,
    onResize: function (s) { lastSidebarWidth = s; }
  });

  var terminal = root.querySelector('.vt-terminal');
  var terminalHandle = root.querySelector('#vtTerminalHandle');
  var lastTerminalHeight = terminal.getBoundingClientRect().height || 150;
  makeResizable(terminalHandle, {
    axis: 'y', target: terminal, prop: 'height', min: 60, max: 280, invert: true,
    onResize: function (s) { lastTerminalHeight = s; }
  });

  var vtBody = root.querySelector('.vt-body');
  var windowHandle = root.querySelector('#vtWindowHandle');
  makeResizable(windowHandle, {
    axis: 'y', target: vtBody, prop: 'height', min: 300, max: 620, invert: false
  });

  /* --- show/hide toggles --- */
  var toggleSidebarBtn = root.querySelector('#vtToggleSidebar');
  var sidebarHidden = false;
  toggleSidebarBtn.addEventListener('click', function () {
    sidebarHidden = !sidebarHidden;
    if (sidebarHidden) {
      var w = sidebar.getBoundingClientRect().width;
      if (w > 0) lastSidebarWidth = w;
      sidebar.classList.add('is-hidden');
      sidebarHandle.style.display = 'none';
    } else {
      sidebar.classList.remove('is-hidden');
      sidebar.style.width = lastSidebarWidth + 'px';
      sidebarHandle.style.display = '';
    }
  });

  var toggleTerminalBtn = root.querySelector('#vtToggleTerminal');
  var terminalCollapsed = false;
  toggleTerminalBtn.addEventListener('click', function () {
    terminalCollapsed = !terminalCollapsed;
    if (terminalCollapsed) {
      var h = terminal.getBoundingClientRect().height;
      if (h > 30) lastTerminalHeight = h;
      terminal.classList.add('is-collapsed');
      terminalHandle.style.display = 'none';
    } else {
      terminal.classList.remove('is-collapsed');
      terminal.style.height = lastTerminalHeight + 'px';
      terminalHandle.style.display = '';
    }
  });
})();
</script>