🎯 Goal of This Note
Learn how to require and use a third-party npm package (slugify) in code — completing the picture alongside core modules (like fs, http) and custom modules (like replaceTemplate).
🔄 Recap: Three Types of require() Imports
📌 Imports are conventionally placed at the top of the file, in this order:
⚙️ Core Node.js modules (e.g.,
fs,http,url)📦 Third-party modules installed via npm (e.g.,
slugify) ← this note's focus🧩 Your own custom modules (e.g.,
replaceTemplate)
📥 Step 1: Requiring a Third-Party Package
const slugify = require('slugify');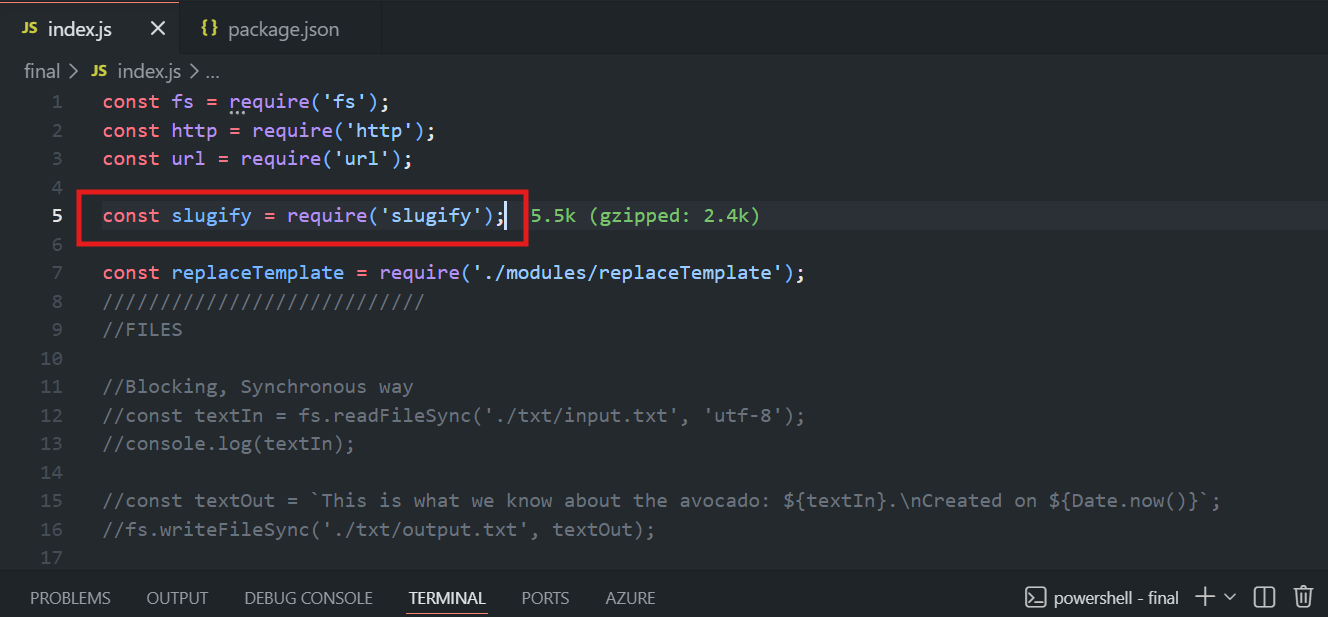
🔍 How This Works
📦 Just like requiring a core module, you use
require()with the package name.📂 Since
slugifyisn't a built-in Node module, Node automatically knows to look inside thenode_modulesfolder (created earlier when you rannpm install slugify) to find it.🏷️ The result — a function, in this case — is stored in a variable (named
slugifyhere, matching the package name for clarity).
🔗 Step 2: What Is a "Slug"?
📝 A slug is the human-readable, unique part of a URL that identifies a specific resource — commonly seen in blog posts and product pages.
💡 Example
❌ Instead of a URL like:
/product?id=0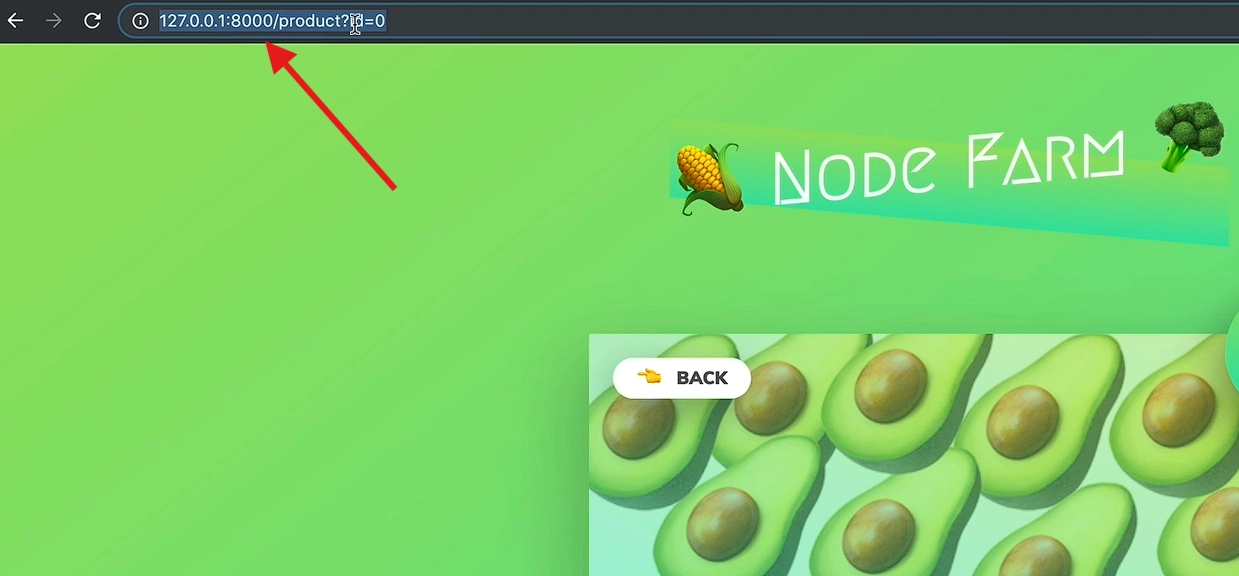
You could have something more meaningful like:
/product/fresh-avocados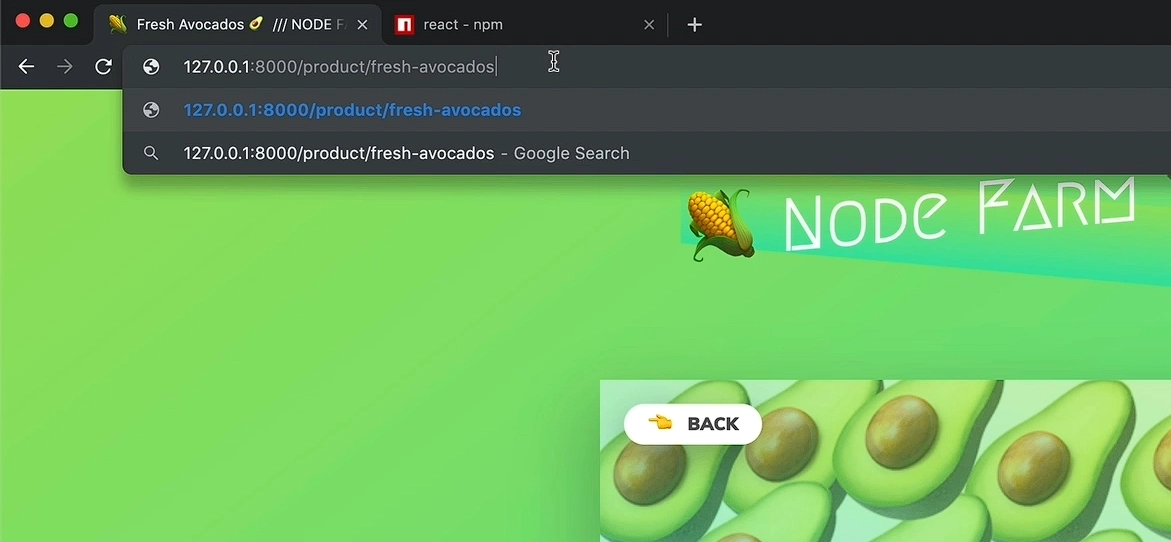
Here, fresh-avocados is the slug — generated from a name like "Fresh avocados" by:
Converting it to lowercase.
Replacing spaces with dashes.
This is much more descriptive and SEO-friendly than a plain numeric ID.
📖 Step 3: Checking the Documentation
💡 When using a new package for the first time, it's good practice to check its documentation on npmjs.com:
Search for the package by name (
slugify) on npmjs.com.The docs show usage examples, such as:
slugify(string, options);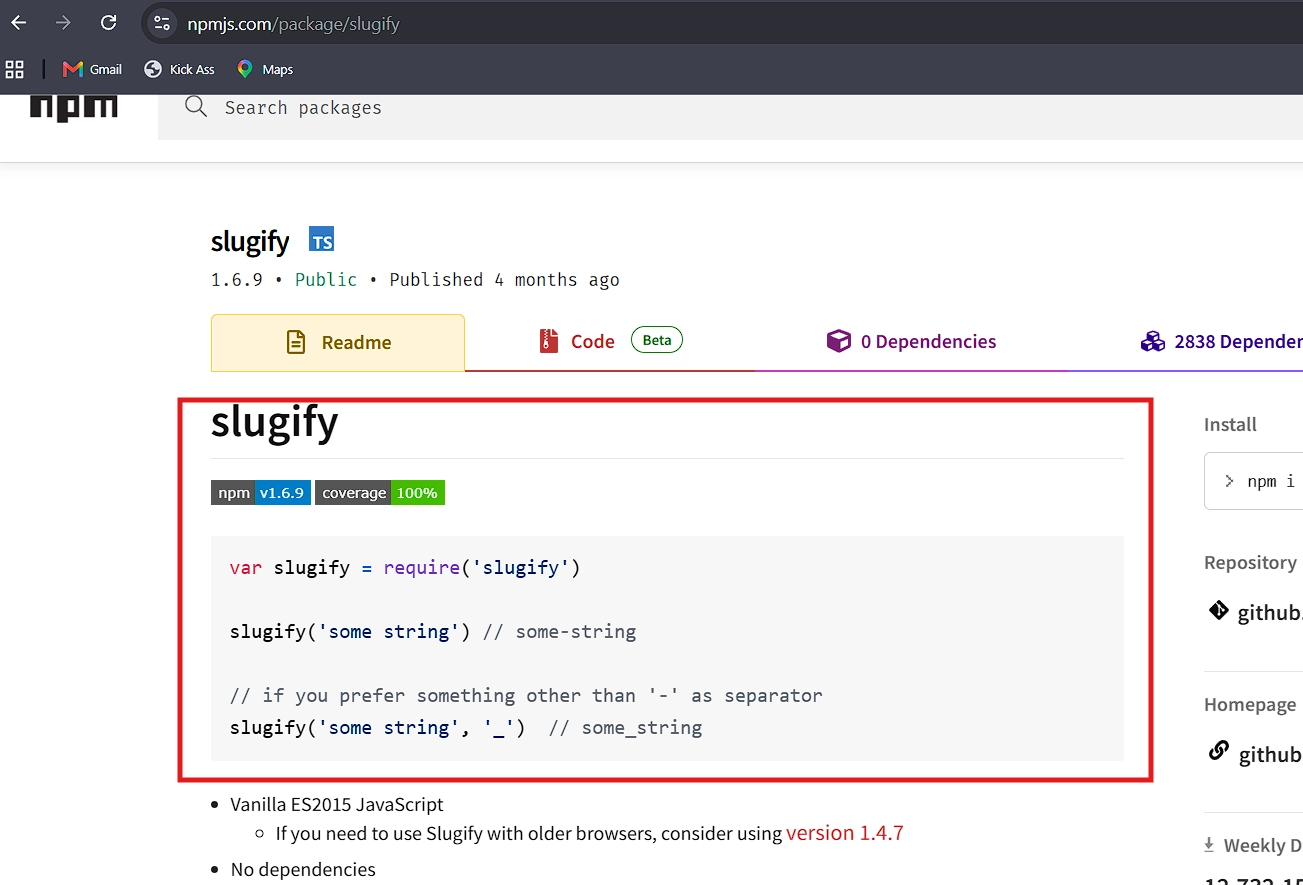
⚙️ Available options include things like:
🔄
replacement— the character used to replace spaces (defaults to , but could be_or nothing).🔡
lower— whether to convert everything to lowercase (true/false).
💡 Lesson: Documentation is essential for correctly understanding a package's options and behavior — don't guess, check the docs.
🧪 Step 4: Testing Slugify
console.log(slugify('Fresh avocados', { lower: true }));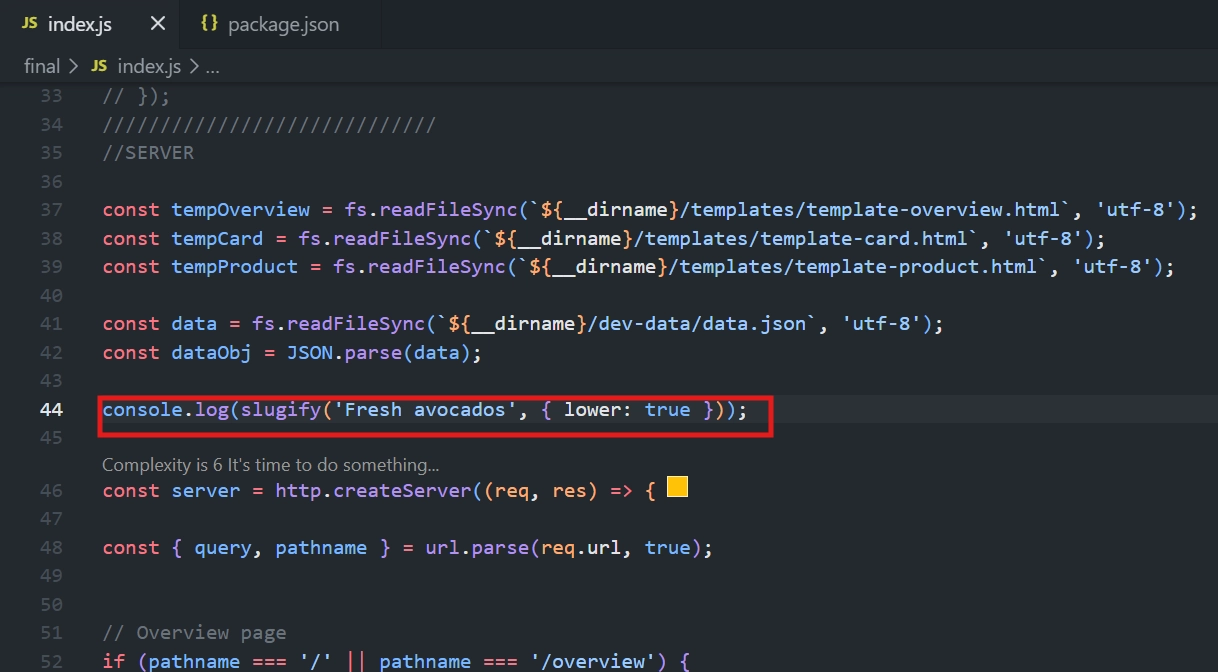
🔄 This converts
"Fresh avocados"into a clean slug:fresh-avocados.
💡 Bonus tip: Since Nodemon is now running (from the previous lecture), there's no need to manually stop and restart the server after each code change — Nodemon automatically restarts it and shows the updated console output.
🏷️ Step 5: Generating Slugs for All Products
📦 Using the array of products (
dataObject) and the familiar.map()method:
const slugs = dataObj.map(el => slugify(el.productName, { lower: true }));
console.log(slugs);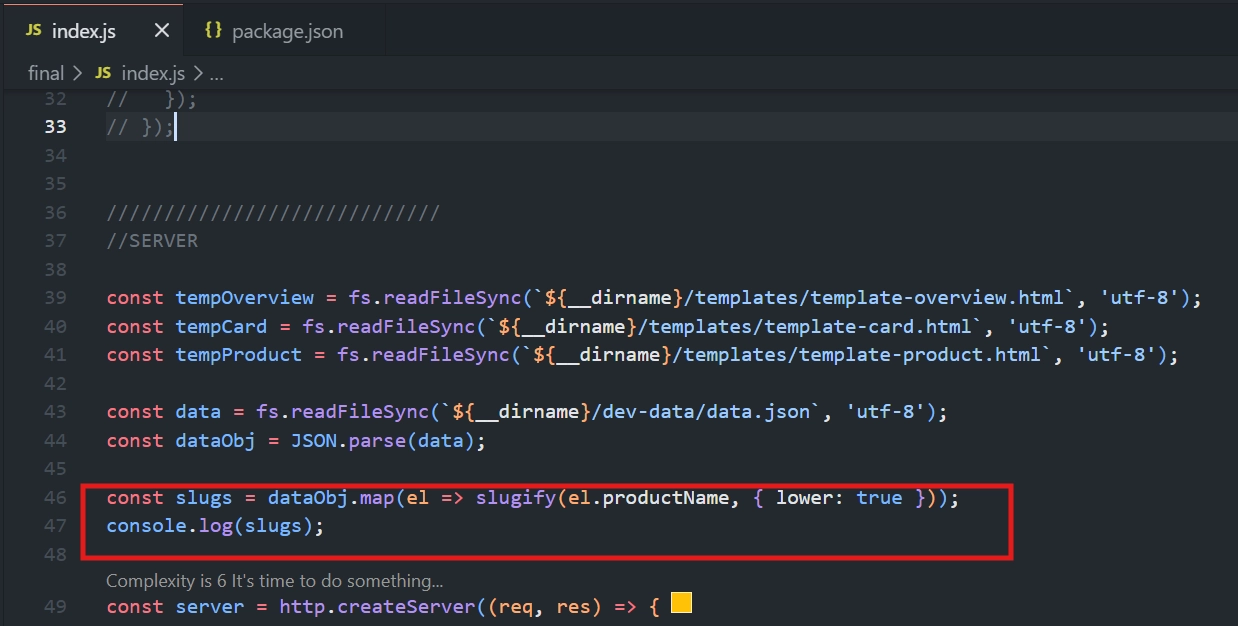
🔍 How This Works
🔁
.map()loops through each product object (el) indataObject.🏷️ For each one, it creates a slug from
el.productName(the field holding the product's name).📋 The result is a new array of slug strings — one for each of the five products.
📦 Key Concept: This Package Is Now a Dependency
By using
slugifyin the code, the project now genuinely depends on it — without this package installed, this part of the code would break.This is exactly why npm tracks it under
"dependencies"inpackage.json.
🚫 What Wasn't Done (On Purpose)
The lecture stops short of actually:
💾 Saving these generated slugs into
data.json.🔗 Updating the app's routing/templates to use slugs instead of numeric IDs in URLs.
This is intentional — doing so would just be repeating the same concepts already learned (modifying JSON, updating routes, templates, etc.) without introducing anything new.
The purpose of this lecture was purely to demonstrate the process of integrating a third-party npm package:
📥 Install it (
npm install).📦
require()it in code.📖 Check its documentation.
🚀 Use it with a simple example.
🎯Key Takeaways
📌 Concept | 💡 Explanation |
|---|---|
📥 | Loads a third-party package from |
📦 Import order convention | Core modules → third-party modules → your own custom modules |
🏷️ Slug | A readable, unique URL string (e.g., |
📖 Checking documentation | Essential for correctly using unfamiliar packages and their options (e.g., |
🔁 | Common pattern: transform an array of data using a third-party function inside the callback |
✅ A used package = a dependency | Once your code relies on a package to function, it becomes a real dependency of your project |
➡️ This completes the module import trilogy:
⚙️ Core modules
🧩 Own modules
📦 Third-party modules
all imported using the same require() function, just resolving to different locations (Node's built-ins, your local files, or node_modules).
<div class="infographic-vscodeterm" id="vt">
<style>
.infographic-vscodeterm {
--ink: #1a1a1a;
--ink-soft: #5c5c5c;
--paper: #ffffff;
--paper-alt: #f0ece4;
--accent: #2563eb;
--accent-deep: #1942a8;
--accent-soft: #e3ebfd;
--line: #ddd6c9;
--radius: 8px;
--display-font: 'Fraunces', Georgia, serif;
--body-font: 'Inter', system-ui, sans-serif;
--mono-font: 'IBM Plex Mono', monospace;
max-width: 880px;
margin: 0 auto;
box-sizing: border-box;
background: transparent;
color: var(--ink);
font-family: var(--body-font);
}
.infographic-vscodeterm[data-theme="dark"] {
--ink: #e8e6e1;
--ink-soft: #9a968c;
--paper: #13171f;
--paper-alt: #1c212b;
--accent: #5b8def;
--accent-deep: #8fb4ff;
--accent-soft: #20293f;
--line: #2c313d;
}
.infographic-vscodeterm * { box-sizing: border-box; min-width: 0; }
.vt-eyebrow {
font-family: var(--mono-font); font-size: 0.72rem; letter-spacing: 0.1em;
text-transform: uppercase; color: var(--accent); margin: 0 0 0.45rem;
display: flex; align-items: center; justify-content: center; gap: 0.4rem;
}
.vt-eyebrow::before { content: ""; width: 14px; height: 2px; background: var(--accent); display: inline-block; }
.vt-title {
font-family: var(--display-font); font-size: clamp(1.5rem, 4vw, 2.3rem); text-align: center;
margin: 0 0 0.5rem; line-height: 1.14; letter-spacing: -0.01em;
}
.vt-sub { color: var(--ink-soft); font-size: 0.95rem; text-align: center; margin: 0 0 1.7rem; }
/* ===== VS Code window — fixed dark theme regardless of page mode ===== */
.vt-window { border-radius: 8px; overflow: hidden; box-shadow: 0 16px 40px -14px rgba(0,0,0,0.45); border: 1px solid #1e1e1e; font-family: var(--mono-font); }
.vt-titlebar { background: #323233; display: flex; align-items: center; padding: 0.5rem 0.8rem; position: relative; }
.vt-dots { display: flex; gap: 0.4rem; }
.vt-dots span { width: 10px; height: 10px; border-radius: 50%; display: block; }
.vt-dots span:nth-child(1) { background: #ff5f56; }
.vt-dots span:nth-child(2) { background: #ffbd2e; }
.vt-dots span:nth-child(3) { background: #27c93f; }
.vt-titlebar-text { position: absolute; left: 50%; transform: translateX(-50%); font-size: 0.72rem; color: #cccccc; }
.vt-body { display: flex; height: 300px; }
.vt-resize-h { width: 5px; cursor: col-resize; background: transparent; flex-shrink: 0; transition: background 0.15s; touch-action: none; }
.vt-resize-h:hover, .vt-resize-h.is-dragging { background: #0078d4; }
.vt-resize-v { height: 5px; cursor: row-resize; background: transparent; flex-shrink: 0; transition: background 0.15s; touch-action: none; }
.vt-resize-v:hover, .vt-resize-v.is-dragging { background: #0078d4; }
.vt-window-resize {
height: 9px; background: #252526; cursor: row-resize; display: flex; align-items: center;
justify-content: center; border-top: 1px solid #1e1e1e; touch-action: none;
}
.vt-window-resize span { width: 30px; height: 3px; border-radius: 2px; background: #4a4a52; }
.vt-window-resize:hover span, .vt-window-resize.is-dragging span { background: #0078d4; }
.vt-toggle-btn {
background: none; border: none; color: #9a9a9a; cursor: pointer; display: flex; align-items: center;
padding: 0.3rem; border-radius: 3px; flex-shrink: 0;
}
.vt-toggle-btn:hover { background: #2a2d2e; color: #fff; }
.vt-toggle-btn svg { width: 13px; height: 13px; }
.vt-sidebar.is-hidden { width: 0 !important; overflow: hidden; border-right: none; }
.vt-terminal.is-collapsed { height: auto !important; }
.vt-terminal.is-collapsed .vt-term-body { display: none; }
.vt-terminal.is-collapsed .vt-term-toggle svg { transform: rotate(-90deg); }
.vt-activitybar { width: 40px; background: #333333; display: flex; flex-direction: column; align-items: center; padding-top: 0.7rem; gap: 1.1rem; flex-shrink: 0; }
.vt-activitybar svg { width: 18px; height: 18px; opacity: 0.55; }
.vt-activitybar svg.is-on { opacity: 1; }
.vt-sidebar { width: 170px; background: #252526; flex-shrink: 0; overflow-y: auto; border-right: 1px solid #1e1e1e; }
.vt-sidebar-head { font-size: 0.65rem; font-weight: 700; letter-spacing: 0.06em; color: #bbbbbb; padding: 0.6rem 0.8rem 0.3rem; }
.vt-sidebar-root { font-size: 0.74rem; color: #cccccc; padding: 0.2rem 0.7rem; display: flex; align-items: center; gap: 0.3rem; }
.vt-sidebar-folder { font-size: 0.74rem; color: #cccccc; padding: 0.2rem 0.7rem 0.2rem 1.4rem; display: flex; align-items: center; gap: 0.3rem; }
.vt-sidebar-folder.lvl2 { padding-left: 2.6rem; }
.vt-row {
display: flex; align-items: center; gap: 0.35rem; width: 100%; background: none; border: none;
color: #cccccc; font: inherit; font-size: 0.74rem; padding: 0.24rem 0.7rem 0.24rem 2.1rem;
cursor: pointer; text-align: left; border-left: 2px solid transparent;
}
.vt-row.lvl1 { padding-left: 1.4rem; }
.vt-row.lvl2 { padding-left: 3.4rem; }
.vt-row:hover { background: #2a2d2e; }
.vt-row.is-selected { background: #37373d; border-left-color: #0078d4; }
.vt-badge { width: 15px; height: 15px; border-radius: 3px; flex-shrink: 0; display: flex; align-items: center; justify-content: center; font-size: 0.46rem; font-weight: 700; color: #1a1a1a; background: #29b6f6; }
.vt-main { flex: 1; display: flex; flex-direction: column; min-width: 0; }
.vt-tabbar { display: flex; background: #252526; border-bottom: 1px solid #1e1e1e; overflow-x: auto; }
.vt-tab {
display: flex; align-items: center; gap: 0.35rem; background: #1e1e1e; color: #808080; font: inherit;
font-size: 0.72rem; padding: 0.45rem 0.8rem; border: none; border-right: 1px solid #1e1e1e;
border-top: 2px solid transparent; cursor: pointer; white-space: nowrap;
}
.vt-tab.is-active { color: #d4d4d4; border-top-color: #0078d4; background: #1e1e1e; }
.vt-tab .vt-badge { width: 13px; height: 13px; font-size: 0.42rem; }
.vt-code-wrap { flex: 1; background: #1e1e1e; overflow: auto; padding: 0.85rem 1rem; }
.vt-code-wrap pre { margin: 0; }
.vt-code-wrap code { font-family: var(--mono-font); font-size: 0.72rem; line-height: 1.7; color: #d4d4d8; white-space: pre; }
.tok-kw { color: #c678dd; }
.tok-tag { color: #e06c75; }
.tok-type { color: #61afef; }
.tok-attr { color: #d19a66; }
.tok-str { color: #98c379; }
.tok-expr { color: #56b6c2; }
.tok-punc { color: #6b7280; }
.vt-flash { background: rgba(220,38,38,0.22); }
/* ===== terminal ===== */
.vt-terminal { background: #181818; border-top: 1px solid #2c2c2c; display: flex; flex-direction: column; height: 150px; flex-shrink: 0; }
.vt-term-head { display: flex; align-items: center; gap: 0.4rem; font-size: 0.62rem; letter-spacing: 0.05em; color: #9a9a9a; padding: 0.35rem 0.8rem; border-bottom: 1px solid #262626; text-transform: uppercase; }
.vt-term-body { flex: 1; overflow-y: auto; padding: 0.5rem 0.9rem; font-size: 0.72rem; line-height: 1.65; }
.vt-term-line { color: #d4d4d4; white-space: pre; opacity: 0; transform: translateY(2px); animation: vt-line-in 0.25s ease forwards; }
@keyframes vt-line-in { to { opacity: 1; transform: none; } }
.vt-term-line.is-cmd { color: #7ee787; }
.vt-term-line.is-ok { color: #7ee787; font-weight: 600; }
.vt-term-prompt { color: #7ee787; }
.vt-run-row { display: flex; align-items: center; gap: 0.5rem; margin-top: 0.2rem; }
.vt-run-btn {
font: inherit; font-size: 0.68rem; font-weight: 600; color: #1a1a1a; background: #7ee787;
border: none; border-radius: 4px; padding: 0.3rem 0.7rem; cursor: pointer; display: flex; align-items: center; gap: 0.3rem;
}
.vt-run-btn:disabled { opacity: 0.5; cursor: default; }
.vt-run-btn svg { width: 9px; height: 9px; }
.vt-run-hint { color: #6b7280; font-size: 0.68rem; }
@media (max-width: 620px) {
.vt-sidebar { width: 130px; }
.vt-body { height: 320px; }
}
@media (max-width: 480px) { .vt-activitybar { display: none; } }
/* ===== browser output ===== */
.vt-output-label {
font-family: var(--mono-font); font-size: 0.68rem; letter-spacing: 0.1em; text-transform: uppercase;
color: var(--ink-soft); text-align: center; margin: 1.5rem 0 0.7rem;
}
.vt-browser {
border: 1px solid var(--line); border-radius: var(--radius); overflow: hidden; max-width: 560px; margin: 0 auto;
box-shadow: 0 10px 24px -12px rgba(26,26,26,0.18);
opacity: 0; transform: translateY(8px); transition: opacity 0.4s ease, transform 0.4s ease; pointer-events: none;
}
.vt-browser.is-shown { opacity: 1; transform: none; pointer-events: auto; }
.vt-browser-bar { background: #e9e9e9; padding: 0.5rem 0.7rem; display: flex; align-items: center; gap: 0.5rem; }
.vt-browser-bar .vt-dots span { width: 8px; height: 8px; }
.vt-browser-url { font-family: var(--mono-font); font-size: 0.65rem; color: #555; background: #fff; border-radius: 4px; padding: 0.2rem 0.5rem; flex: 1; }
.vt-browser-page { background: #fff; padding: 1.2rem 1.2rem 1.6rem; text-align: center; }
.vt-output-placeholder { text-align: center; font-size: 0.82rem; color: var(--ink-soft); }
.vt-route-row { display: flex; gap: 0.35rem; justify-content: center; margin-bottom: 1rem; flex-wrap: wrap; }
.vt-route-btn {
font-family: var(--mono-font); font-size: 0.66rem; font-weight: 600; color: #555;
background: #f0f0f0; border: 1px solid #ddd; border-radius: 999px; padding: 0.25rem 0.6rem; cursor: pointer;
}
.vt-route-btn.is-on { background: #2563eb; border-color: #2563eb; color: #fff; }
.vt-route-body { font-family: var(--mono-font); font-size: 0.88rem; color: #000; margin: 0; }
.vt-route-status {
display: inline-block; font-family: var(--mono-font); font-size: 0.66rem; font-weight: 700;
color: #b3261e; background: #fbe6e6; border: 1px solid #b3261e; border-radius: 999px;
padding: 0.15rem 0.55rem; margin-bottom: 0.5rem;
}
.vt-route-status.is-ok { color: #1f9d55; background: #e5f6ec; border-color: #1f9d55; }
.vt-json-preview {
text-align: left; font-family: var(--mono-font); font-size: 0.6rem; line-height: 1.5; color: #333;
background: #f7f7f5; border: 1px solid #e2e2de; border-radius: 6px; padding: 0.5rem 0.65rem;
max-height: 140px; overflow: auto; margin: 0; white-space: pre-wrap;
}
.vt-overview-wrap {
width: 520px; height: 400px; overflow: hidden; border-radius: 6px; border: 1px solid #e2e2de;
margin: 0 auto; background: #fff;
}
.vt-overview-frame {
width: 950px; height: 1900px; border: none; display: block;
transform: scale(0.5474); transform-origin: top left;
}
.vt-route-headers {
font-family: var(--mono-font); font-size: 0.62rem; color: #777; margin-top: 0.5rem; line-height: 1.6;
}
.vt-route-headers b { color: #333; }
.vt-takeaway {
margin-top: 1.7rem; padding: 0.95rem 1.2rem; background: var(--accent-soft); border-left: 3px solid var(--accent);
border-radius: 4px; font-size: 0.9rem; color: var(--ink); line-height: 1.5; max-width: 620px; margin-left: auto; margin-right: auto;
}
.vt-takeaway b { color: var(--accent-deep); }
@media (prefers-reduced-motion: reduce) {
.infographic-vscodeterm *, .infographic-vscodeterm *::before, .infographic-vscodeterm *::after {
transition-duration: 0.001ms !important; animation-duration: 0.001ms !important;
}
}
</style>
<div class="vt-window">
<div class="vt-titlebar">
<div class="vt-dots"><span></span><span></span><span></span></div>
<div class="vt-titlebar-text">node-server — Visual Studio Code</div>
</div>
<div class="vt-body">
<div class="vt-activitybar">
<svg class="is-on" viewBox="0 0 24 24" fill="none" aria-hidden="true"><rect x="3" y="4" width="7" height="7" rx="1" stroke="#fff" stroke-width="1.6"/><rect x="14" y="4" width="7" height="7" rx="1" stroke="#fff" stroke-width="1.6"/><rect x="3" y="15" width="7" height="7" rx="1" stroke="#fff" stroke-width="1.6"/><rect x="14" y="15" width="7" height="7" rx="1" stroke="#fff" stroke-width="1.6"/></svg>
<svg viewBox="0 0 24 24" fill="none" aria-hidden="true"><circle cx="10" cy="10" r="6.5" stroke="#fff" stroke-width="1.6"/><line x1="15" y1="15" x2="20" y2="20" stroke="#fff" stroke-width="1.6" stroke-linecap="round"/></svg>
</div>
<div class="vt-sidebar">
<div class="vt-sidebar-head">EXPLORER</div>
<div class="vt-sidebar-root">▾ NODE-SERVER</div>
<button class="vt-row lvl1 is-selected" data-file="index" type="button"><span class="vt-badge">JS</span><span>index.js</span></button>
<button class="vt-row lvl1" data-file="packageJson" type="button"><span class="vt-badge" style="background:#dcb67a;">{}</span><span>package.json</span></button>
<div class="vt-sidebar-folder">▾ modules</div>
<button class="vt-row lvl2" data-file="replaceTemplate" type="button"><span class="vt-badge">JS</span><span>replaceTemplate.js</span></button>
<div class="vt-sidebar-folder">▾ dev-data</div>
<button class="vt-row lvl2" data-file="data" type="button"><span class="vt-badge" style="background:#dcb67a;">{}</span><span>data.json</span></button>
<div class="vt-sidebar-folder">▾ templates</div>
<button class="vt-row lvl2" data-file="card" type="button"><span class="vt-badge" style="background:#e37933;">H</span><span>template-card.html</span></button>
<button class="vt-row lvl2" data-file="overview" type="button"><span class="vt-badge" style="background:#e37933;">H</span><span>template-overview.html</span></button>
<button class="vt-row lvl2" data-file="product" type="button"><span class="vt-badge" style="background:#e37933;">H</span><span>template-product.html</span></button>
</div>
<div class="vt-resize-h" id="vtSidebarHandle" title="Drag to resize sidebar"></div>
<div class="vt-main">
<div class="vt-tabbar">
<button class="vt-toggle-btn" id="vtToggleSidebar" type="button" aria-label="Toggle sidebar" title="Toggle sidebar">
<svg viewBox="0 0 16 16" fill="none" aria-hidden="true"><rect x="1.5" y="2" width="13" height="12" rx="1.5" stroke="currentColor" stroke-width="1.3"/><line x1="6" y1="2" x2="6" y2="14" stroke="currentColor" stroke-width="1.3"/></svg>
</button>
<button class="vt-tab is-active" data-file="index" type="button"><span class="vt-badge">JS</span><span>index.js</span></button>
<button class="vt-tab" data-file="replaceTemplate" type="button"><span class="vt-badge">JS</span><span>replaceTemplate.js</span></button>
<button class="vt-tab" data-file="packageJson" type="button"><span class="vt-badge" style="background:#dcb67a;">{}</span><span>package.json</span></button>
<button class="vt-tab" data-file="data" type="button"><span class="vt-badge" style="background:#dcb67a;">{}</span><span>data.json</span></button>
<button class="vt-tab" data-file="card" type="button"><span class="vt-badge" style="background:#e37933;">H</span><span>template-card.html</span></button>
<button class="vt-tab" data-file="overview" type="button"><span class="vt-badge" style="background:#e37933;">H</span><span>template-overview.html</span></button>
<button class="vt-tab" data-file="product" type="button"><span class="vt-badge" style="background:#e37933;">H</span><span>template-product.html</span></button>
</div>
<div class="vt-code-wrap">
<pre><code id="vtCode"></code></pre>
</div>
<div class="vt-resize-v" id="vtTerminalHandle" title="Drag to resize terminal"></div>
<div class="vt-terminal">
<div class="vt-term-head">
<button class="vt-toggle-btn vt-term-toggle" id="vtToggleTerminal" type="button" aria-label="Toggle terminal" title="Toggle terminal">
<svg viewBox="0 0 16 16" fill="none" aria-hidden="true"><path d="M4 6l4 4 4-4" stroke="currentColor" stroke-width="1.6" stroke-linecap="round" stroke-linejoin="round"/></svg>
</button>
<span>Terminal</span>
</div>
<div class="vt-term-body">
<div id="vtTermLines"><div class="vt-term-line" style="animation-delay:0s;"><span class="vt-term-prompt">$</span> </div></div>
<div class="vt-run-row">
<button class="vt-run-btn" id="vtRunBtn" type="button">
<svg viewBox="0 0 12 12" aria-hidden="true"><path d="M2.5 1.5v9l7-4.5z" fill="currentColor"/></svg>
<span id="vtRunLabel">node index.js</span>
</button>
<span class="vt-run-hint" id="vtRunHint">starts the server</span>
</div>
</div>
</div>
</div>
</div>
<div class="vt-window-resize" id="vtWindowHandle" title="Drag to resize window"><span></span></div>
</div>
<div class="vt-output-label">Output</div>
<div id="vtOutputArea">
<p class="vt-output-placeholder">Run <code style="font-family:var(--mono-font)">node index.js</code> above, then visit the server to see it here.</p>
<div class="vt-browser" id="vtBrowser">
<div class="vt-browser-bar">
<div class="vt-dots"><span></span><span></span><span></span></div>
<div class="vt-browser-url" id="vtUrl">127.0.0.1:8000</div>
</div>
<div class="vt-browser-page">
<div class="vt-route-row" id="vtRouteRow">
<button class="vt-route-btn is-on" data-path="/" type="button">/</button>
<button class="vt-route-btn" data-path="/product/fresh-avocados" type="button">/product/fresh-avocados</button>
<button class="vt-route-btn" data-path="/product/carrot" type="button">/product/carrot</button>
<button class="vt-route-btn" data-path="/api" type="button">/api</button>
</div>
<div id="vtRouteResult">
<p class="vt-route-body">This is the OVERVIEW</p>
</div>
</div>
</div>
</div>
</div>
<link rel="preconnect" href="https://fonts.googleapis.com">
<link href="https://fonts.googleapis.com/css2?family=Fraunces:wght@500;600&family=Inter:wght@400;500;600;700&family=IBM+Plex+Mono:wght@400;500&display=swap" rel="stylesheet">
<script>
(function () {
var root = document.getElementById('vt');
if (!root) return;
/* --- dark mode detection: body attribute > cookie > postMessage > light --- */
function applyDark(dark) {
if (dark) root.setAttribute('data-theme', 'dark');
else root.removeAttribute('data-theme');
}
var bodyAttr = document.body.getAttribute('data-darkmode');
var dark;
if (bodyAttr === 'true') dark = true;
else if (bodyAttr === 'false') dark = false;
else {
var match = document.cookie.match(/(?:^|;\s*)darkMode=([^;]+)/);
dark = match ? match[1] === 'true' : false;
}
applyDark(dark);
window.addEventListener('message', function (e) {
if (e.data && e.data.type === 'darkMode') applyDark(!!e.data.value);
});
/* --- file switching (single file here, kept for template consistency) --- */
var files = {
index:
'<span class="tok-kw">const</span> fs <span class="tok-punc">=</span> require<span class="tok-punc">(</span><span class="tok-str">\'fs\'</span><span class="tok-punc">);</span>\n' +
'<span class="tok-kw">const</span> http <span class="tok-punc">=</span> require<span class="tok-punc">(</span><span class="tok-str">\'http\'</span><span class="tok-punc">);</span>\n' +
'<span class="tok-kw">const</span> url <span class="tok-punc">=</span> require<span class="tok-punc">(</span><span class="tok-str">\'url\'</span><span class="tok-punc">);</span>\n\n' +
'<span class="tok-kw">const</span> slugify <span class="tok-punc">=</span> require<span class="tok-punc">(</span><span class="tok-str">\'slugify\'</span><span class="tok-punc">);</span>\n\n' +
'<span class="tok-kw">const</span> replaceTemplate <span class="tok-punc">=</span> require<span class="tok-punc">(</span><span class="tok-str">\'./modules/replaceTemplate\'</span><span class="tok-punc">);</span>\n' +
'<span class="tok-punc">////////////////////////////</span>\n' +
'<span class="tok-punc">//FILES</span>\n\n' +
'<span class="tok-punc">//Blocking, Synchronous way</span>\n' +
'<span class="tok-punc">//const textIn = fs.readFileSync(\'./txt/input.txt\', \'utf-8\');</span>\n' +
'<span class="tok-punc">//console.log(textIn);</span>\n\n' +
'<span class="tok-punc">//const textOut = `This is what we know about the avocado: ${textIn}.\\nCreated on ${Date.now()}`;</span>\n' +
'<span class="tok-punc">//fs.writeFileSync(\'./txt/output.txt\', textOut);</span>\n\n' +
'<span class="tok-punc">//console.log(\'File written!\');</span>\n\n' +
'<span class="tok-punc">//Non-blocking, Asynchronous way</span>\n' +
'<span class="tok-punc">// fs.readFile(\'./txt/start.txt\', \'utf8\', (err, data1) => {</span>\n' +
'<span class="tok-punc">// fs.readFile(`./txt/${data1}.txt`, \'utf8\', (err, data2) => {</span>\n' +
'<span class="tok-punc">// console.log(data2);</span>\n\n' +
'<span class="tok-punc">// fs.readFile(\'./txt/append.txt\', \'utf8\', (err, data3) => {</span>\n' +
'<span class="tok-punc">// console.log(data2, data3);</span>\n\n' +
'<span class="tok-punc">// fs.writeFile(\'./txt/final.txt\', `${data2}\\n${data3}`, \'utf8\', (err) => {</span>\n' +
'<span class="tok-punc">// console.log(\'Your file has been written \uD83C\uDF89\');</span>\n' +
'<span class="tok-punc">// });</span>\n' +
'<span class="tok-punc">// });</span>\n' +
'<span class="tok-punc">// });</span>\n' +
'<span class="tok-punc">// });</span>\n' +
'<span class="tok-punc">/////////////////////////////</span>\n' +
'<span class="tok-punc">//SERVER</span>\n' +
'<span class="tok-kw">const</span> tempOverview <span class="tok-punc">=</span> fs<span class="tok-punc">.</span><span class="tok-type">readFileSync</span><span class="tok-punc">(`</span><span class="tok-expr">${__dirname}</span><span class="tok-punc">/templates/template-overview.html`,</span> <span class="tok-str">\'utf-8\'</span><span class="tok-punc">);</span>\n' +
'<span class="tok-kw">const</span> tempCard <span class="tok-punc">=</span> fs<span class="tok-punc">.</span><span class="tok-type">readFileSync</span><span class="tok-punc">(`</span><span class="tok-expr">${__dirname}</span><span class="tok-punc">/templates/template-card.html`,</span> <span class="tok-str">\'utf-8\'</span><span class="tok-punc">);</span>\n' +
'<span class="tok-kw">const</span> tempProduct <span class="tok-punc">=</span> fs<span class="tok-punc">.</span><span class="tok-type">readFileSync</span><span class="tok-punc">(`</span><span class="tok-expr">${__dirname}</span><span class="tok-punc">/templates/template-product.html`,</span> <span class="tok-str">\'utf-8\'</span><span class="tok-punc">);</span>\n\n' +
'<span class="tok-kw">const</span> data <span class="tok-punc">=</span> fs<span class="tok-punc">.</span><span class="tok-type">readFileSync</span><span class="tok-punc">(`</span><span class="tok-expr">${__dirname}</span><span class="tok-punc">/dev-data/data.json`,</span> <span class="tok-str">\'utf-8\'</span><span class="tok-punc">);</span>\n' +
'<span class="tok-kw">const</span> dataObj <span class="tok-punc">=</span> <span class="tok-type">JSON</span><span class="tok-punc">.</span><span class="tok-type">parse</span><span class="tok-punc">(</span>data<span class="tok-punc">);</span>\n\n' +
'<span class="tok-kw">const</span> slugs <span class="tok-punc">=</span> dataObj<span class="tok-punc">.</span><span class="tok-type">map</span><span class="tok-punc">(</span>el <span class="tok-punc">=></span> slugify<span class="tok-punc">(</span>el<span class="tok-punc">.</span>productName<span class="tok-punc">, {</span> <span class="tok-attr">lower</span><span class="tok-punc">:</span> <span class="tok-kw">true</span> <span class="tok-punc">}));</span>\n' +
'console<span class="tok-punc">.</span><span class="tok-type">log</span><span class="tok-punc">(</span>slugs<span class="tok-punc">);</span>\n\n' +
'<span class="tok-kw">const</span> server <span class="tok-punc">=</span> http<span class="tok-punc">.</span><span class="tok-type">createServer</span><span class="tok-punc">((</span>req<span class="tok-punc">,</span> res<span class="tok-punc">) => {</span>\n\n' +
' <span class="tok-kw">const</span> <span class="tok-punc">{</span> query<span class="tok-punc">,</span> pathname <span class="tok-punc">}</span> <span class="tok-punc">=</span> url<span class="tok-punc">.</span><span class="tok-type">parse</span><span class="tok-punc">(</span>req<span class="tok-punc">.</span>url<span class="tok-punc">,</span> <span class="tok-kw">true</span><span class="tok-punc">);</span>\n\n' +
'<span class="tok-punc">// Overview page</span>\n' +
'<span class="tok-kw">if</span> <span class="tok-punc">(</span>pathname <span class="tok-punc">===</span> <span class="tok-str">\'/\'</span> <span class="tok-punc">||</span> pathname <span class="tok-punc">===</span> <span class="tok-str">\'/overview\'</span><span class="tok-punc">) {</span>\n' +
' res<span class="tok-punc">.</span><span class="tok-type">writeHead</span><span class="tok-punc">(</span><span class="tok-expr">200</span><span class="tok-punc">, {</span> <span class="tok-attr">\'Content-Type\'</span><span class="tok-punc">:</span> <span class="tok-str">\'text/html\'</span> <span class="tok-punc">});</span>\n\n' +
'const cardsHtml <span class="tok-punc">=</span> dataObj<span class="tok-punc">.</span><span class="tok-type">map</span><span class="tok-punc">((</span>el<span class="tok-punc">,</span> i<span class="tok-punc">) =></span> replaceTemplate<span class="tok-punc">(</span>tempCard<span class="tok-punc">,</span> el<span class="tok-punc">,</span> slugs<span class="tok-punc">[</span>i<span class="tok-punc">])).</span><span class="tok-type">join</span><span class="tok-punc">(</span><span class="tok-str">\'\'</span><span class="tok-punc">);</span>\n' +
'const output <span class="tok-punc">=</span> tempOverview<span class="tok-punc">.</span><span class="tok-type">replace</span><span class="tok-punc">(</span><span class="tok-str">\'{%PRODUCT_CARDS%}\'</span><span class="tok-punc">,</span> cardsHtml<span class="tok-punc">);</span>\n' +
'res<span class="tok-punc">.</span><span class="tok-type">end</span><span class="tok-punc">(</span>output<span class="tok-punc">);</span>\n\n' +
' <span class="tok-punc">// Product page</span>\n' +
'<span class="tok-punc">}</span> <span class="tok-kw">else if</span> <span class="tok-punc">(</span>pathname<span class="tok-punc">.</span><span class="tok-type">startsWith</span><span class="tok-punc">(</span><span class="tok-str">\'/product/\'</span><span class="tok-punc">)) {</span>\n' +
' res<span class="tok-punc">.</span><span class="tok-type">writeHead</span><span class="tok-punc">(</span><span class="tok-expr">200</span><span class="tok-punc">, {</span> <span class="tok-attr">\'Content-type\'</span><span class="tok-punc">:</span> <span class="tok-str">\'text/html\'</span> <span class="tok-punc">});</span>\n\n' +
' <span class="tok-kw">const</span> slug <span class="tok-punc">=</span> pathname<span class="tok-punc">.</span><span class="tok-type">replace</span><span class="tok-punc">(</span><span class="tok-str">\'/product/\'</span><span class="tok-punc">,</span> <span class="tok-str">\'\'</span><span class="tok-punc">);</span>\n' +
' <span class="tok-kw">const</span> id <span class="tok-punc">=</span> slugs<span class="tok-punc">.</span><span class="tok-type">indexOf</span><span class="tok-punc">(</span>slug<span class="tok-punc">);</span>\n' +
' <span class="tok-kw">const</span> product <span class="tok-punc">=</span> dataObj<span class="tok-punc">[</span>id<span class="tok-punc">];</span>\n' +
' <span class="tok-kw">const</span> output <span class="tok-punc">=</span> replaceTemplate<span class="tok-punc">(</span>tempProduct<span class="tok-punc">,</span> product<span class="tok-punc">);</span>\n\n' +
' res<span class="tok-punc">.</span><span class="tok-type">end</span><span class="tok-punc">(</span>output<span class="tok-punc">);</span>\n\n' +
' <span class="tok-punc">// API</span>\n' +
' <span class="tok-punc">}</span> <span class="tok-kw">else if</span> <span class="tok-punc">(</span>pathname <span class="tok-punc">===</span> <span class="tok-str">\'/api\'</span><span class="tok-punc">) {</span>\n' +
' res<span class="tok-punc">.</span><span class="tok-type">writeHead</span><span class="tok-punc">(</span><span class="tok-expr">200</span><span class="tok-punc">, {</span> <span class="tok-attr">\'Content-Type\'</span><span class="tok-punc">:</span> <span class="tok-str">\'application/json\'</span> <span class="tok-punc">});</span>\n' +
' res<span class="tok-punc">.</span><span class="tok-type">end</span><span class="tok-punc">(</span>data<span class="tok-punc">);</span>\n\n' +
' <span class="tok-punc">// Not found</span>\n' +
' <span class="tok-punc">}</span> <span class="tok-kw">else</span> <span class="tok-punc">{</span>\n' +
' res<span class="tok-punc">.</span><span class="tok-type">writeHead</span><span class="tok-punc">(</span><span class="tok-expr">404</span><span class="tok-punc">, {</span> <span class="tok-attr">\'Content-Type\'</span><span class="tok-punc">:</span> <span class="tok-str">\'text/html\'</span> <span class="tok-punc">});</span>\n' +
' res<span class="tok-punc">.</span><span class="tok-type">end</span><span class="tok-punc">(</span><span class="tok-str">\'<h1>Page not found!</h1>\'</span><span class="tok-punc">);</span>\n' +
' <span class="tok-punc">}</span>\n' +
'<span class="tok-punc">});</span>\n\n' +
'server<span class="tok-punc">.</span><span class="tok-type">listen</span><span class="tok-punc">(</span><span class="tok-expr">8000</span><span class="tok-punc">,</span> <span class="tok-str">\'127.0.0.1\'</span><span class="tok-punc">, () => {</span>\n' +
' console<span class="tok-punc">.</span><span class="tok-type">log</span><span class="tok-punc">(</span><span class="tok-str">\'Listening to requests on port 8000\'</span><span class="tok-punc">);</span>\n' +
'<span class="tok-punc">});</span>'
,
replaceTemplate:
'<span class="tok-type">module</span><span class="tok-punc">.</span>exports <span class="tok-punc">=</span> <span class="tok-punc">(</span>temp<span class="tok-punc">,</span> product<span class="tok-punc">,</span> slug<span class="tok-punc">) => {</span>\n' +
' <span class="tok-kw">let</span> output <span class="tok-punc">=</span> temp<span class="tok-punc">.</span><span class="tok-type">replace</span><span class="tok-punc">(</span><span class="tok-str">/{%PRODUCTNAME%}/g</span><span class="tok-punc">,</span> product<span class="tok-punc">.</span>productName<span class="tok-punc">);</span>\n' +
' output <span class="tok-punc">=</span> output<span class="tok-punc">.</span><span class="tok-type">replace</span><span class="tok-punc">(</span><span class="tok-str">/{%IMAGE%}/g</span><span class="tok-punc">,</span> product<span class="tok-punc">.</span>image<span class="tok-punc">);</span>\n' +
' output <span class="tok-punc">=</span> output<span class="tok-punc">.</span><span class="tok-type">replace</span><span class="tok-punc">(</span><span class="tok-str">/{%PRICE%}/g</span><span class="tok-punc">,</span> product<span class="tok-punc">.</span>price<span class="tok-punc">);</span>\n' +
' output <span class="tok-punc">=</span> output<span class="tok-punc">.</span><span class="tok-type">replace</span><span class="tok-punc">(</span><span class="tok-str">/{%FROM%}/g</span><span class="tok-punc">,</span> product<span class="tok-punc">.</span>from<span class="tok-punc">);</span>\n' +
' output <span class="tok-punc">=</span> output<span class="tok-punc">.</span><span class="tok-type">replace</span><span class="tok-punc">(</span><span class="tok-str">/{%NUTRIENTS%}/g</span><span class="tok-punc">,</span> product<span class="tok-punc">.</span>nutrients<span class="tok-punc">);</span>\n' +
' output <span class="tok-punc">=</span> output<span class="tok-punc">.</span><span class="tok-type">replace</span><span class="tok-punc">(</span><span class="tok-str">/{%QUANTITY%}/g</span><span class="tok-punc">,</span> product<span class="tok-punc">.</span>quantity<span class="tok-punc">);</span>\n' +
' output <span class="tok-punc">=</span> output<span class="tok-punc">.</span><span class="tok-type">replace</span><span class="tok-punc">(</span><span class="tok-str">/{%DESCRIPTION%}/g</span><span class="tok-punc">,</span> product<span class="tok-punc">.</span>description<span class="tok-punc">);</span>\n' +
' output <span class="tok-punc">=</span> output<span class="tok-punc">.</span><span class="tok-type">replace</span><span class="tok-punc">(</span><span class="tok-str">/{%ID%}/g</span><span class="tok-punc">,</span> slug <span class="tok-punc">||</span> product<span class="tok-punc">.</span>id<span class="tok-punc">);</span>\n\n' +
' <span class="tok-kw">if</span> <span class="tok-punc">(!</span>product<span class="tok-punc">.</span>organic<span class="tok-punc">)</span>\n' +
' output <span class="tok-punc">=</span> output<span class="tok-punc">.</span><span class="tok-type">replace</span><span class="tok-punc">(</span><span class="tok-str">/{%NOT_ORGANIC%}/g</span><span class="tok-punc">,</span> <span class="tok-str">\'not-organic\'</span><span class="tok-punc">);</span>\n\n' +
' <span class="tok-kw">return</span> output<span class="tok-punc">;</span>\n' +
'<span class="tok-punc">};</span>'
,
packageJson:
'<span class="tok-punc">{</span>\n' +
' <span class="tok-punc">"</span><span class="tok-attr">name</span><span class="tok-punc">": </span><span class="tok-str">"node-farm"</span><span class="tok-punc">,</span>\n' +
' <span class="tok-punc">"</span><span class="tok-attr">version</span><span class="tok-punc">": </span><span class="tok-str">"1.0.0"</span><span class="tok-punc">,</span>\n' +
' <span class="tok-punc">"</span><span class="tok-attr">description</span><span class="tok-punc">": </span><span class="tok-str">"Learning node.js"</span><span class="tok-punc">,</span>\n' +
' <span class="tok-punc">"</span><span class="tok-attr">main</span><span class="tok-punc">": </span><span class="tok-str">"index.js"</span><span class="tok-punc">,</span>\n' +
' <span class="tok-punc">"</span><span class="tok-attr">scripts</span><span class="tok-punc">": {</span>\n' +
' <span class="tok-punc">"</span><span class="tok-attr">start</span><span class="tok-punc">": </span><span class="tok-str">"nodemon index.js"</span>\n' +
' <span class="tok-punc">},</span>\n' +
' <span class="tok-punc">"</span><span class="tok-attr">author</span><span class="tok-punc">": </span><span class="tok-str">"Jonas Schmedtmann"</span><span class="tok-punc">,</span>\n' +
' <span class="tok-punc">"</span><span class="tok-attr">license</span><span class="tok-punc">": </span><span class="tok-str">"ISC"</span><span class="tok-punc">,</span>\n' +
' <span class="tok-punc">"</span><span class="tok-attr">dependencies</span><span class="tok-punc">": {</span>\n' +
' <span class="tok-punc">"</span><span class="tok-attr">slugify</span><span class="tok-punc">": </span><span class="tok-str">"^1.3.4"</span>\n' +
' <span class="tok-punc">},</span>\n' +
' <span class="tok-punc">"</span><span class="tok-attr">devDependencies</span><span class="tok-punc">": {</span>\n' +
' <span class="tok-punc">"</span><span class="tok-attr">nodemon</span><span class="tok-punc">": </span><span class="tok-str">"^1.18.11"</span>\n' +
' <span class="tok-punc">}</span>\n' +
'<span class="tok-punc">}</span>\n'
,
data:
'<span class="tok-punc">[</span>\n' +
' <span class="tok-punc">{</span>\n' +
' <span class="tok-punc">"</span><span class="tok-attr">id</span><span class="tok-punc">": </span><span class="tok-expr">0</span><span class="tok-punc">,</span>\n' +
' <span class="tok-punc">"</span><span class="tok-attr">productName</span><span class="tok-punc">": </span><span class="tok-str">"Fresh Avocados"</span><span class="tok-punc">,</span>\n' +
' <span class="tok-punc">"</span><span class="tok-attr">image</span><span class="tok-punc">": </span><span class="tok-str">"🥑"</span><span class="tok-punc">,</span>\n' +
' <span class="tok-punc">"</span><span class="tok-attr">from</span><span class="tok-punc">": </span><span class="tok-str">"Spain"</span><span class="tok-punc">,</span>\n' +
' <span class="tok-punc">"</span><span class="tok-attr">nutrients</span><span class="tok-punc">": </span><span class="tok-str">"Vitamin B, Vitamin K"</span><span class="tok-punc">,</span>\n' +
' <span class="tok-punc">"</span><span class="tok-attr">quantity</span><span class="tok-punc">": </span><span class="tok-str">"4 🥑"</span><span class="tok-punc">,</span>\n' +
' <span class="tok-punc">"</span><span class="tok-attr">price</span><span class="tok-punc">": </span><span class="tok-str">"6.50"</span><span class="tok-punc">,</span>\n' +
' <span class="tok-punc">"</span><span class="tok-attr">organic</span><span class="tok-punc">": </span><span class="tok-kw">true</span><span class="tok-punc">,</span>\n' +
' <span class="tok-punc">"</span><span class="tok-attr">description</span><span class="tok-punc">": </span><span class="tok-str">"A ripe avocado yields to gentle pressure when held in the palm of the hand and squeezed. The fruit is not sweet, but distinctly and subtly flavored, with smooth texture. The avocado is popular in vegetarian cuisine as a substitute for meats in sandwiches and salads because of its high fat content. Generally, avocado is served raw, though some cultivars, including the common \'Hass\', can be cooked for a short time without becoming bitter. It is used as the base for the Mexican dip known as guacamole, as well as a spread on corn tortillas or toast, served with spices."</span><span class="tok-punc"></span>\n' +
' <span class="tok-punc">}</span><span class="tok-punc">,</span>\n' +
' <span class="tok-punc">{</span>\n' +
' <span class="tok-punc">"</span><span class="tok-attr">id</span><span class="tok-punc">": </span><span class="tok-expr">1</span><span class="tok-punc">,</span>\n' +
' <span class="tok-punc">"</span><span class="tok-attr">productName</span><span class="tok-punc">": </span><span class="tok-str">"Goat and Sheep Cheese"</span><span class="tok-punc">,</span>\n' +
' <span class="tok-punc">"</span><span class="tok-attr">image</span><span class="tok-punc">": </span><span class="tok-str">"🧀"</span><span class="tok-punc">,</span>\n' +
' <span class="tok-punc">"</span><span class="tok-attr">from</span><span class="tok-punc">": </span><span class="tok-str">"Portugal"</span><span class="tok-punc">,</span>\n' +
' <span class="tok-punc">"</span><span class="tok-attr">nutrients</span><span class="tok-punc">": </span><span class="tok-str">"Vitamin A, Calcium"</span><span class="tok-punc">,</span>\n' +
' <span class="tok-punc">"</span><span class="tok-attr">quantity</span><span class="tok-punc">": </span><span class="tok-str">"250g"</span><span class="tok-punc">,</span>\n' +
' <span class="tok-punc">"</span><span class="tok-attr">price</span><span class="tok-punc">": </span><span class="tok-str">"5.00"</span><span class="tok-punc">,</span>\n' +
' <span class="tok-punc">"</span><span class="tok-attr">organic</span><span class="tok-punc">": </span><span class="tok-kw">false</span><span class="tok-punc">,</span>\n' +
' <span class="tok-punc">"</span><span class="tok-attr">description</span><span class="tok-punc">": </span><span class="tok-str">"Creamy and distinct in flavor, goat cheese is a dairy product enjoyed around the world. Goat cheese comes in a wide variety of flavors and textures, from soft and spreadable fresh cheese to salty, crumbly aged cheese. Although it\'s made using the same coagulation and separation process as cheese made from cow\'s milk, goat cheese differs in nutrient content."</span><span class="tok-punc"></span>\n' +
' <span class="tok-punc">}</span><span class="tok-punc">,</span>\n' +
' <span class="tok-punc">{</span>\n' +
' <span class="tok-punc">"</span><span class="tok-attr">id</span><span class="tok-punc">": </span><span class="tok-expr">2</span><span class="tok-punc">,</span>\n' +
' <span class="tok-punc">"</span><span class="tok-attr">productName</span><span class="tok-punc">": </span><span class="tok-str">"Apollo Broccoli"</span><span class="tok-punc">,</span>\n' +
' <span class="tok-punc">"</span><span class="tok-attr">image</span><span class="tok-punc">": </span><span class="tok-str">"🥦"</span><span class="tok-punc">,</span>\n' +
' <span class="tok-punc">"</span><span class="tok-attr">from</span><span class="tok-punc">": </span><span class="tok-str">"Portugal"</span><span class="tok-punc">,</span>\n' +
' <span class="tok-punc">"</span><span class="tok-attr">nutrients</span><span class="tok-punc">": </span><span class="tok-str">"Vitamin C, Vitamin K"</span><span class="tok-punc">,</span>\n' +
' <span class="tok-punc">"</span><span class="tok-attr">quantity</span><span class="tok-punc">": </span><span class="tok-str">"3 🥦"</span><span class="tok-punc">,</span>\n' +
' <span class="tok-punc">"</span><span class="tok-attr">price</span><span class="tok-punc">": </span><span class="tok-str">"5.50"</span><span class="tok-punc">,</span>\n' +
' <span class="tok-punc">"</span><span class="tok-attr">organic</span><span class="tok-punc">": </span><span class="tok-kw">true</span><span class="tok-punc">,</span>\n' +
' <span class="tok-punc">"</span><span class="tok-attr">description</span><span class="tok-punc">": </span><span class="tok-str">"Broccoli is known to be a hearty and tasty vegetable which is rich in dozens of nutrients. It is said to pack the most nutritional punch of any vegetable. When we think about green vegetables to include in our diet, broccoli is one of the foremost veggies to come to our mind. Broccoli is a cruciferous vegetable and part of the cabbage family, which includes vegetables such as Brussel sprouts and kale. Although the tastes are different, broccoli and these other vegetables are from the same family."</span><span class="tok-punc"></span>\n' +
' <span class="tok-punc">}</span><span class="tok-punc">,</span>\n' +
' <span class="tok-punc">{</span>\n' +
' <span class="tok-punc">"</span><span class="tok-attr">id</span><span class="tok-punc">": </span><span class="tok-expr">3</span><span class="tok-punc">,</span>\n' +
' <span class="tok-punc">"</span><span class="tok-attr">productName</span><span class="tok-punc">": </span><span class="tok-str">"Baby Carrots"</span><span class="tok-punc">,</span>\n' +
' <span class="tok-punc">"</span><span class="tok-attr">image</span><span class="tok-punc">": </span><span class="tok-str">"🥕"</span><span class="tok-punc">,</span>\n' +
' <span class="tok-punc">"</span><span class="tok-attr">from</span><span class="tok-punc">": </span><span class="tok-str">"France"</span><span class="tok-punc">,</span>\n' +
' <span class="tok-punc">"</span><span class="tok-attr">nutrients</span><span class="tok-punc">": </span><span class="tok-str">"Vitamin A, Vitamin K"</span><span class="tok-punc">,</span>\n' +
' <span class="tok-punc">"</span><span class="tok-attr">quantity</span><span class="tok-punc">": </span><span class="tok-str">"20 🥕"</span><span class="tok-punc">,</span>\n' +
' <span class="tok-punc">"</span><span class="tok-attr">price</span><span class="tok-punc">": </span><span class="tok-str">"3.00"</span><span class="tok-punc">,</span>\n' +
' <span class="tok-punc">"</span><span class="tok-attr">organic</span><span class="tok-punc">": </span><span class="tok-kw">true</span><span class="tok-punc">,</span>\n' +
' <span class="tok-punc">"</span><span class="tok-attr">description</span><span class="tok-punc">": </span><span class="tok-str">"The carrot is a root vegetable that is often claimed to be the perfect health food. It is crunchy, tasty and highly nutritious. Carrots are a particularly good source of beta-carotene, fiber, vitamin K, potassium and antioxidants. Carrots have a number of health benefits. They are a weight loss friendly food and have been linked to lower cholesterol levels and improved eye health."</span><span class="tok-punc"></span>\n' +
' <span class="tok-punc">}</span><span class="tok-punc">,</span>\n' +
' <span class="tok-punc">{</span>\n' +
' <span class="tok-punc">"</span><span class="tok-attr">id</span><span class="tok-punc">": </span><span class="tok-expr">4</span><span class="tok-punc">,</span>\n' +
' <span class="tok-punc">"</span><span class="tok-attr">productName</span><span class="tok-punc">": </span><span class="tok-str">"Sweet Corncobs"</span><span class="tok-punc">,</span>\n' +
' <span class="tok-punc">"</span><span class="tok-attr">image</span><span class="tok-punc">": </span><span class="tok-str">"🌽"</span><span class="tok-punc">,</span>\n' +
' <span class="tok-punc">"</span><span class="tok-attr">from</span><span class="tok-punc">": </span><span class="tok-str">"Germany"</span><span class="tok-punc">,</span>\n' +
' <span class="tok-punc">"</span><span class="tok-attr">nutrients</span><span class="tok-punc">": </span><span class="tok-str">"Vitamin C, Magnesium"</span><span class="tok-punc">,</span>\n' +
' <span class="tok-punc">"</span><span class="tok-attr">quantity</span><span class="tok-punc">": </span><span class="tok-str">"2 🌽"</span><span class="tok-punc">,</span>\n' +
' <span class="tok-punc">"</span><span class="tok-attr">price</span><span class="tok-punc">": </span><span class="tok-str">"2.00"</span><span class="tok-punc">,</span>\n' +
' <span class="tok-punc">"</span><span class="tok-attr">organic</span><span class="tok-punc">": </span><span class="tok-kw">false</span><span class="tok-punc">,</span>\n' +
' <span class="tok-punc">"</span><span class="tok-attr">description</span><span class="tok-punc">": </span><span class="tok-str">"Also known as maize, corn is one of the most popular cereal grains in the world. Popcorn and sweet corn are commonly eaten varieties, but refined corn products are also widely consumed, frequently as ingredients in foods. These include tortillas, tortilla chips, polenta, cornmeal, corn flour, corn syrup, and corn oil. Whole-grain corn is as healthy as any cereal grain, rich in fiber and many vitamins, minerals, and antioxidants."</span><span class="tok-punc"></span>\n' +
' <span class="tok-punc">}</span>\n' +
'<span class="tok-punc">]</span>\n'
,
card:
' <span class="tok-punc"><</span><span class="tok-tag">figure</span> <span class="tok-attr">class</span><span class="tok-punc">=</span><span class="tok-str">"card"</span><span class="tok-punc">></span>\n' +
' <span class="tok-punc"><</span><span class="tok-tag">div</span> <span class="tok-attr">class</span><span class="tok-punc">=</span><span class="tok-str">"card__emoji"</span><span class="tok-punc">></span><span class="tok-expr">{%IMAGE%}</span><span class="tok-expr">{%IMAGE%}</span><span class="tok-punc"></</span><span class="tok-tag">div</span><span class="tok-punc">></span>\n' +
' <span class="tok-punc"><</span><span class="tok-tag">div</span> <span class="tok-attr">class</span><span class="tok-punc">=</span><span class="tok-str">"card__title-box"</span><span class="tok-punc">></span>\n' +
' <span class="tok-punc"><</span><span class="tok-tag">h2</span> <span class="tok-attr">class</span><span class="tok-punc">=</span><span class="tok-str">"card__title"</span><span class="tok-punc">></span><span class="tok-expr">{%PRODUCTNAME%}</span><span class="tok-punc"></</span><span class="tok-tag">h2</span><span class="tok-punc">></span>\n' +
' <span class="tok-punc"></</span><span class="tok-tag">div</span><span class="tok-punc">></span>\n' +
'\n' +
' <span class="tok-punc"><</span><span class="tok-tag">div</span> <span class="tok-attr">class</span><span class="tok-punc">=</span><span class="tok-str">"card__details"</span><span class="tok-punc">></span>\n' +
' <span class="tok-punc"><</span><span class="tok-tag">div</span> <span class="tok-attr">class</span><span class="tok-punc">=</span><span class="tok-str">"card__detail-box {%NOT_ORGANIC%}"</span><span class="tok-punc">></span>\n' +
' <span class="tok-punc"><</span><span class="tok-tag">h6</span> <span class="tok-attr">class</span><span class="tok-punc">=</span><span class="tok-str">"card__detail card__detail--organic"</span><span class="tok-punc">></span>Organic!<span class="tok-punc"></</span><span class="tok-tag">h6</span><span class="tok-punc">></span>\n' +
' <span class="tok-punc"></</span><span class="tok-tag">div</span><span class="tok-punc">></span>\n' +
'\n' +
' <span class="tok-punc"><</span><span class="tok-tag">div</span> <span class="tok-attr">class</span><span class="tok-punc">=</span><span class="tok-str">"card__detail-box"</span><span class="tok-punc">></span>\n' +
' <span class="tok-punc"><</span><span class="tok-tag">h6</span> <span class="tok-attr">class</span><span class="tok-punc">=</span><span class="tok-str">"card__detail"</span><span class="tok-punc">></span><span class="tok-expr">{%QUANTITY%}</span> per 📦<span class="tok-punc"></</span><span class="tok-tag">h6</span><span class="tok-punc">></span>\n' +
' <span class="tok-punc"></</span><span class="tok-tag">div</span><span class="tok-punc">></span>\n' +
' \n' +
' <span class="tok-punc"><</span><span class="tok-tag">div</span> <span class="tok-attr">class</span><span class="tok-punc">=</span><span class="tok-str">"card__detail-box"</span><span class="tok-punc">></span>\n' +
' <span class="tok-punc"><</span><span class="tok-tag">h6</span> <span class="tok-attr">class</span><span class="tok-punc">=</span><span class="tok-str">"card__detail card__detail--price"</span><span class="tok-punc">></span><span class="tok-expr">{%PRICE%}</span>€<span class="tok-punc"></</span><span class="tok-tag">h6</span><span class="tok-punc">></span>\n' +
' <span class="tok-punc"></</span><span class="tok-tag">div</span><span class="tok-punc">></span>\n' +
' <span class="tok-punc"></</span><span class="tok-tag">div</span><span class="tok-punc">></span>\n' +
'\n' +
' <span class="tok-punc"><</span><span class="tok-tag">a</span> <span class="tok-attr">class</span><span class="tok-punc">=</span><span class="tok-str">"card__link"</span> <span class="tok-attr">href</span><span class="tok-punc">=</span><span class="tok-str">"/product/{%ID%}"</span><span class="tok-punc">></span>\n' +
' <span class="tok-punc"><</span><span class="tok-tag">span</span><span class="tok-punc">></span>Detail <span class="tok-punc"><</span><span class="tok-tag">i</span> <span class="tok-attr">class</span><span class="tok-punc">=</span><span class="tok-str">"emoji-right"</span><span class="tok-punc">></span>👉<span class="tok-punc"></</span><span class="tok-tag">i</span><span class="tok-punc">></span><span class="tok-punc"></</span><span class="tok-tag">span</span><span class="tok-punc">></span>\n' +
' <span class="tok-punc"></</span><span class="tok-tag">a</span><span class="tok-punc">></span>\n' +
' <span class="tok-punc"></</span><span class="tok-tag">figure</span><span class="tok-punc">></span> \n' +
'\n',
overview:
'<span class="tok-punc"><!DOCTYPE html></span>\n' +
'<span class="tok-punc"><</span><span class="tok-tag">html</span> <span class="tok-attr">lang</span><span class="tok-punc">=</span><span class="tok-str">"en"</span><span class="tok-punc">></span>\n' +
' <span class="tok-punc"><</span><span class="tok-tag">head</span><span class="tok-punc">></span>\n' +
' <span class="tok-punc"><</span><span class="tok-tag">meta</span> <span class="tok-attr">charset</span><span class="tok-punc">=</span><span class="tok-str">"UTF-8"</span> <span class="tok-punc">/></span>\n' +
' <span class="tok-punc"><</span><span class="tok-tag">meta</span> <span class="tok-attr">name</span><span class="tok-punc">=</span><span class="tok-str">"viewport"</span> <span class="tok-attr">content</span><span class="tok-punc">=</span><span class="tok-str">"width=device-width, initial-scale=1.0"</span> <span class="tok-punc">/></span>\n' +
' <span class="tok-punc"><</span><span class="tok-tag">meta</span> <span class="tok-attr">http-equiv</span><span class="tok-punc">=</span><span class="tok-str">"X-UA-Compatible"</span> <span class="tok-attr">content</span><span class="tok-punc">=</span><span class="tok-str">"ie=edge"</span> <span class="tok-punc">/></span>\n' +
' <span class="tok-punc"><</span><span class="tok-tag">link</span>\n' +
' <span class="tok-attr">href</span><span class="tok-punc">=</span><span class="tok-str">"https://fonts.googleapis.com/css?family=Megrim|Nunito+Sans:400,900"</span>\n' +
' <span class="tok-attr">rel</span><span class="tok-punc">=</span><span class="tok-str">"stylesheet"</span>\n' +
' <span class="tok-punc">/></span>\n' +
' <span class="tok-punc"><</span><span class="tok-tag">link</span>\n' +
' <span class="tok-attr">rel</span><span class="tok-punc">=</span><span class="tok-str">"icon"</span>\n' +
' <span class="tok-attr">href</span><span class="tok-punc">=</span><span class="tok-str">"https://emojipedia-us.s3.dualstack.us-west-1.amazonaws.com/thumbs/240/apple/155/ear-of-maize_1f33d.png"</span>\n' +
' <span class="tok-punc">/></span>\n' +
'\n' +
' <span class="tok-punc"><</span><span class="tok-tag">title</span><span class="tok-punc">></span>NODE FARM<span class="tok-punc"></</span><span class="tok-tag">title</span><span class="tok-punc">></span>\n' +
'\n' +
' <span class="tok-punc"><style></span>\n' +
' <span class="tok-tag">*,</span>\n' +
' <span class="tok-tag">*::before,</span>\n' +
' <span class="tok-tag">*::after</span> <span class="tok-punc">{</span>\n' +
' <span class="tok-attr">margin</span><span class="tok-punc">:</span> <span class="tok-str">0</span><span class="tok-punc">;</span>\n' +
' <span class="tok-attr">padding</span><span class="tok-punc">:</span> <span class="tok-str">0</span><span class="tok-punc">;</span>\n' +
' <span class="tok-attr">box-sizing</span><span class="tok-punc">:</span> <span class="tok-str">inherit</span><span class="tok-punc">;</span>\n' +
' <span class="tok-punc">}</span>\n' +
'\n' +
' <span class="tok-tag">html</span> <span class="tok-punc">{</span>\n' +
' <span class="tok-attr">font-size</span><span class="tok-punc">:</span> <span class="tok-str">62.5%</span><span class="tok-punc">;</span>\n' +
' <span class="tok-attr">box-sizing</span><span class="tok-punc">:</span> <span class="tok-str">border-box</span><span class="tok-punc">;</span>\n' +
' <span class="tok-punc">}</span>\n' +
'\n' +
' <span class="tok-tag">body</span> <span class="tok-punc">{</span>\n' +
' <span class="tok-attr">padding</span><span class="tok-punc">:</span> <span class="tok-str">5rem 5rem 10rem</span><span class="tok-punc">;</span>\n' +
' <span class="tok-attr">line-height</span><span class="tok-punc">:</span> <span class="tok-str">1.7</span><span class="tok-punc">;</span>\n' +
' <span class="tok-attr">font-family</span><span class="tok-punc">:</span> <span class="tok-str">\'Nunito Sans\', sans-serif</span><span class="tok-punc">;</span>\n' +
' <span class="tok-attr">color</span><span class="tok-punc">:</span> <span class="tok-str">#555</span><span class="tok-punc">;</span>\n' +
' <span class="tok-attr">min-height</span><span class="tok-punc">:</span> <span class="tok-str">100vh</span><span class="tok-punc">;</span>\n' +
' <span class="tok-attr">background</span><span class="tok-punc">:</span> <span class="tok-str">linear-gradient(to bottom right, #9be15d, #00e3ae)</span><span class="tok-punc">;</span>\n' +
' <span class="tok-punc">}</span>\n' +
'\n' +
' <span class="tok-tag">h1</span> <span class="tok-punc">{</span>\n' +
' <span class="tok-attr">font-family</span><span class="tok-punc">:</span> <span class="tok-str">\'Megrim\', sans-serif</span><span class="tok-punc">;</span>\n' +
' <span class="tok-attr">font-size</span><span class="tok-punc">:</span> <span class="tok-str">6rem</span><span class="tok-punc">;</span>\n' +
' <span class="tok-attr">color</span><span class="tok-punc">:</span> <span class="tok-str">white</span><span class="tok-punc">;</span>\n' +
' <span class="tok-attr">transform</span><span class="tok-punc">:</span> <span class="tok-str">skewY(-5deg)</span><span class="tok-punc">;</span>\n' +
' <span class="tok-attr">text-align</span><span class="tok-punc">:</span> <span class="tok-str">center</span><span class="tok-punc">;</span>\n' +
' <span class="tok-attr">position</span><span class="tok-punc">:</span> <span class="tok-str">relative</span><span class="tok-punc">;</span>\n' +
' <span class="tok-attr">word-spacing</span><span class="tok-punc">:</span> <span class="tok-str">3px</span><span class="tok-punc">;</span>\n' +
' <span class="tok-punc">}</span>\n' +
'\n' +
' <span class="tok-tag">h1::before</span> <span class="tok-punc">{</span>\n' +
' <span class="tok-attr">content</span><span class="tok-punc">:</span> <span class="tok-str">\'\'</span><span class="tok-punc">;</span>\n' +
' <span class="tok-attr">display</span><span class="tok-punc">:</span> <span class="tok-str">block</span><span class="tok-punc">;</span>\n' +
' <span class="tok-attr">height</span><span class="tok-punc">:</span> <span class="tok-str">65%</span><span class="tok-punc">;</span>\n' +
' <span class="tok-attr">width</span><span class="tok-punc">:</span> <span class="tok-str">49%</span><span class="tok-punc">;</span>\n' +
' <span class="tok-attr">position</span><span class="tok-punc">:</span> <span class="tok-str">absolute</span><span class="tok-punc">;</span>\n' +
' <span class="tok-attr">top</span><span class="tok-punc">:</span> <span class="tok-str">105%</span><span class="tok-punc">;</span>\n' +
' <span class="tok-attr">left</span><span class="tok-punc">:</span> <span class="tok-str">50%</span><span class="tok-punc">;</span>\n' +
' <span class="tok-attr">background</span><span class="tok-punc">:</span> <span class="tok-str">linear-gradient(to bottom, #9be15d, #00e3ae)</span><span class="tok-punc">;</span>\n' +
' <span class="tok-attr">opacity</span><span class="tok-punc">:</span> <span class="tok-str">0.8</span><span class="tok-punc">;</span>\n' +
' <span class="tok-attr">z-index</span><span class="tok-punc">:</span> <span class="tok-str">-1</span><span class="tok-punc">;</span>\n' +
' <span class="tok-attr">transform</span><span class="tok-punc">:</span> <span class="tok-str">skewY(370deg) translate(-50%, -50%)</span><span class="tok-punc">;</span>\n' +
' <span class="tok-punc">}</span>\n' +
'\n' +
' <span class="tok-tag">.container</span> <span class="tok-punc">{</span>\n' +
' <span class="tok-attr">width</span><span class="tok-punc">:</span> <span class="tok-str">95rem</span><span class="tok-punc">;</span>\n' +
' <span class="tok-attr">margin</span><span class="tok-punc">:</span> <span class="tok-str">0 auto</span><span class="tok-punc">;</span>\n' +
' <span class="tok-punc">}</span>\n' +
'\n' +
' <span class="tok-tag">.cards-container</span> <span class="tok-punc">{</span>\n' +
' <span class="tok-attr">margin-top</span><span class="tok-punc">:</span> <span class="tok-str">8rem</span><span class="tok-punc">;</span>\n' +
' <span class="tok-punc">}</span>\n' +
'\n' +
' <span class="tok-tag">.card</span> <span class="tok-punc">{</span>\n' +
' <span class="tok-attr">background</span><span class="tok-punc">:</span> <span class="tok-str">white</span><span class="tok-punc">;</span>\n' +
' <span class="tok-attr">box-shadow</span><span class="tok-punc">:</span> <span class="tok-str">0 2rem 6rem 1rem rgba(0, 0, 0, 0.15)</span><span class="tok-punc">;</span>\n' +
' <span class="tok-attr">margin-bottom</span><span class="tok-punc">:</span> <span class="tok-str">5rem</span><span class="tok-punc">;</span>\n' +
' <span class="tok-attr">transform</span><span class="tok-punc">:</span> <span class="tok-str">skewX(-20deg)</span><span class="tok-punc">;</span>\n' +
' <span class="tok-attr">display</span><span class="tok-punc">:</span> <span class="tok-str">flex</span><span class="tok-punc">;</span>\n' +
' <span class="tok-attr">transition</span><span class="tok-punc">:</span> <span class="tok-str">all 0.5s</span><span class="tok-punc">;</span>\n' +
' <span class="tok-punc">}</span>\n' +
'\n' +
' <span class="tok-tag">.card__emoji</span> <span class="tok-punc">{</span>\n' +
' <span class="tok-attr">font-size</span><span class="tok-punc">:</span> <span class="tok-str">5.5rem</span><span class="tok-punc">;</span>\n' +
' <span class="tok-attr">line-height</span><span class="tok-punc">:</span> <span class="tok-str">1.2</span><span class="tok-punc">;</span>\n' +
' <span class="tok-attr">padding</span><span class="tok-punc">:</span> <span class="tok-str">1.5rem 6rem 0.5rem 1.5rem</span><span class="tok-punc">;</span>\n' +
' <span class="tok-attr">letter-spacing</span><span class="tok-punc">:</span> <span class="tok-str">-4rem</span><span class="tok-punc">;</span>\n' +
' <span class="tok-attr">transform</span><span class="tok-punc">:</span> <span class="tok-str">skewX(20deg)</span><span class="tok-punc">;</span>\n' +
' <span class="tok-punc">}</span>\n' +
'\n' +
' <span class="tok-tag">.card__title-box</span> <span class="tok-punc">{</span>\n' +
' <span class="tok-attr">background</span><span class="tok-punc">:</span> <span class="tok-str">linear-gradient(to bottom, #9be15d, #00e3ae)</span><span class="tok-punc">;</span>\n' +
' <span class="tok-attr">margin-right</span><span class="tok-punc">:</span> <span class="tok-str">auto</span><span class="tok-punc">;</span>\n' +
' <span class="tok-attr">display</span><span class="tok-punc">:</span> <span class="tok-str">flex</span><span class="tok-punc">;</span>\n' +
' <span class="tok-attr">align-items</span><span class="tok-punc">:</span> <span class="tok-str">center</span><span class="tok-punc">;</span>\n' +
' <span class="tok-attr">padding</span><span class="tok-punc">:</span> <span class="tok-str">0 3rem</span><span class="tok-punc">;</span>\n' +
' <span class="tok-punc">}</span>\n' +
'\n' +
' <span class="tok-tag">.card__title</span> <span class="tok-punc">{</span>\n' +
' <span class="tok-attr">font-family</span><span class="tok-punc">:</span> <span class="tok-str">\'Megrim\', sans-serif</span><span class="tok-punc">;</span>\n' +
' <span class="tok-attr">color</span><span class="tok-punc">:</span> <span class="tok-str">white</span><span class="tok-punc">;</span>\n' +
' <span class="tok-attr">font-size</span><span class="tok-punc">:</span> <span class="tok-str">3.25rem</span><span class="tok-punc">;</span>\n' +
' <span class="tok-attr">transform</span><span class="tok-punc">:</span> <span class="tok-str">skewX(20deg)</span><span class="tok-punc">;</span>\n' +
' <span class="tok-punc">}</span>\n' +
'\n' +
' <span class="tok-tag">.card__details</span> <span class="tok-punc">{</span>\n' +
' <span class="tok-attr">display</span><span class="tok-punc">:</span> <span class="tok-str">flex</span><span class="tok-punc">;</span>\n' +
' <span class="tok-punc">}</span>\n' +
'\n' +
' <span class="tok-tag">.card__detail-box</span> <span class="tok-punc">{</span>\n' +
' <span class="tok-attr">align-self</span><span class="tok-punc">:</span> <span class="tok-str">stretch</span><span class="tok-punc">;</span>\n' +
' <span class="tok-attr">border-right</span><span class="tok-punc">:</span> <span class="tok-str">1px solid #ddd</span><span class="tok-punc">;</span>\n' +
' <span class="tok-attr">display</span><span class="tok-punc">:</span> <span class="tok-str">flex</span><span class="tok-punc">;</span>\n' +
' <span class="tok-attr">align-items</span><span class="tok-punc">:</span> <span class="tok-str">center</span><span class="tok-punc">;</span>\n' +
' <span class="tok-punc">}</span>\n' +
'\n' +
' <span class="tok-tag">.card__detail-box:last-child</span> <span class="tok-punc">{</span>\n' +
' <span class="tok-attr">border</span><span class="tok-punc">:</span> <span class="tok-str">none</span><span class="tok-punc">;</span>\n' +
' <span class="tok-punc">}</span>\n' +
'\n' +
' <span class="tok-tag">.card__detail</span> <span class="tok-punc">{</span>\n' +
' <span class="tok-attr">font-weight</span><span class="tok-punc">:</span> <span class="tok-str">400</span><span class="tok-punc">;</span>\n' +
' <span class="tok-attr">font-size</span><span class="tok-punc">:</span> <span class="tok-str">1.8rem</span><span class="tok-punc">;</span>\n' +
' <span class="tok-attr">transform</span><span class="tok-punc">:</span> <span class="tok-str">skewX(20deg)</span><span class="tok-punc">;</span>\n' +
' <span class="tok-attr">padding</span><span class="tok-punc">:</span> <span class="tok-str">1.75rem</span><span class="tok-punc">;</span>\n' +
' <span class="tok-punc">}</span>\n' +
'\n' +
' <span class="tok-tag">.card__detail--organic</span> <span class="tok-punc">{</span>\n' +
' <span class="tok-attr">font-weight</span><span class="tok-punc">:</span> <span class="tok-str">900</span><span class="tok-punc">;</span>\n' +
' <span class="tok-attr">text-transform</span><span class="tok-punc">:</span> <span class="tok-str">uppercase</span><span class="tok-punc">;</span>\n' +
' <span class="tok-attr">font-size</span><span class="tok-punc">:</span> <span class="tok-str">1.9rem</span><span class="tok-punc">;</span>\n' +
' <span class="tok-attr">background-image</span><span class="tok-punc">:</span> <span class="tok-str">linear-gradient(to right, #9be15d, #00e3ae)</span><span class="tok-punc">;</span>\n' +
' <span class="tok-attr">-webkit-background-clip</span><span class="tok-punc">:</span> <span class="tok-str">text</span><span class="tok-punc">;</span>\n' +
' <span class="tok-attr">background-clip</span><span class="tok-punc">:</span> <span class="tok-str">text</span><span class="tok-punc">;</span>\n' +
' <span class="tok-attr">color</span><span class="tok-punc">:</span> <span class="tok-str">transparent</span><span class="tok-punc">;</span>\n' +
' <span class="tok-punc">}</span>\n' +
'\n' +
' <span class="tok-tag">.card__detail--price</span> <span class="tok-punc">{</span>\n' +
' <span class="tok-attr">font-weight</span><span class="tok-punc">:</span> <span class="tok-str">900</span><span class="tok-punc">;</span>\n' +
' <span class="tok-attr">font-size</span><span class="tok-punc">:</span> <span class="tok-str">1.9rem</span><span class="tok-punc">;</span>\n' +
' <span class="tok-punc">}</span>\n' +
'\n' +
' <span class="tok-tag">.card__link:link,</span>\n' +
' <span class="tok-tag">.card__link:visited</span> <span class="tok-punc">{</span>\n' +
' <span class="tok-attr">flex</span><span class="tok-punc">:</span> <span class="tok-str">0 0 auto</span><span class="tok-punc">;</span>\n' +
' <span class="tok-attr">background-color</span><span class="tok-punc">:</span> <span class="tok-str">#79e17b</span><span class="tok-punc">;</span>\n' +
' <span class="tok-attr">color</span><span class="tok-punc">:</span> <span class="tok-str">white</span><span class="tok-punc">;</span>\n' +
' <span class="tok-attr">font-size</span><span class="tok-punc">:</span> <span class="tok-str">1.6rem</span><span class="tok-punc">;</span>\n' +
' <span class="tok-attr">font-weight</span><span class="tok-punc">:</span> <span class="tok-str">900</span><span class="tok-punc">;</span>\n' +
' <span class="tok-attr">text-transform</span><span class="tok-punc">:</span> <span class="tok-str">uppercase</span><span class="tok-punc">;</span>\n' +
' <span class="tok-attr">text-decoration</span><span class="tok-punc">:</span> <span class="tok-str">none</span><span class="tok-punc">;</span>\n' +
' <span class="tok-attr">padding</span><span class="tok-punc">:</span> <span class="tok-str">2.5rem</span><span class="tok-punc">;</span>\n' +
' <span class="tok-attr">text-align</span><span class="tok-punc">:</span> <span class="tok-str">center</span><span class="tok-punc">;</span>\n' +
' <span class="tok-attr">display</span><span class="tok-punc">:</span> <span class="tok-str">flex</span><span class="tok-punc">;</span>\n' +
' <span class="tok-attr">align-items</span><span class="tok-punc">:</span> <span class="tok-str">center</span><span class="tok-punc">;</span>\n' +
' <span class="tok-attr">justify-content</span><span class="tok-punc">:</span> <span class="tok-str">center</span><span class="tok-punc">;</span>\n' +
' <span class="tok-attr">transition</span><span class="tok-punc">:</span> <span class="tok-str">all 0.3s</span><span class="tok-punc">;</span>\n' +
' <span class="tok-punc">}</span>\n' +
'\n' +
' <span class="tok-tag">.card__link:hover,</span>\n' +
' <span class="tok-tag">.card__link:active</span> <span class="tok-punc">{</span>\n' +
' <span class="tok-attr">background-color</span><span class="tok-punc">:</span> <span class="tok-str">#9be15d</span><span class="tok-punc">;</span>\n' +
' <span class="tok-punc">}</span>\n' +
'\n' +
' <span class="tok-tag">.card__link span</span> <span class="tok-punc">{</span>\n' +
' <span class="tok-attr">transform</span><span class="tok-punc">:</span> <span class="tok-str">skewX(20deg)</span><span class="tok-punc">;</span>\n' +
' <span class="tok-punc">}</span>\n' +
'\n' +
' <span class="tok-tag">.card:hover</span> <span class="tok-punc">{</span>\n' +
' <span class="tok-attr">transform</span><span class="tok-punc">:</span> <span class="tok-str">skewX(-20deg) scale(1.08)</span><span class="tok-punc">;</span>\n' +
' <span class="tok-attr">box-shadow</span><span class="tok-punc">:</span> <span class="tok-str">0 3rem 8rem 2rem rgba(0, 0, 0, 0.15)</span><span class="tok-punc">;</span>\n' +
' <span class="tok-punc">}</span>\n' +
'\n' +
' <span class="tok-tag">.emoji-left</span> <span class="tok-punc">{</span>\n' +
' <span class="tok-attr">font-size</span><span class="tok-punc">:</span> <span class="tok-str">2rem</span><span class="tok-punc">;</span>\n' +
' <span class="tok-attr">margin-right</span><span class="tok-punc">:</span> <span class="tok-str">1rem</span><span class="tok-punc">;</span>\n' +
' <span class="tok-punc">}</span>\n' +
'\n' +
' <span class="tok-tag">.emoji-right</span> <span class="tok-punc">{</span>\n' +
' <span class="tok-attr">font-size</span><span class="tok-punc">:</span> <span class="tok-str">2rem</span><span class="tok-punc">;</span>\n' +
' <span class="tok-attr">margin-left</span><span class="tok-punc">:</span> <span class="tok-str">1rem</span><span class="tok-punc">;</span>\n' +
' <span class="tok-punc">}</span>\n' +
'\n' +
' <span class="tok-tag">.not-organic</span> <span class="tok-punc">{</span>\n' +
' <span class="tok-attr">display</span><span class="tok-punc">:</span> <span class="tok-str">none</span><span class="tok-punc">;</span>\n' +
' <span class="tok-punc">}</span>\n' +
' <span class="tok-punc"></style></span>\n' +
' <span class="tok-punc"></</span><span class="tok-tag">head</span><span class="tok-punc">></span>\n' +
'\n' +
' <span class="tok-punc"><</span><span class="tok-tag">body</span><span class="tok-punc">></span>\n' +
' <span class="tok-punc"><</span><span class="tok-tag">div</span> <span class="tok-attr">class</span><span class="tok-punc">=</span><span class="tok-str">"container"</span><span class="tok-punc">></span>\n' +
' <span class="tok-punc"><</span><span class="tok-tag">h1</span><span class="tok-punc">></span>🌽 Node Farm 🥦<span class="tok-punc"></</span><span class="tok-tag">h1</span><span class="tok-punc">></span>\n' +
'\n' +
' <span class="tok-punc"><</span><span class="tok-tag">div</span> <span class="tok-attr">class</span><span class="tok-punc">=</span><span class="tok-str">"cards-container"</span><span class="tok-punc">></span>\n' +
' <span class="tok-expr">{%PRODUCT_CARDS%}</span>\n' +
' <span class="tok-punc"></</span><span class="tok-tag">div</span><span class="tok-punc">></span>\n' +
' <span class="tok-punc"></</span><span class="tok-tag">div</span><span class="tok-punc">></span>\n' +
' <span class="tok-punc"></</span><span class="tok-tag">body</span><span class="tok-punc">></span>\n' +
'<span class="tok-punc"></</span><span class="tok-tag">html</span><span class="tok-punc">></span>\n' +
'\n',
product:
'<span class="tok-punc"><!DOCTYPE html></span>\n' +
'<span class="tok-punc"><</span><span class="tok-tag">html</span> <span class="tok-attr">lang</span><span class="tok-punc">=</span><span class="tok-str">"en"</span><span class="tok-punc">></span>\n' +
' <span class="tok-punc"><</span><span class="tok-tag">head</span><span class="tok-punc">></span>\n' +
' <span class="tok-punc"><</span><span class="tok-tag">meta</span> <span class="tok-attr">charset</span><span class="tok-punc">=</span><span class="tok-str">"UTF-8"</span> <span class="tok-punc">/></span>\n' +
' <span class="tok-punc"><</span><span class="tok-tag">meta</span> <span class="tok-attr">name</span><span class="tok-punc">=</span><span class="tok-str">"viewport"</span> <span class="tok-attr">content</span><span class="tok-punc">=</span><span class="tok-str">"width=device-width, initial-scale=1.0"</span> <span class="tok-punc">/></span>\n' +
' <span class="tok-punc"><</span><span class="tok-tag">meta</span> <span class="tok-attr">http-equiv</span><span class="tok-punc">=</span><span class="tok-str">"X-UA-Compatible"</span> <span class="tok-attr">content</span><span class="tok-punc">=</span><span class="tok-str">"ie=edge"</span> <span class="tok-punc">/></span>\n' +
' <span class="tok-punc"><</span><span class="tok-tag">link</span>\n' +
' <span class="tok-attr">href</span><span class="tok-punc">=</span><span class="tok-str">"https://fonts.googleapis.com/css?family=Megrim|Nunito+Sans:400,900"</span>\n' +
' <span class="tok-attr">rel</span><span class="tok-punc">=</span><span class="tok-str">"stylesheet"</span>\n' +
' <span class="tok-punc">/></span>\n' +
' <span class="tok-punc"><</span><span class="tok-tag">link</span>\n' +
' <span class="tok-attr">rel</span><span class="tok-punc">=</span><span class="tok-str">"icon"</span>\n' +
' <span class="tok-attr">href</span><span class="tok-punc">=</span><span class="tok-str">"https://emojipedia-us.s3.dualstack.us-west-1.amazonaws.com/thumbs/240/apple/155/ear-of-maize_1f33d.png"</span>\n' +
' <span class="tok-punc">/></span>\n' +
'\n' +
' <span class="tok-punc"><</span><span class="tok-tag">title</span><span class="tok-punc">></span><span class="tok-expr">{%PRODUCTNAME%}</span> <span class="tok-expr">{%IMAGE%}</span> /// NODE FARM<span class="tok-punc"></</span><span class="tok-tag">title</span><span class="tok-punc">></span>\n' +
'\n' +
' <span class="tok-punc"><style></span>\n' +
' <span class="tok-tag">*,</span>\n' +
' <span class="tok-tag">*::before,</span>\n' +
' <span class="tok-tag">*::after</span> <span class="tok-punc">{</span>\n' +
' <span class="tok-attr">margin</span><span class="tok-punc">:</span> <span class="tok-str">0</span><span class="tok-punc">;</span>\n' +
' <span class="tok-attr">padding</span><span class="tok-punc">:</span> <span class="tok-str">0</span><span class="tok-punc">;</span>\n' +
' <span class="tok-attr">box-sizing</span><span class="tok-punc">:</span> <span class="tok-str">inherit</span><span class="tok-punc">;</span>\n' +
' <span class="tok-punc">}</span>\n' +
'\n' +
' <span class="tok-tag">html</span> <span class="tok-punc">{</span>\n' +
' <span class="tok-attr">font-size</span><span class="tok-punc">:</span> <span class="tok-str">62.5%</span><span class="tok-punc">;</span>\n' +
' <span class="tok-attr">box-sizing</span><span class="tok-punc">:</span> <span class="tok-str">border-box</span><span class="tok-punc">;</span>\n' +
' <span class="tok-punc">}</span>\n' +
'\n' +
' <span class="tok-tag">body</span> <span class="tok-punc">{</span>\n' +
' <span class="tok-attr">padding</span><span class="tok-punc">:</span> <span class="tok-str">5rem 5rem 10rem</span><span class="tok-punc">;</span>\n' +
' <span class="tok-attr">line-height</span><span class="tok-punc">:</span> <span class="tok-str">1.7</span><span class="tok-punc">;</span>\n' +
' <span class="tok-attr">font-family</span><span class="tok-punc">:</span> <span class="tok-str">\'Nunito Sans\', sans-serif</span><span class="tok-punc">;</span>\n' +
' <span class="tok-attr">color</span><span class="tok-punc">:</span> <span class="tok-str">#555</span><span class="tok-punc">;</span>\n' +
' <span class="tok-attr">min-height</span><span class="tok-punc">:</span> <span class="tok-str">100vh</span><span class="tok-punc">;</span>\n' +
' <span class="tok-attr">background</span><span class="tok-punc">:</span> <span class="tok-str">linear-gradient(to bottom right, #9be15d, #00e3ae)</span><span class="tok-punc">;</span>\n' +
' <span class="tok-punc">}</span>\n' +
'\n' +
' <span class="tok-tag">h1</span> <span class="tok-punc">{</span>\n' +
' <span class="tok-attr">font-family</span><span class="tok-punc">:</span> <span class="tok-str">\'Megrim\', sans-serif</span><span class="tok-punc">;</span>\n' +
' <span class="tok-attr">font-size</span><span class="tok-punc">:</span> <span class="tok-str">6rem</span><span class="tok-punc">;</span>\n' +
' <span class="tok-attr">color</span><span class="tok-punc">:</span> <span class="tok-str">white</span><span class="tok-punc">;</span>\n' +
' <span class="tok-attr">transform</span><span class="tok-punc">:</span> <span class="tok-str">skewY(-5deg)</span><span class="tok-punc">;</span>\n' +
' <span class="tok-attr">text-align</span><span class="tok-punc">:</span> <span class="tok-str">center</span><span class="tok-punc">;</span>\n' +
' <span class="tok-attr">position</span><span class="tok-punc">:</span> <span class="tok-str">relative</span><span class="tok-punc">;</span>\n' +
' <span class="tok-attr">word-spacing</span><span class="tok-punc">:</span> <span class="tok-str">3px</span><span class="tok-punc">;</span>\n' +
' <span class="tok-punc">}</span>\n' +
'\n' +
' <span class="tok-tag">h1::before</span> <span class="tok-punc">{</span>\n' +
' <span class="tok-attr">content</span><span class="tok-punc">:</span> <span class="tok-str">\'\'</span><span class="tok-punc">;</span>\n' +
' <span class="tok-attr">display</span><span class="tok-punc">:</span> <span class="tok-str">block</span><span class="tok-punc">;</span>\n' +
' <span class="tok-attr">height</span><span class="tok-punc">:</span> <span class="tok-str">65%</span><span class="tok-punc">;</span>\n' +
' <span class="tok-attr">width</span><span class="tok-punc">:</span> <span class="tok-str">49%</span><span class="tok-punc">;</span>\n' +
' <span class="tok-attr">position</span><span class="tok-punc">:</span> <span class="tok-str">absolute</span><span class="tok-punc">;</span>\n' +
' <span class="tok-attr">top</span><span class="tok-punc">:</span> <span class="tok-str">105%</span><span class="tok-punc">;</span>\n' +
' <span class="tok-attr">left</span><span class="tok-punc">:</span> <span class="tok-str">50%</span><span class="tok-punc">;</span>\n' +
' <span class="tok-attr">background</span><span class="tok-punc">:</span> <span class="tok-str">linear-gradient(to bottom, #9be15d, #00e3ae)</span><span class="tok-punc">;</span>\n' +
' <span class="tok-attr">opacity</span><span class="tok-punc">:</span> <span class="tok-str">0.8</span><span class="tok-punc">;</span>\n' +
' <span class="tok-attr">z-index</span><span class="tok-punc">:</span> <span class="tok-str">-1</span><span class="tok-punc">;</span>\n' +
' <span class="tok-attr">transform</span><span class="tok-punc">:</span> <span class="tok-str">skewY(370deg) translate(-50%, -50%)</span><span class="tok-punc">;</span>\n' +
' <span class="tok-punc">}</span>\n' +
'\n' +
' <span class="tok-tag">.container</span> <span class="tok-punc">{</span>\n' +
' <span class="tok-attr">width</span><span class="tok-punc">:</span> <span class="tok-str">95rem</span><span class="tok-punc">;</span>\n' +
' <span class="tok-attr">margin</span><span class="tok-punc">:</span> <span class="tok-str">0 auto</span><span class="tok-punc">;</span>\n' +
' <span class="tok-punc">}</span>\n' +
'\n' +
' <span class="tok-tag">.product</span> <span class="tok-punc">{</span>\n' +
' <span class="tok-attr">width</span><span class="tok-punc">:</span> <span class="tok-str">60rem</span><span class="tok-punc">;</span>\n' +
' <span class="tok-attr">margin</span><span class="tok-punc">:</span> <span class="tok-str">0 auto</span><span class="tok-punc">;</span>\n' +
' <span class="tok-attr">margin-top</span><span class="tok-punc">:</span> <span class="tok-str">9rem</span><span class="tok-punc">;</span>\n' +
' <span class="tok-attr">background</span><span class="tok-punc">:</span> <span class="tok-str">white</span><span class="tok-punc">;</span>\n' +
' <span class="tok-attr">box-shadow</span><span class="tok-punc">:</span> <span class="tok-str">0 3rem 6rem 1rem rgba(0, 0, 0, 0.2)</span><span class="tok-punc">;</span>\n' +
' <span class="tok-attr">position</span><span class="tok-punc">:</span> <span class="tok-str">relative</span><span class="tok-punc">;</span>\n' +
' <span class="tok-punc">}</span>\n' +
'\n' +
' <span class="tok-tag">.product__hero</span> <span class="tok-punc">{</span>\n' +
' <span class="tok-attr">position</span><span class="tok-punc">:</span> <span class="tok-str">relative</span><span class="tok-punc">;</span>\n' +
' <span class="tok-attr">height</span><span class="tok-punc">:</span> <span class="tok-str">22rem</span><span class="tok-punc">;</span>\n' +
' <span class="tok-attr">overflow</span><span class="tok-punc">:</span> <span class="tok-str">hidden</span><span class="tok-punc">;</span>\n' +
' <span class="tok-punc">}</span>\n' +
'\n' +
' <span class="tok-tag">.product__hero::before</span> <span class="tok-punc">{</span>\n' +
' <span class="tok-attr">content</span><span class="tok-punc">:</span> <span class="tok-str">\'\'</span><span class="tok-punc">;</span>\n' +
' <span class="tok-attr">display</span><span class="tok-punc">:</span> <span class="tok-str">block</span><span class="tok-punc">;</span>\n' +
' <span class="tok-attr">height</span><span class="tok-punc">:</span> <span class="tok-str">100%</span><span class="tok-punc">;</span>\n' +
' <span class="tok-attr">width</span><span class="tok-punc">:</span> <span class="tok-str">100%</span><span class="tok-punc">;</span>\n' +
' <span class="tok-attr">position</span><span class="tok-punc">:</span> <span class="tok-str">absolute</span><span class="tok-punc">;</span>\n' +
' <span class="tok-attr">top</span><span class="tok-punc">:</span> <span class="tok-str">0</span><span class="tok-punc">;</span>\n' +
' <span class="tok-attr">left</span><span class="tok-punc">:</span> <span class="tok-str">0</span><span class="tok-punc">;</span>\n' +
' <span class="tok-attr">background-image</span><span class="tok-punc">:</span> <span class="tok-str">linear-gradient(to left bottom, #9be15d, #00e3ae)</span><span class="tok-punc">;</span>\n' +
' <span class="tok-attr">opacity</span><span class="tok-punc">:</span> <span class="tok-str">0.5</span><span class="tok-punc">;</span>\n' +
' <span class="tok-attr">z-index</span><span class="tok-punc">:</span> <span class="tok-str">100</span><span class="tok-punc">;</span>\n' +
' <span class="tok-punc">}</span>\n' +
'\n' +
' <span class="tok-tag">.product__emoji</span> <span class="tok-punc">{</span>\n' +
' <span class="tok-attr">font-size</span><span class="tok-punc">:</span> <span class="tok-str">15rem</span><span class="tok-punc">;</span>\n' +
' <span class="tok-attr">position</span><span class="tok-punc">:</span> <span class="tok-str">absolute</span><span class="tok-punc">;</span>\n' +
' <span class="tok-punc">}</span>\n' +
'\n' +
' <span class="tok-tag">.product__emoji--1</span> <span class="tok-punc">{</span>\n' +
' <span class="tok-attr">top</span><span class="tok-punc">:</span> <span class="tok-str">-4rem</span><span class="tok-punc">;</span>\n' +
' <span class="tok-attr">left</span><span class="tok-punc">:</span> <span class="tok-str">-2rem</span><span class="tok-punc">;</span>\n' +
' <span class="tok-attr">z-index</span><span class="tok-punc">:</span> <span class="tok-str">10</span><span class="tok-punc">;</span>\n' +
' <span class="tok-punc">}</span>\n' +
'\n' +
' <span class="tok-tag">.product__emoji--2</span> <span class="tok-punc">{</span>\n' +
' <span class="tok-attr">top</span><span class="tok-punc">:</span> <span class="tok-str">-6rem</span><span class="tok-punc">;</span>\n' +
' <span class="tok-attr">left</span><span class="tok-punc">:</span> <span class="tok-str">9rem</span><span class="tok-punc">;</span>\n' +
' <span class="tok-punc">}</span>\n' +
'\n' +
' <span class="tok-tag">.product__emoji--3</span> <span class="tok-punc">{</span>\n' +
' <span class="tok-attr">top</span><span class="tok-punc">:</span> <span class="tok-str">-4rem</span><span class="tok-punc">;</span>\n' +
' <span class="tok-attr">right</span><span class="tok-punc">:</span> <span class="tok-str">15rem</span><span class="tok-punc">;</span>\n' +
' <span class="tok-punc">}</span>\n' +
'\n' +
' <span class="tok-tag">.product__emoji--4</span> <span class="tok-punc">{</span>\n' +
' <span class="tok-attr">top</span><span class="tok-punc">:</span> <span class="tok-str">-5rem</span><span class="tok-punc">;</span>\n' +
' <span class="tok-attr">right</span><span class="tok-punc">:</span> <span class="tok-str">2rem</span><span class="tok-punc">;</span>\n' +
' <span class="tok-attr">z-index</span><span class="tok-punc">:</span> <span class="tok-str">10</span><span class="tok-punc">;</span>\n' +
' <span class="tok-punc">}</span>\n' +
'\n' +
' <span class="tok-tag">.product__emoji--5</span> <span class="tok-punc">{</span>\n' +
' <span class="tok-attr">bottom</span><span class="tok-punc">:</span> <span class="tok-str">-9rem</span><span class="tok-punc">;</span>\n' +
' <span class="tok-attr">left</span><span class="tok-punc">:</span> <span class="tok-str">18rem</span><span class="tok-punc">;</span>\n' +
' <span class="tok-punc">}</span>\n' +
'\n' +
' <span class="tok-tag">.product__emoji--6</span> <span class="tok-punc">{</span>\n' +
' <span class="tok-attr">bottom</span><span class="tok-punc">:</span> <span class="tok-str">-8rem</span><span class="tok-punc">;</span>\n' +
' <span class="tok-attr">left</span><span class="tok-punc">:</span> <span class="tok-str">5rem</span><span class="tok-punc">;</span>\n' +
' <span class="tok-punc">}</span>\n' +
'\n' +
' <span class="tok-tag">.product__emoji--7</span> <span class="tok-punc">{</span>\n' +
' <span class="tok-attr">bottom</span><span class="tok-punc">:</span> <span class="tok-str">-12rem</span><span class="tok-punc">;</span>\n' +
' <span class="tok-attr">right</span><span class="tok-punc">:</span> <span class="tok-str">14rem</span><span class="tok-punc">;</span>\n' +
' <span class="tok-punc">}</span>\n' +
'\n' +
' <span class="tok-tag">.product__emoji--8</span> <span class="tok-punc">{</span>\n' +
' <span class="tok-attr">bottom</span><span class="tok-punc">:</span> <span class="tok-str">-8rem</span><span class="tok-punc">;</span>\n' +
' <span class="tok-attr">right</span><span class="tok-punc">:</span> <span class="tok-str">-2rem</span><span class="tok-punc">;</span>\n' +
' <span class="tok-punc">}</span>\n' +
'\n' +
' <span class="tok-tag">.product__emoji--9</span> <span class="tok-punc">{</span>\n' +
' <span class="tok-attr">top</span><span class="tok-punc">:</span> <span class="tok-str">-7rem</span><span class="tok-punc">;</span>\n' +
' <span class="tok-attr">left</span><span class="tok-punc">:</span> <span class="tok-str">19rem</span><span class="tok-punc">;</span>\n' +
' <span class="tok-punc">}</span>\n' +
'\n' +
' <span class="tok-tag">.product__organic</span> <span class="tok-punc">{</span>\n' +
' <span class="tok-attr">position</span><span class="tok-punc">:</span> <span class="tok-str">absolute</span><span class="tok-punc">;</span>\n' +
' <span class="tok-attr">top</span><span class="tok-punc">:</span> <span class="tok-str">-4rem</span><span class="tok-punc">;</span>\n' +
' <span class="tok-attr">right</span><span class="tok-punc">:</span> <span class="tok-str">-4rem</span><span class="tok-punc">;</span>\n' +
' <span class="tok-attr">z-index</span><span class="tok-punc">:</span> <span class="tok-str">1000</span><span class="tok-punc">;</span>\n' +
' <span class="tok-attr">height</span><span class="tok-punc">:</span> <span class="tok-str">11rem</span><span class="tok-punc">;</span>\n' +
' <span class="tok-attr">width</span><span class="tok-punc">:</span> <span class="tok-str">11rem</span><span class="tok-punc">;</span>\n' +
' <span class="tok-attr">background-image</span><span class="tok-punc">:</span> <span class="tok-str">linear-gradient(to bottom, #9be15d, #00e3ae)</span><span class="tok-punc">;</span>\n' +
' <span class="tok-attr">border-radius</span><span class="tok-punc">:</span> <span class="tok-str">50%</span><span class="tok-punc">;</span>\n' +
' <span class="tok-attr">transform</span><span class="tok-punc">:</span> <span class="tok-str">rotate(15deg)</span><span class="tok-punc">;</span>\n' +
' <span class="tok-attr">box-shadow</span><span class="tok-punc">:</span> <span class="tok-str">0 2rem 4rem rgba(0, 0, 0, 0.4)</span><span class="tok-punc">;</span>\n' +
' <span class="tok-attr">display</span><span class="tok-punc">:</span> <span class="tok-str">flex</span><span class="tok-punc">;</span>\n' +
' <span class="tok-attr">align-items</span><span class="tok-punc">:</span> <span class="tok-str">center</span><span class="tok-punc">;</span>\n' +
' <span class="tok-attr">justify-content</span><span class="tok-punc">:</span> <span class="tok-str">center</span><span class="tok-punc">;</span>\n' +
' <span class="tok-punc">}</span>\n' +
'\n' +
' <span class="tok-tag">.product__organic h5</span> <span class="tok-punc">{</span>\n' +
' <span class="tok-attr">font-weight</span><span class="tok-punc">:</span> <span class="tok-str">900</span><span class="tok-punc">;</span>\n' +
' <span class="tok-attr">text-transform</span><span class="tok-punc">:</span> <span class="tok-str">uppercase</span><span class="tok-punc">;</span>\n' +
' <span class="tok-attr">font-size</span><span class="tok-punc">:</span> <span class="tok-str">1.8rem</span><span class="tok-punc">;</span>\n' +
' <span class="tok-attr">color</span><span class="tok-punc">:</span> <span class="tok-str">white</span><span class="tok-punc">;</span>\n' +
' <span class="tok-punc">}</span>\n' +
'\n' +
' <span class="tok-tag">.product__back:link,</span>\n' +
' <span class="tok-tag">.product__back:visited</span> <span class="tok-punc">{</span>\n' +
' <span class="tok-attr">position</span><span class="tok-punc">:</span> <span class="tok-str">absolute</span><span class="tok-punc">;</span>\n' +
' <span class="tok-attr">top</span><span class="tok-punc">:</span> <span class="tok-str">2rem</span><span class="tok-punc">;</span>\n' +
' <span class="tok-attr">left</span><span class="tok-punc">:</span> <span class="tok-str">2rem</span><span class="tok-punc">;</span>\n' +
' <span class="tok-attr">font-size</span><span class="tok-punc">:</span> <span class="tok-str">1.5rem</span><span class="tok-punc">;</span>\n' +
' <span class="tok-attr">font-weight</span><span class="tok-punc">:</span> <span class="tok-str">700</span><span class="tok-punc">;</span>\n' +
' <span class="tok-attr">text-transform</span><span class="tok-punc">:</span> <span class="tok-str">uppercase</span><span class="tok-punc">;</span>\n' +
' <span class="tok-attr">text-decoration</span><span class="tok-punc">:</span> <span class="tok-str">none</span><span class="tok-punc">;</span>\n' +
' <span class="tok-attr">z-index</span><span class="tok-punc">:</span> <span class="tok-str">1000</span><span class="tok-punc">;</span>\n' +
' <span class="tok-attr">color</span><span class="tok-punc">:</span> <span class="tok-str">#555</span><span class="tok-punc">;</span>\n' +
' <span class="tok-attr">background-color</span><span class="tok-punc">:</span> <span class="tok-str">white</span><span class="tok-punc">;</span>\n' +
' <span class="tok-attr">box-shadow</span><span class="tok-punc">:</span> <span class="tok-str">0 1rem 3rem rgba(0, 0, 0, 0.3)</span><span class="tok-punc">;</span>\n' +
' <span class="tok-attr">border-radius</span><span class="tok-punc">:</span> <span class="tok-str">100rem</span><span class="tok-punc">;</span>\n' +
' <span class="tok-attr">padding</span><span class="tok-punc">:</span> <span class="tok-str">0 2rem</span><span class="tok-punc">;</span>\n' +
' <span class="tok-attr">transition</span><span class="tok-punc">:</span> <span class="tok-str">all 0.3s</span><span class="tok-punc">;</span>\n' +
' <span class="tok-attr">display</span><span class="tok-punc">:</span> <span class="tok-str">flex</span><span class="tok-punc">;</span>\n' +
' <span class="tok-attr">align-items</span><span class="tok-punc">:</span> <span class="tok-str">center</span><span class="tok-punc">;</span>\n' +
' <span class="tok-punc">}</span>\n' +
'\n' +
' <span class="tok-tag">.product__back:hover,</span>\n' +
' <span class="tok-tag">.product__back:active</span> <span class="tok-punc">{</span>\n' +
' <span class="tok-attr">background-color</span><span class="tok-punc">:</span> <span class="tok-str">#79e17b</span><span class="tok-punc">;</span>\n' +
' <span class="tok-punc">}</span>\n' +
'\n' +
' <span class="tok-tag">.product__name</span> <span class="tok-punc">{</span>\n' +
' <span class="tok-attr">background</span><span class="tok-punc">:</span> <span class="tok-str">linear-gradient(to bottom, #9be15d, #00e3ae)</span><span class="tok-punc">;</span>\n' +
' <span class="tok-attr">padding</span><span class="tok-punc">:</span> <span class="tok-str">1rem</span><span class="tok-punc">;</span>\n' +
' <span class="tok-attr">font-family</span><span class="tok-punc">:</span> <span class="tok-str">\'Megrim\', sans-serif</span><span class="tok-punc">;</span>\n' +
' <span class="tok-attr">font-size</span><span class="tok-punc">:</span> <span class="tok-str">4rem</span><span class="tok-punc">;</span>\n' +
' <span class="tok-attr">color</span><span class="tok-punc">:</span> <span class="tok-str">white</span><span class="tok-punc">;</span>\n' +
' <span class="tok-attr">text-align</span><span class="tok-punc">:</span> <span class="tok-str">center</span><span class="tok-punc">;</span>\n' +
' <span class="tok-attr">word-spacing</span><span class="tok-punc">:</span> <span class="tok-str">2px</span><span class="tok-punc">;</span>\n' +
' <span class="tok-punc">}</span>\n' +
'\n' +
' <span class="tok-tag">.product__details</span> <span class="tok-punc">{</span>\n' +
' <span class="tok-attr">background-color</span><span class="tok-punc">:</span> <span class="tok-str">#eee</span><span class="tok-punc">;</span>\n' +
' <span class="tok-attr">padding</span><span class="tok-punc">:</span> <span class="tok-str">4rem 6rem</span><span class="tok-punc">;</span>\n' +
' <span class="tok-attr">font-size</span><span class="tok-punc">:</span> <span class="tok-str">1.9rem</span><span class="tok-punc">;</span>\n' +
' <span class="tok-attr">display</span><span class="tok-punc">:</span> <span class="tok-str">grid</span><span class="tok-punc">;</span>\n' +
' <span class="tok-attr">grid-template-columns</span><span class="tok-punc">:</span> <span class="tok-str">1fr 1fr</span><span class="tok-punc">;</span>\n' +
' <span class="tok-attr">grid-gap</span><span class="tok-punc">:</span> <span class="tok-str">1.5rem</span><span class="tok-punc">;</span>\n' +
' <span class="tok-punc">}</span>\n' +
'\n' +
' <span class="tok-tag">.product__description</span> <span class="tok-punc">{</span>\n' +
' <span class="tok-attr">padding</span><span class="tok-punc">:</span> <span class="tok-str">5rem 6rem</span><span class="tok-punc">;</span>\n' +
' <span class="tok-attr">font-size</span><span class="tok-punc">:</span> <span class="tok-str">1.6rem</span><span class="tok-punc">;</span>\n' +
' <span class="tok-attr">line-height</span><span class="tok-punc">:</span> <span class="tok-str">1.8</span><span class="tok-punc">;</span>\n' +
' <span class="tok-punc">}</span>\n' +
'\n' +
' <span class="tok-tag">.product__link:link,</span>\n' +
' <span class="tok-tag">.product__link:visited</span> <span class="tok-punc">{</span>\n' +
' <span class="tok-attr">display</span><span class="tok-punc">:</span> <span class="tok-str">block</span><span class="tok-punc">;</span>\n' +
' <span class="tok-attr">background-color</span><span class="tok-punc">:</span> <span class="tok-str">#79e17b</span><span class="tok-punc">;</span>\n' +
' <span class="tok-attr">color</span><span class="tok-punc">:</span> <span class="tok-str">white</span><span class="tok-punc">;</span>\n' +
' <span class="tok-attr">font-size</span><span class="tok-punc">:</span> <span class="tok-str">1.6rem</span><span class="tok-punc">;</span>\n' +
' <span class="tok-attr">font-weight</span><span class="tok-punc">:</span> <span class="tok-str">700</span><span class="tok-punc">;</span>\n' +
' <span class="tok-attr">text-transform</span><span class="tok-punc">:</span> <span class="tok-str">uppercase</span><span class="tok-punc">;</span>\n' +
' <span class="tok-attr">text-decoration</span><span class="tok-punc">:</span> <span class="tok-str">none</span><span class="tok-punc">;</span>\n' +
' <span class="tok-attr">padding</span><span class="tok-punc">:</span> <span class="tok-str">1.5rem</span><span class="tok-punc">;</span>\n' +
' <span class="tok-attr">text-align</span><span class="tok-punc">:</span> <span class="tok-str">center</span><span class="tok-punc">;</span>\n' +
' <span class="tok-attr">transform</span><span class="tok-punc">:</span> <span class="tok-str">scale(1.07) skewX(-20deg)</span><span class="tok-punc">;</span>\n' +
' <span class="tok-attr">box-shadow</span><span class="tok-punc">:</span> <span class="tok-str">0 2rem 6rem rgba(0, 0, 0, 0.2)</span><span class="tok-punc">;</span>\n' +
' <span class="tok-attr">display</span><span class="tok-punc">:</span> <span class="tok-str">flex</span><span class="tok-punc">;</span>\n' +
' <span class="tok-attr">align-items</span><span class="tok-punc">:</span> <span class="tok-str">center</span><span class="tok-punc">;</span>\n' +
' <span class="tok-attr">justify-content</span><span class="tok-punc">:</span> <span class="tok-str">center</span><span class="tok-punc">;</span>\n' +
' <span class="tok-attr">transition</span><span class="tok-punc">:</span> <span class="tok-str">all 0.3s</span><span class="tok-punc">;</span>\n' +
' <span class="tok-punc">}</span>\n' +
'\n' +
' <span class="tok-tag">.product__link:hover,</span>\n' +
' <span class="tok-tag">.product__link:active</span> <span class="tok-punc">{</span>\n' +
' <span class="tok-attr">background-color</span><span class="tok-punc">:</span> <span class="tok-str">#9be15d</span><span class="tok-punc">;</span>\n' +
' <span class="tok-attr">transform</span><span class="tok-punc">:</span> <span class="tok-str">scale(1.1) skewX(-20deg)</span><span class="tok-punc">;</span>\n' +
' <span class="tok-punc">}</span>\n' +
'\n' +
' <span class="tok-tag">.product__link span</span> <span class="tok-punc">{</span>\n' +
' <span class="tok-attr">transform</span><span class="tok-punc">:</span> <span class="tok-str">skewX(20deg)</span><span class="tok-punc">;</span>\n' +
' <span class="tok-punc">}</span>\n' +
'\n' +
' <span class="tok-tag">.emoji-left</span> <span class="tok-punc">{</span>\n' +
' <span class="tok-attr">font-size</span><span class="tok-punc">:</span> <span class="tok-str">2rem</span><span class="tok-punc">;</span>\n' +
' <span class="tok-attr">margin-right</span><span class="tok-punc">:</span> <span class="tok-str">1rem</span><span class="tok-punc">;</span>\n' +
' <span class="tok-punc">}</span>\n' +
'\n' +
' <span class="tok-tag">.emoji-right</span> <span class="tok-punc">{</span>\n' +
' <span class="tok-attr">font-size</span><span class="tok-punc">:</span> <span class="tok-str">2rem</span><span class="tok-punc">;</span>\n' +
' <span class="tok-attr">margin-left</span><span class="tok-punc">:</span> <span class="tok-str">1rem</span><span class="tok-punc">;</span>\n' +
' <span class="tok-punc">}</span>\n' +
'\n' +
' <span class="tok-tag">.not-organic</span> <span class="tok-punc">{</span>\n' +
' <span class="tok-attr">display</span><span class="tok-punc">:</span> <span class="tok-str">none</span><span class="tok-punc">;</span>\n' +
' <span class="tok-punc">}</span>\n' +
' <span class="tok-punc"></style></span>\n' +
' <span class="tok-punc"></</span><span class="tok-tag">head</span><span class="tok-punc">></span>\n' +
'\n' +
' <span class="tok-punc"><</span><span class="tok-tag">body</span><span class="tok-punc">></span>\n' +
' <span class="tok-punc"><</span><span class="tok-tag">div</span> <span class="tok-attr">class</span><span class="tok-punc">=</span><span class="tok-str">"container"</span><span class="tok-punc">></span>\n' +
' <span class="tok-punc"><</span><span class="tok-tag">h1</span><span class="tok-punc">></span>🌽 Node Farm 🥦<span class="tok-punc"></</span><span class="tok-tag">h1</span><span class="tok-punc">></span>\n' +
'\n' +
' <span class="tok-punc"><</span><span class="tok-tag">figure</span> <span class="tok-attr">class</span><span class="tok-punc">=</span><span class="tok-str">"product"</span><span class="tok-punc">></span>\n' +
' <span class="tok-punc"><</span><span class="tok-tag">div</span> <span class="tok-attr">class</span><span class="tok-punc">=</span><span class="tok-str">"product__organic {%NOT_ORGANIC%}"</span><span class="tok-punc">></span><span class="tok-punc"><</span><span class="tok-tag">h5</span><span class="tok-punc">></span>Organic<span class="tok-punc"></</span><span class="tok-tag">h5</span><span class="tok-punc">></span><span class="tok-punc"></</span><span class="tok-tag">div</span><span class="tok-punc">></span>\n' +
' <span class="tok-punc"><</span><span class="tok-tag">a</span> <span class="tok-attr">href</span><span class="tok-punc">=</span><span class="tok-str">"/overview"</span> <span class="tok-attr">class</span><span class="tok-punc">=</span><span class="tok-str">"product__back"</span><span class="tok-punc">></span>\n' +
' <span class="tok-punc"><</span><span class="tok-tag">span</span> <span class="tok-attr">class</span><span class="tok-punc">=</span><span class="tok-str">"emoji-left"</span><span class="tok-punc">></span>👈<span class="tok-punc"></</span><span class="tok-tag">span</span><span class="tok-punc">></span>Back\n' +
' <span class="tok-punc"></</span><span class="tok-tag">a</span><span class="tok-punc">></span>\n' +
' <span class="tok-punc"><</span><span class="tok-tag">div</span> <span class="tok-attr">class</span><span class="tok-punc">=</span><span class="tok-str">"product__hero"</span><span class="tok-punc">></span>\n' +
' <span class="tok-punc"><</span><span class="tok-tag">span</span> <span class="tok-attr">class</span><span class="tok-punc">=</span><span class="tok-str">"product__emoji product__emoji--1"</span><span class="tok-punc">></span><span class="tok-expr">{%IMAGE%}</span><span class="tok-punc"></</span><span class="tok-tag">span</span><span class="tok-punc">></span>\n' +
' <span class="tok-punc"><</span><span class="tok-tag">span</span> <span class="tok-attr">class</span><span class="tok-punc">=</span><span class="tok-str">"product__emoji product__emoji--2"</span><span class="tok-punc">></span><span class="tok-expr">{%IMAGE%}</span><span class="tok-punc"></</span><span class="tok-tag">span</span><span class="tok-punc">></span>\n' +
' <span class="tok-punc"><</span><span class="tok-tag">span</span> <span class="tok-attr">class</span><span class="tok-punc">=</span><span class="tok-str">"product__emoji product__emoji--3"</span><span class="tok-punc">></span><span class="tok-expr">{%IMAGE%}</span><span class="tok-punc"></</span><span class="tok-tag">span</span><span class="tok-punc">></span>\n' +
' <span class="tok-punc"><</span><span class="tok-tag">span</span> <span class="tok-attr">class</span><span class="tok-punc">=</span><span class="tok-str">"product__emoji product__emoji--4"</span><span class="tok-punc">></span><span class="tok-expr">{%IMAGE%}</span><span class="tok-punc"></</span><span class="tok-tag">span</span><span class="tok-punc">></span>\n' +
' <span class="tok-punc"><</span><span class="tok-tag">span</span> <span class="tok-attr">class</span><span class="tok-punc">=</span><span class="tok-str">"product__emoji product__emoji--5"</span><span class="tok-punc">></span><span class="tok-expr">{%IMAGE%}</span><span class="tok-punc"></</span><span class="tok-tag">span</span><span class="tok-punc">></span>\n' +
' <span class="tok-punc"><</span><span class="tok-tag">span</span> <span class="tok-attr">class</span><span class="tok-punc">=</span><span class="tok-str">"product__emoji product__emoji--6"</span><span class="tok-punc">></span><span class="tok-expr">{%IMAGE%}</span><span class="tok-punc"></</span><span class="tok-tag">span</span><span class="tok-punc">></span>\n' +
' <span class="tok-punc"><</span><span class="tok-tag">span</span> <span class="tok-attr">class</span><span class="tok-punc">=</span><span class="tok-str">"product__emoji product__emoji--7"</span><span class="tok-punc">></span><span class="tok-expr">{%IMAGE%}</span><span class="tok-punc"></</span><span class="tok-tag">span</span><span class="tok-punc">></span>\n' +
' <span class="tok-punc"><</span><span class="tok-tag">span</span> <span class="tok-attr">class</span><span class="tok-punc">=</span><span class="tok-str">"product__emoji product__emoji--8"</span><span class="tok-punc">></span><span class="tok-expr">{%IMAGE%}</span><span class="tok-punc"></</span><span class="tok-tag">span</span><span class="tok-punc">></span>\n' +
' <span class="tok-punc"><</span><span class="tok-tag">span</span> <span class="tok-attr">class</span><span class="tok-punc">=</span><span class="tok-str">"product__emoji product__emoji--9"</span><span class="tok-punc">></span><span class="tok-expr">{%IMAGE%}</span><span class="tok-punc"></</span><span class="tok-tag">span</span><span class="tok-punc">></span>\n' +
' <span class="tok-punc"></</span><span class="tok-tag">div</span><span class="tok-punc">></span>\n' +
' <span class="tok-punc"><</span><span class="tok-tag">h2</span> <span class="tok-attr">class</span><span class="tok-punc">=</span><span class="tok-str">"product__name"</span><span class="tok-punc">></span><span class="tok-expr">{%PRODUCTNAME%}</span><span class="tok-punc"></</span><span class="tok-tag">h2</span><span class="tok-punc">></span>\n' +
' <span class="tok-punc"><</span><span class="tok-tag">div</span> <span class="tok-attr">class</span><span class="tok-punc">=</span><span class="tok-str">"product__details"</span><span class="tok-punc">></span>\n' +
' <span class="tok-punc"><</span><span class="tok-tag">p</span><span class="tok-punc">></span><span class="tok-punc"><</span><span class="tok-tag">span</span> <span class="tok-attr">class</span><span class="tok-punc">=</span><span class="tok-str">"emoji-left"</span><span class="tok-punc">></span>🌍<span class="tok-punc"></</span><span class="tok-tag">span</span><span class="tok-punc">></span>From <span class="tok-expr">{%FROM%}</span><span class="tok-punc"></</span><span class="tok-tag">p</span><span class="tok-punc">></span>\n' +
' <span class="tok-punc"><</span><span class="tok-tag">p</span><span class="tok-punc">></span><span class="tok-punc"><</span><span class="tok-tag">span</span> <span class="tok-attr">class</span><span class="tok-punc">=</span><span class="tok-str">"emoji-left"</span><span class="tok-punc">></span>❤️<span class="tok-punc"></</span><span class="tok-tag">span</span><span class="tok-punc">></span><span class="tok-expr">{%NUTRIENTS%}</span><span class="tok-punc"></</span><span class="tok-tag">p</span><span class="tok-punc">></span>\n' +
' <span class="tok-punc"><</span><span class="tok-tag">p</span><span class="tok-punc">></span><span class="tok-punc"><</span><span class="tok-tag">span</span> <span class="tok-attr">class</span><span class="tok-punc">=</span><span class="tok-str">"emoji-left"</span><span class="tok-punc">></span>📦<span class="tok-punc"></</span><span class="tok-tag">span</span><span class="tok-punc">></span><span class="tok-expr">{%QUANTITY%}</span><span class="tok-punc"></</span><span class="tok-tag">p</span><span class="tok-punc">></span>\n' +
' <span class="tok-punc"><</span><span class="tok-tag">p</span><span class="tok-punc">></span><span class="tok-punc"><</span><span class="tok-tag">span</span> <span class="tok-attr">class</span><span class="tok-punc">=</span><span class="tok-str">"emoji-left"</span><span class="tok-punc">></span>🏷<span class="tok-punc"></</span><span class="tok-tag">span</span><span class="tok-punc">></span><span class="tok-expr">{%PRICE%}</span>€<span class="tok-punc"></</span><span class="tok-tag">p</span><span class="tok-punc">></span>\n' +
' <span class="tok-punc"></</span><span class="tok-tag">div</span><span class="tok-punc">></span>\n' +
' \n' +
' <span class="tok-punc"><</span><span class="tok-tag">a</span> <span class="tok-attr">href</span><span class="tok-punc">=</span><span class="tok-str">"#"</span> <span class="tok-attr">class</span><span class="tok-punc">=</span><span class="tok-str">"product__link"</span><span class="tok-punc">></span>\n' +
' <span class="tok-punc"><</span><span class="tok-tag">span</span> <span class="tok-attr">class</span><span class="tok-punc">=</span><span class="tok-str">"emoji-left"</span><span class="tok-punc">></span>🛒<span class="tok-punc"></</span><span class="tok-tag">span</span><span class="tok-punc">></span>\n' +
' <span class="tok-punc"><</span><span class="tok-tag">span</span><span class="tok-punc">></span>Add to shopping card (<span class="tok-expr">{%PRICE%}</span>€)<span class="tok-punc"></</span><span class="tok-tag">span</span><span class="tok-punc">></span>\n' +
' <span class="tok-punc"></</span><span class="tok-tag">a</span><span class="tok-punc">></span>\n' +
' \n' +
' <span class="tok-punc"><</span><span class="tok-tag">p</span> <span class="tok-attr">class</span><span class="tok-punc">=</span><span class="tok-str">"product__description"</span><span class="tok-punc">></span>\n' +
' <span class="tok-expr">{%DESCRIPTION%}</span>\n' +
' <span class="tok-punc"></</span><span class="tok-tag">p</span><span class="tok-punc">></span>\n' +
' <span class="tok-punc"></</span><span class="tok-tag">figure</span><span class="tok-punc">></span>\n' +
' \n' +
' <span class="tok-punc"></</span><span class="tok-tag">div</span><span class="tok-punc">></span>\n' +
' <span class="tok-punc"></</span><span class="tok-tag">body</span><span class="tok-punc">></span>\n' +
'<span class="tok-punc"></</span><span class="tok-tag">html</span><span class="tok-punc">></span>\n' +
'\n'
};
var codeEl = root.querySelector('#vtCode');
var rows = root.querySelectorAll('.vt-row');
var tabs = root.querySelectorAll('.vt-tab');
function selectFile(id) {
codeEl.innerHTML = files[id];
rows.forEach(function (r) { r.classList.toggle('is-selected', r.getAttribute('data-file') === id); });
tabs.forEach(function (t) { t.classList.toggle('is-active', t.getAttribute('data-file') === id); });
}
rows.forEach(function (r) { r.addEventListener('click', function () { selectFile(r.getAttribute('data-file')); }); });
tabs.forEach(function (t) { t.addEventListener('click', function () { selectFile(t.getAttribute('data-file')); }); });
selectFile('index');
/* --- terminal run simulation --- */
var termLines = root.querySelector('#vtTermLines');
var runBtn = root.querySelector('#vtRunBtn');
var runLabel = root.querySelector('#vtRunLabel');
var runHint = root.querySelector('#vtRunHint');
var browser = root.querySelector('#vtBrowser');
var placeholder = root.querySelector('.vt-output-placeholder');
var running = false;
var lines = [
{ text: '$ node index.js', cls: 'is-cmd', delay: 0 },
{ text: 'Listening to requests on port 8000', cls: 'is-ok', delay: 700 }
];
runBtn.addEventListener('click', function () {
if (running) return;
running = true;
runBtn.disabled = true;
runLabel.textContent = 'running\u2026';
browser.classList.remove('is-shown');
placeholder.style.display = 'block';
termLines.innerHTML = '';
lines.forEach(function (line) {
setTimeout(function () {
var div = document.createElement('div');
div.className = 'vt-term-line ' + line.cls;
div.textContent = line.text;
termLines.appendChild(div);
}, line.delay);
});
setTimeout(function () {
placeholder.style.display = 'none';
browser.classList.add('is-shown');
runBtn.disabled = false;
runLabel.textContent = 'node index.js';
runHint.textContent = 'server running \u2014 rerun anytime';
running = false;
showRoute('/');
}, 1600);
});
/* --- route buttons: simulate visiting each path --- */
var vtUrl = root.querySelector('#vtUrl');
var routeResult = root.querySelector('#vtRouteResult');
var routeBtns = root.querySelectorAll('.vt-route-btn');
function detok(html) {
return html.replace(/<[^>]+>/g, '')
.replace(/</g, '<').replace(/>/g, '>').replace(/&/g, '&');
}
function apiPreview() {
try {
var obj = JSON.parse(detok(files.data));
return JSON.stringify(obj, null, 2);
} catch (e) {
return '[ ...5 products... ]';
}
}
function replaceTemplate(temp, product, slug) {
var output = temp.replace(/\{%PRODUCTNAME%\}/g, product.productName);
output = output.replace(/\{%IMAGE%\}/g, product.image);
output = output.replace(/\{%PRICE%\}/g, product.price);
output = output.replace(/\{%FROM%\}/g, product.from);
output = output.replace(/\{%NUTRIENTS%\}/g, product.nutrients);
output = output.replace(/\{%QUANTITY%\}/g, product.quantity);
output = output.replace(/\{%DESCRIPTION%\}/g, product.description);
output = output.replace(/\{%ID%\}/g, slug || product.id);
if (!product.organic) output = output.replace(/\{%NOT_ORGANIC%\}/g, 'not-organic');
return output;
}
function slugify(str) {
return String(str)
.toLowerCase()
.trim()
.replace(/[^a-z0-9]+/g, '-')
.replace(/^-+|-+$/g, '');
}
function buildOverviewHtml() {
try {
var dataObj = JSON.parse(detok(files.data));
var tempCardPlain = detok(files.card);
var tempOverviewPlain = detok(files.overview);
var cardsHtml = dataObj.map(function (el) { return replaceTemplate(tempCardPlain, el, slugify(el.productName)); }).join('');
return tempOverviewPlain.replace('{%PRODUCT_CARDS%}', cardsHtml);
} catch (e) {
return '<p style="font-family:sans-serif;padding:2rem;">Preview failed to render.</p>';
}
}
// mirrors url.parse(req.url, true): splits pathname from a parsed query object
function parseUrl(fullPath) {
var qIndex = fullPath.indexOf('?');
var pathname = qIndex === -1 ? fullPath : fullPath.slice(0, qIndex);
var query = {};
if (qIndex !== -1) {
fullPath.slice(qIndex + 1).split('&').forEach(function (pair) {
if (!pair) return;
var kv = pair.split('=');
query[decodeURIComponent(kv[0])] = decodeURIComponent(kv[1] || '');
});
}
return { pathname: pathname, query: query };
}
function renderIntoBrowser(html, onLoadWire) {
routeResult.innerHTML = '<div class="vt-overview-wrap" id="vtOverviewWrap"></div>';
var wrap = routeResult.querySelector('#vtOverviewWrap');
var iframe = document.createElement('iframe');
iframe.className = 'vt-overview-frame';
iframe.setAttribute('scrolling', 'no');
iframe.srcdoc = html;
if (onLoadWire) iframe.addEventListener('load', function () { onLoadWire(iframe); });
wrap.appendChild(iframe);
}
function showRoute(fullPath) {
var parsed = parseUrl(fullPath);
var pathname = parsed.pathname, query = parsed.query;
routeBtns.forEach(function (b) { b.classList.toggle('is-on', b.getAttribute('data-path') === pathname); });
vtUrl.textContent = '127.0.0.1:8000' + (fullPath === '/' ? '' : fullPath);
if (pathname === '/' || pathname === '/overview') {
renderIntoBrowser(buildOverviewHtml(), function (iframe) {
try {
iframe.contentDocument.querySelectorAll('.card__link').forEach(function (link) {
link.addEventListener('click', function (e) {
e.preventDefault();
showRoute(link.getAttribute('href') || '/product');
});
});
} catch (e) { /* ignore */ }
});
return;
}
if (pathname.indexOf('/product/') === 0) {
var dataObj;
try { dataObj = JSON.parse(detok(files.data)); } catch (e) { dataObj = []; }
var slug = pathname.replace('/product/', '');
var id = dataObj.map(function (el) { return slugify(el.productName); }).indexOf(slug);
var product = dataObj[id];
if (!product) {
routeResult.innerHTML =
'<span class="vt-route-status">500</span>' +
'<p class="vt-route-body">TypeError: Cannot read properties of undefined</p>' +
'<div class="vt-route-headers">dataObj[' + id + '] is undefined \u2014 slug “' + slug +
'” did not match any product \u2014 replaceTemplate() crashes reading product.productName</div>';
return;
}
renderIntoBrowser(replaceTemplate(detok(files.product), product), function (iframe) {
try {
var back = iframe.contentDocument.querySelector('.product__back');
if (back) back.addEventListener('click', function (e) { e.preventDefault(); showRoute('/'); });
} catch (e) { /* ignore */ }
});
return;
}
if (pathname === '/api') {
routeResult.innerHTML =
'<span class="vt-route-status is-ok">200 OK \u2014 application/json</span>' +
'<pre class="vt-json-preview">' + apiPreview().replace(/&/g, '&').replace(/</g, '<') + '</pre>';
return;
}
routeResult.innerHTML =
'<span class="vt-route-status">404 Not Found</span>' +
'<p class="vt-route-body">Page not found!</p>' +
'<div class="vt-route-headers">Content-Type: <b>text/html</b></div>';
}
routeBtns.forEach(function (btn) {
btn.addEventListener('click', function () { showRoute(btn.getAttribute('data-path')); });
});
/* --- resize handles (pointer-capture drag) --- */
function makeResizable(handle, opts) {
var dragging = false, startPos = 0, startSize = 0;
handle.addEventListener('pointerdown', function (e) {
dragging = true;
handle.classList.add('is-dragging');
startPos = opts.axis === 'x' ? e.clientX : e.clientY;
startSize = opts.target.getBoundingClientRect()[opts.axis === 'x' ? 'width' : 'height'];
handle.setPointerCapture(e.pointerId);
e.preventDefault();
});
handle.addEventListener('pointermove', function (e) {
if (!dragging) return;
var pos = opts.axis === 'x' ? e.clientX : e.clientY;
var delta = pos - startPos;
if (opts.invert) delta = -delta;
var size = Math.min(opts.max, Math.max(opts.min, startSize + delta));
opts.target.style[opts.prop] = size + 'px';
if (opts.onResize) opts.onResize(size);
});
function stop() { dragging = false; handle.classList.remove('is-dragging'); }
handle.addEventListener('pointerup', stop);
handle.addEventListener('pointercancel', stop);
}
var sidebar = root.querySelector('.vt-sidebar');
var sidebarHandle = root.querySelector('#vtSidebarHandle');
var lastSidebarWidth = sidebar.getBoundingClientRect().width || 170;
makeResizable(sidebarHandle, {
axis: 'x', target: sidebar, prop: 'width', min: 100, max: 280, invert: false,
onResize: function (s) { lastSidebarWidth = s; }
});
var terminal = root.querySelector('.vt-terminal');
var terminalHandle = root.querySelector('#vtTerminalHandle');
var lastTerminalHeight = terminal.getBoundingClientRect().height || 150;
makeResizable(terminalHandle, {
axis: 'y', target: terminal, prop: 'height', min: 60, max: 280, invert: true,
onResize: function (s) { lastTerminalHeight = s; }
});
var vtBody = root.querySelector('.vt-body');
var windowHandle = root.querySelector('#vtWindowHandle');
makeResizable(windowHandle, {
axis: 'y', target: vtBody, prop: 'height', min: 300, max: 600, invert: false
});
/* --- show/hide toggles --- */
var toggleSidebarBtn = root.querySelector('#vtToggleSidebar');
var sidebarHidden = false;
toggleSidebarBtn.addEventListener('click', function () {
sidebarHidden = !sidebarHidden;
if (sidebarHidden) {
var w = sidebar.getBoundingClientRect().width;
if (w > 0) lastSidebarWidth = w;
sidebar.classList.add('is-hidden');
sidebarHandle.style.display = 'none';
} else {
sidebar.classList.remove('is-hidden');
sidebar.style.width = lastSidebarWidth + 'px';
sidebarHandle.style.display = '';
}
});
var toggleTerminalBtn = root.querySelector('#vtToggleTerminal');
var terminalCollapsed = false;
toggleTerminalBtn.addEventListener('click', function () {
terminalCollapsed = !terminalCollapsed;
if (terminalCollapsed) {
var h = terminal.getBoundingClientRect().height;
if (h > 30) lastTerminalHeight = h;
terminal.classList.add('is-collapsed');
terminalHandle.style.display = 'none';
} else {
terminal.classList.remove('is-collapsed');
terminal.style.height = lastTerminalHeight + 'px';
terminalHandle.style.display = '';
}
});
})();
</script>