🎯 Goal of This Note
<div class="infographic-webserver">
<style>
.infographic-webserver {
--ink: #1a1a1a;
--ink-soft: #5c5c5c;
--paper: #ffffff;
--paper-alt: #f0ece4;
--accent: #2563eb;
--accent-soft:#e3ebfd;
--line: #ddd6c9;
--ok: #1f9d55;
--ok-soft: #e5f6ec;
--radius: 10px;
box-sizing: border-box;
max-width: 880px;
margin: 0 auto;
font-family: 'Inter', -apple-system, BlinkMacSystemFont, sans-serif;
color: var(--ink);
background: transparent;
}
.infographic-webserver[data-theme="dark"] {
--ink: #e8e6e1;
--ink-soft: #9a968c;
--paper: #13171F;
--paper-alt: #1e1e26;
--accent: #5b8def;
--accent-soft:#202942;
--line: #2c313d;
--ok: #34d399;
--ok-soft: #163227;
}
.infographic-webserver * { box-sizing: border-box; }
.infographic-webserver .w-inner { padding: 0 clamp(1rem, 4vw, 1.5rem); }
.infographic-webserver .w-eyebrow {
font-size: 0.7rem; font-weight: 600; letter-spacing: 0.09em;
text-transform: uppercase; color: var(--accent); margin: 0 0 0.35rem;
}
.infographic-webserver h2 {
font-family: 'Newsreader', Georgia, serif; font-weight: 600;
font-size: clamp(1.5rem, 4vw, 2rem); line-height: 1.15;
margin: 0 0 0.3rem; letter-spacing: -0.01em;
}
.infographic-webserver .w-sub { font-size: 0.9rem; color: var(--ink-soft); margin: 0 0 1.1rem; }
.infographic-webserver .w-listen {
display: inline-flex; align-items: center; gap: 0.4rem; font-family: 'SFMono-Regular', Consolas, Menlo, monospace;
font-size: 0.72rem; color: var(--ink-soft); background: var(--paper-alt); border: 1px solid var(--line);
border-radius: 999px; padding: 0.28rem 0.75rem; margin-bottom: 1.2rem;
}
.infographic-webserver .w-listen-dot { width: 7px; height: 7px; border-radius: 50%; background: var(--ok); flex: none; }
/* mode toggle */
.infographic-webserver .w-modes { display: flex; gap: 0.45rem; flex-wrap: wrap; margin-bottom: 1rem; }
.infographic-webserver .w-mode-btn {
font-family: 'SFMono-Regular', Consolas, Menlo, monospace; font-size: 0.8rem; font-weight: 600;
color: var(--ink-soft); background: var(--paper); border: 1px solid var(--line);
border-radius: 999px; padding: 0.4rem 0.9rem; cursor: pointer; transition: all 0.15s ease;
}
.infographic-webserver .w-mode-btn:hover { border-color: var(--accent); }
.infographic-webserver .w-mode-btn.is-on { background: var(--accent); border-color: var(--accent); color: #fff; }
/* scene */
.infographic-webserver .w-scene-card {
border: 1px solid var(--line); border-radius: var(--radius); background: var(--paper-alt);
padding: 1.1rem 1.1rem 1.2rem; margin-bottom: 1rem;
}
.infographic-webserver .w-scene { display: grid; grid-template-columns: 1.3fr 90px 0.7fr; align-items: center; gap: 0.4rem; }
@media (max-width: 560px) { .infographic-webserver .w-scene { grid-template-columns: 1fr; } }
.infographic-webserver .w-browser { border: 1px solid var(--line); border-radius: 9px; background: var(--paper); overflow: hidden; }
.infographic-webserver .w-browser-bar { display: flex; align-items: center; gap: 0.4rem; padding: 0.4rem 0.55rem; background: var(--paper-alt); border-bottom: 1px solid var(--line); }
.infographic-webserver .w-browser-bar svg { width: 12px; height: 12px; stroke: var(--ink-soft); flex: none; }
.infographic-webserver .w-browser-url { font-family: 'SFMono-Regular', Consolas, Menlo, monospace; font-size: 0.7rem; color: var(--ink-soft); }
.infographic-webserver .w-browser-body { min-height: 92px; padding: 0.85rem; display: flex; align-items: center; justify-content: center; text-align: center; }
.infographic-webserver .w-render-html h1 { font-size: 1.05rem; margin: 0 0 0.2rem; font-family: 'Newsreader', Georgia, serif; }
.infographic-webserver .w-render-html p { font-size: 0.8rem; margin: 0; color: var(--ink-soft); }
.infographic-webserver .w-placeholder { color: var(--ink-soft); font-family: 'SFMono-Regular', Consolas, Menlo, monospace; font-size: 0.85rem; }
.infographic-webserver .w-actor { display: flex; flex-direction: column; align-items: center; gap: 0.3rem; }
.infographic-webserver .w-actor-icon {
width: 38px; height: 38px; border-radius: 10px; background: var(--paper); border: 1px solid var(--line);
display: flex; align-items: center; justify-content: center; position: relative;
box-shadow: 0 1px 3px rgba(0,0,0,0.10), 0 1px 1px rgba(0,0,0,0.06);
transition: transform 0.2s ease, border-color 0.2s ease;
}
.infographic-webserver[data-theme="dark"] .w-actor-icon { box-shadow: 0 1px 4px rgba(0,0,0,0.45); }
.infographic-webserver .w-actor-icon svg { width: 19px; height: 19px; stroke: var(--accent); }
.infographic-webserver .w-actor-icon.is-busy { transform: scale(1.12); border-color: var(--accent); }
.infographic-webserver .w-actor-icon .w-mini-badge {
position: absolute; bottom: -5px; right: -5px; width: 18px; height: 18px; border-radius: 50%;
background: var(--paper); border: 1px solid var(--line); display: flex; align-items: center; justify-content: center;
opacity: 0; transform: scale(0.6); transition: opacity 0.25s ease, transform 0.25s ease;
}
.infographic-webserver .w-actor-icon .w-mini-badge.is-in { opacity: 1; transform: scale(1); }
.infographic-webserver .w-actor-icon .w-mini-badge svg { width: 10px; height: 10px; stroke: var(--accent); }
.infographic-webserver .w-actor-icon .w-mini-badge.is-spin svg { animation: w-spin 0.9s linear infinite; }
@media (prefers-reduced-motion: reduce) { .infographic-webserver .w-actor-icon .w-mini-badge.is-spin svg { animation: none; } }
@keyframes w-spin { to { transform: rotate(360deg); } }
.infographic-webserver .w-lane { display: flex; flex-direction: column; align-items: center; gap: 0.35rem; }
.infographic-webserver .w-lane-track { width: 100%; height: 3px; background: var(--line); border-radius: 2px; position: relative; margin: 3px 0; }
.infographic-webserver .w-dot {
position: absolute; top: 50%; transform: translate(-50%, -50%); left: 0;
padding: 0.13rem 0.4rem; border-radius: 999px; font-size: 0.58rem; font-weight: 700;
font-family: 'SFMono-Regular', Consolas, Menlo, monospace; white-space: nowrap;
opacity: 0; background: var(--accent); color: #fff; transition: left 0.55s ease, opacity 0.2s ease;
}
.infographic-webserver .w-dot.is-go { opacity: 1; }
.infographic-webserver .w-dot.at-end { left: 100%; }
.infographic-webserver .w-dot.is-response { background: var(--ok); }
.infographic-webserver .w-server-box { display: flex; align-items: center; justify-content: center; padding: 0.8rem; border: 1px solid var(--line); border-radius: 9px; background: var(--paper); }
.infographic-webserver .w-visit-row { display: flex; justify-content: center; margin-top: 1rem; }
.infographic-webserver .w-visit-btn {
font: inherit; font-weight: 700; font-size: 0.82rem; color: #fff; background: var(--accent);
border: none; border-radius: 999px; padding: 0.5rem 1.1rem; cursor: pointer;
}
.infographic-webserver .w-visit-btn:disabled { opacity: 0.55; cursor: default; }
.infographic-webserver .w-examples {
font-size: 0.76rem; color: var(--ink-soft); margin-top: 1.3rem; text-align: center;
}
.infographic-webserver .w-examples b { color: var(--ink); font-weight: 600; }
</style>
<div class="w-inner">
<span class="w-listen"><span class="w-listen-dot"></span>listening on port 3000</span>
<div class="w-modes" id="wModes">
<button class="w-mode-btn" data-mode="static" type="button">📄 static file</button>
<button class="w-mode-btn" data-mode="dynamic" type="button">⚙️ dynamic</button>
</div>
<div class="w-scene-card">
<div class="w-scene">
<div class="w-browser">
<div class="w-browser-bar">
<svg viewBox="0 0 24 24" fill="none" stroke="currentColor" stroke-width="2" stroke-linecap="round" stroke-linejoin="round"><path d="M19 21v-2a4 4 0 0 0-4-4H9a4 4 0 0 0-4 4v2"/><circle cx="12" cy="7" r="4"/></svg>
<span class="w-browser-url">yoursite.com</span>
</div>
<div class="w-browser-body" id="wBrowserBody"><span class="w-placeholder">pick a mode & visit</span></div>
</div>
<div class="w-lane">
<div class="w-actor"><span class="w-actor-icon"><svg viewBox="0 0 24 24" fill="none" stroke="currentColor" stroke-width="2" stroke-linecap="round" stroke-linejoin="round"><path d="M19 21v-2a4 4 0 0 0-4-4H9a4 4 0 0 0-4 4v2"/><circle cx="12" cy="7" r="4"/></svg></span></div>
<div class="w-lane-track"><span class="w-dot" id="wDotReq">GET /</span></div>
<div class="w-lane-track"><span class="w-dot is-response" id="wDotRes">200</span></div>
<div class="w-actor">
<span class="w-actor-icon" id="wServerIcon">
<svg viewBox="0 0 24 24" fill="none" stroke="currentColor" stroke-width="2" stroke-linecap="round" stroke-linejoin="round"><rect width="20" height="8" x="2" y="2" rx="2" ry="2"/><rect width="20" height="8" x="2" y="14" rx="2" ry="2"/><line x1="6" x2="6.01" y1="6" y2="6"/><line x1="6" x2="6.01" y1="18" y2="18"/></svg>
<span class="w-mini-badge" id="wMiniBadge"></span>
</span>
</div>
</div>
<div class="w-server-box"><span style="font-size:0.72rem; color:var(--ink-soft);">web server</span></div>
</div>
<div class="w-visit-row">
<button class="w-visit-btn" id="wVisit" type="button" disabled>visit the site</button>
</div>
</div>
<p class="w-examples">Built with something like <b>Node.js</b>, <b>Apache</b>, or <b>Nginx</b>.</p>
</div>
<script>
(function () {
var wrapper = document.currentScript.closest('.infographic-webserver')
|| document.querySelector('.infographic-webserver');
var bodyAttr = document.body.getAttribute('data-darkmode');
var dark;
if (bodyAttr === 'true') { dark = true; }
else if (bodyAttr === 'false') { dark = false; }
else {
var m = document.cookie.match(/(?:^|;\s*)darkMode=([^;]+)/);
dark = m ? m[1] === 'true' : false;
}
if (dark) wrapper.setAttribute('data-theme', 'dark');
var reduced = window.matchMedia && window.matchMedia('(prefers-reduced-motion: reduce)').matches;
var fileIcon = '<path d="M6 22a2 2 0 0 1-2-2V4a2 2 0 0 1 2-2h8a2.4 2.4 0 0 1 1.704.706l3.588 3.588A2.4 2.4 0 0 1 20 8v12a2 2 0 0 1-2 2z"/><path d="M14 2v5a1 1 0 0 0 1 1h5"/>';
var cogIcon = '<path d="M11 10.27 7 3.34"/><path d="m11 13.73-4 6.93"/><path d="M12 22v-2"/><path d="M12 2v2"/><path d="M14 12h8"/><path d="m17 20.66-1-1.73"/><path d="m17 3.34-1 1.73"/><path d="M2 12h2"/><path d="m20.66 17-1.73-1"/><path d="m20.66 7-1.73 1"/><path d="m3.34 17 1.73-1"/><path d="m3.34 7 1.73 1"/><circle cx="12" cy="12" r="2"/><circle cx="12" cy="12" r="8"/>';
var modeBtns = Array.prototype.slice.call(wrapper.querySelectorAll('#wModes .w-mode-btn'));
var visitBtn = wrapper.querySelector('#wVisit');
var browserBody = wrapper.querySelector('#wBrowserBody');
var dotReq = wrapper.querySelector('#wDotReq');
var dotRes = wrapper.querySelector('#wDotRes');
var serverIcon = wrapper.querySelector('#wServerIcon');
var miniBadge = wrapper.querySelector('#wMiniBadge');
var mode = null;
var timers = [];
var busy = false;
function clearTimers() { timers.forEach(clearTimeout); timers = []; }
modeBtns.forEach(function (btn) {
btn.addEventListener('click', function () {
modeBtns.forEach(function (b) { b.classList.remove('is-on'); });
btn.classList.add('is-on');
mode = btn.getAttribute('data-mode');
visitBtn.disabled = false;
browserBody.innerHTML = '<span class="w-placeholder">ready — click visit</span>';
});
});
function timeString() {
var d = new Date();
var h = d.getHours() % 12 || 12;
var m = String(d.getMinutes()).padStart(2, '0');
var s = String(d.getSeconds()).padStart(2, '0');
var ampm = d.getHours() >= 12 ? 'PM' : 'AM';
return h + ':' + m + ':' + s + ' ' + ampm;
}
function visit() {
if (busy || !mode) return;
busy = true;
visitBtn.disabled = true;
clearTimers();
browserBody.innerHTML = '<span class="w-placeholder">loading\u2026</span>';
dotReq.classList.remove('is-go', 'at-end');
dotRes.classList.remove('is-go', 'at-end');
miniBadge.classList.remove('is-in', 'is-spin');
miniBadge.innerHTML = '';
var t = reduced ? 0 : 40;
timers.push(setTimeout(function () {
dotReq.classList.add('is-go');
timers.push(setTimeout(function () { dotReq.classList.add('at-end'); }, 20));
}, t));
var computeTime = mode === 'dynamic' ? (reduced ? 0 : 900) : (reduced ? 0 : 300);
timers.push(setTimeout(function () {
serverIcon.classList.add('is-busy');
miniBadge.innerHTML = '<svg viewBox="0 0 24 24" fill="none" stroke="currentColor" stroke-width="2" stroke-linecap="round" stroke-linejoin="round">' + (mode === 'dynamic' ? cogIcon : fileIcon) + '</svg>';
miniBadge.classList.add('is-in');
if (mode === 'dynamic') miniBadge.classList.add('is-spin');
}, t + (reduced ? 0 : 500)));
timers.push(setTimeout(function () {
serverIcon.classList.remove('is-busy');
miniBadge.classList.remove('is-in', 'is-spin');
dotReq.classList.remove('is-go', 'at-end');
dotRes.classList.add('is-go');
timers.push(setTimeout(function () { dotRes.classList.add('at-end'); }, 20));
}, t + (reduced ? 0 : 500) + computeTime));
timers.push(setTimeout(function () {
dotRes.classList.remove('is-go', 'at-end');
if (mode === 'static') {
browserBody.innerHTML = '<div class="w-render-html"><h1>Welcome!</h1><p>this page never changes</p></div>';
} else {
browserBody.innerHTML = '<div class="w-render-html"><h1>Welcome!</h1><p>server time: ' + timeString() + '</p></div>';
}
busy = false;
visitBtn.disabled = false;
}, t + (reduced ? 0 : 1100) + computeTime));
}
visitBtn.addEventListener('click', visit);
})();
</script>
</div>Learn how to create a basic web server using Node.js that can accept requests from a browser and send back responses.
👷♂️ Setup
📥 Grab the starter files for this section and open the project folder.
Download the Repo & Open
starterfolder inside :1-node-farm
https://github.com/codevedadev/complete-node-bootcamp📄 Create a new file:
index.js📁 If you already have it ready, skip this step.
📦 Step 1: Import the http Module in index.js File
const http = require('http');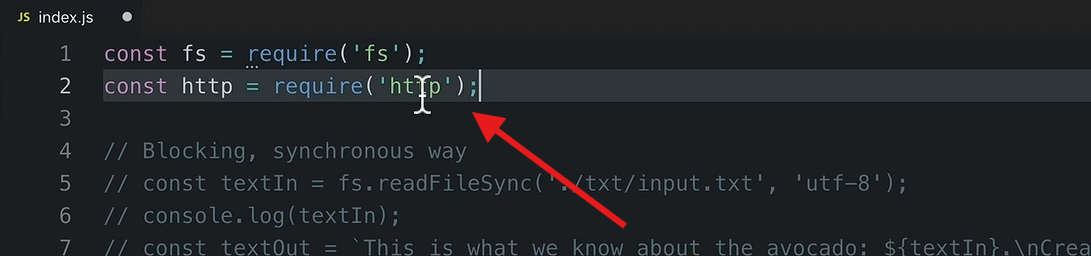
The http module is another built-in Node.js module (just like
fs).It gives Node networking capabilities — specifically, the ability to build a web server.
Tip: It's helpful to comment out any earlier file-reading/writing code at this point, and organize your file with comments like
// FILESand// SERVERto separate sections clearly.
🛠️ Step 2: Building a Server — Two Main Steps
To create a working server in Node.js, you need to:
Create the server.
Start (listen on) the server so it can accept incoming requests.
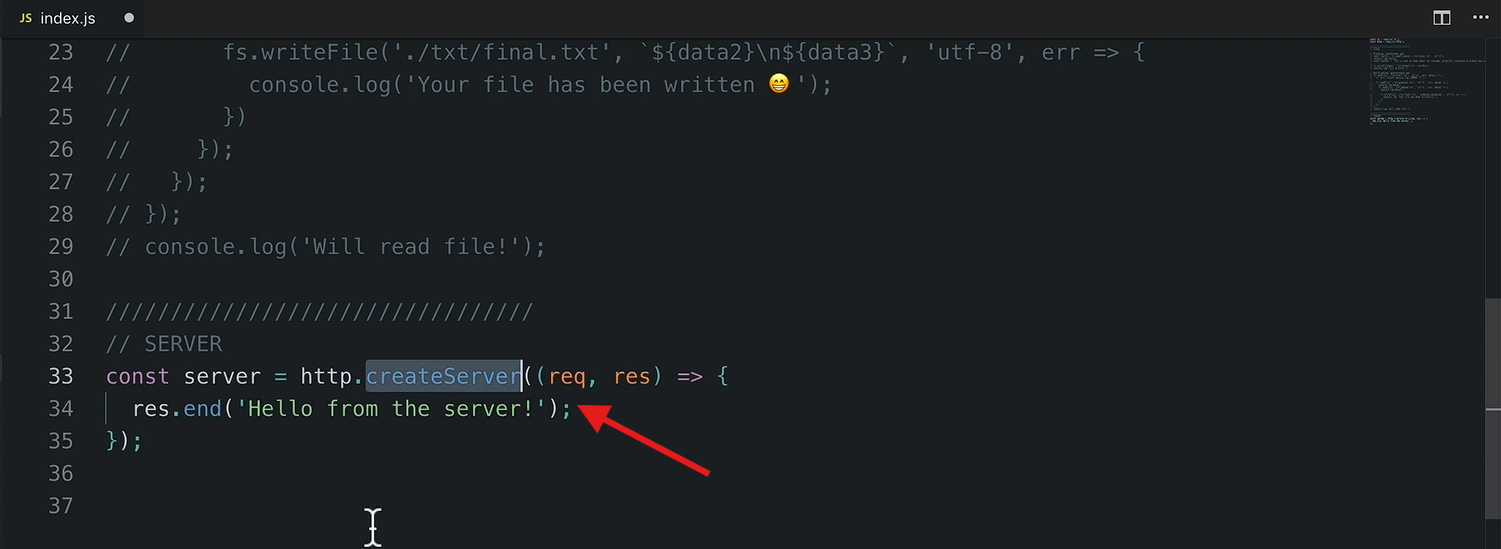
🌐 Creating the Server
const server = http.createServer((req, res) => {
  res.end('Hello from the server!');
});
🔎 Code Breakdown
👷♂️ Building the Server
http.createServer()creates a new server.It accepts a callback function that runs every time a new request hits the server.
This callback receives two important objects:
req(request) — contains information about the incoming request (e.g., the URL requested, headers, etc.)res(response) — provides tools for sending a response back to the client (browser)
🚀 Sending a Response
res.end('Hello from the server!');res.end()is the simplest way to send a plain text response back to whoever made the request.(The reason it's called
.endwill make more sense later — for now, just know it sends and finishes the response.)
Note: Deeper concepts like "requests," "responses," and the client-server model will be explained in a dedicated upcoming lecture on how the web works. For now, the focus is on getting things working practically first, theory later.
🚀 Step 3: Starting the Server (Listening for Requests)
server.listen(8000, '127.0.0.1', () => {
  console.log('Listening to requests on port 8000');
});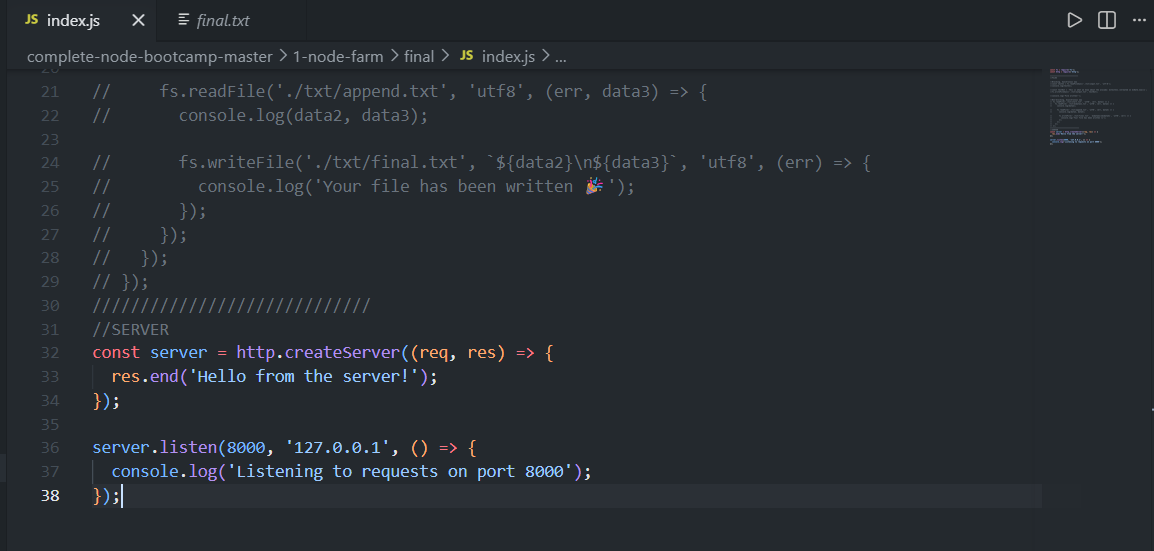
⚙️ Breakdown of .listen()
This method is called on the server variable (the result of createServer) and takes:
🚪 Port number — e.g.,
8000A port is like a sub-address on a specific host/computer.
Common port numbers used in Node development:
8000,3000,80, etc.
🌐 Host (optional)
'127.0.0.1'is the standard IP address for localhost (meaning "this current computer").If not specified, it defaults to
localhostautomatically.
📢 Callback function (optional)
Runs once the server successfully starts listening.
Commonly used to log a confirmation message like:
Listening to requests on port 8000
▶️ Step 4: Running the Server
In the terminal:
node index.js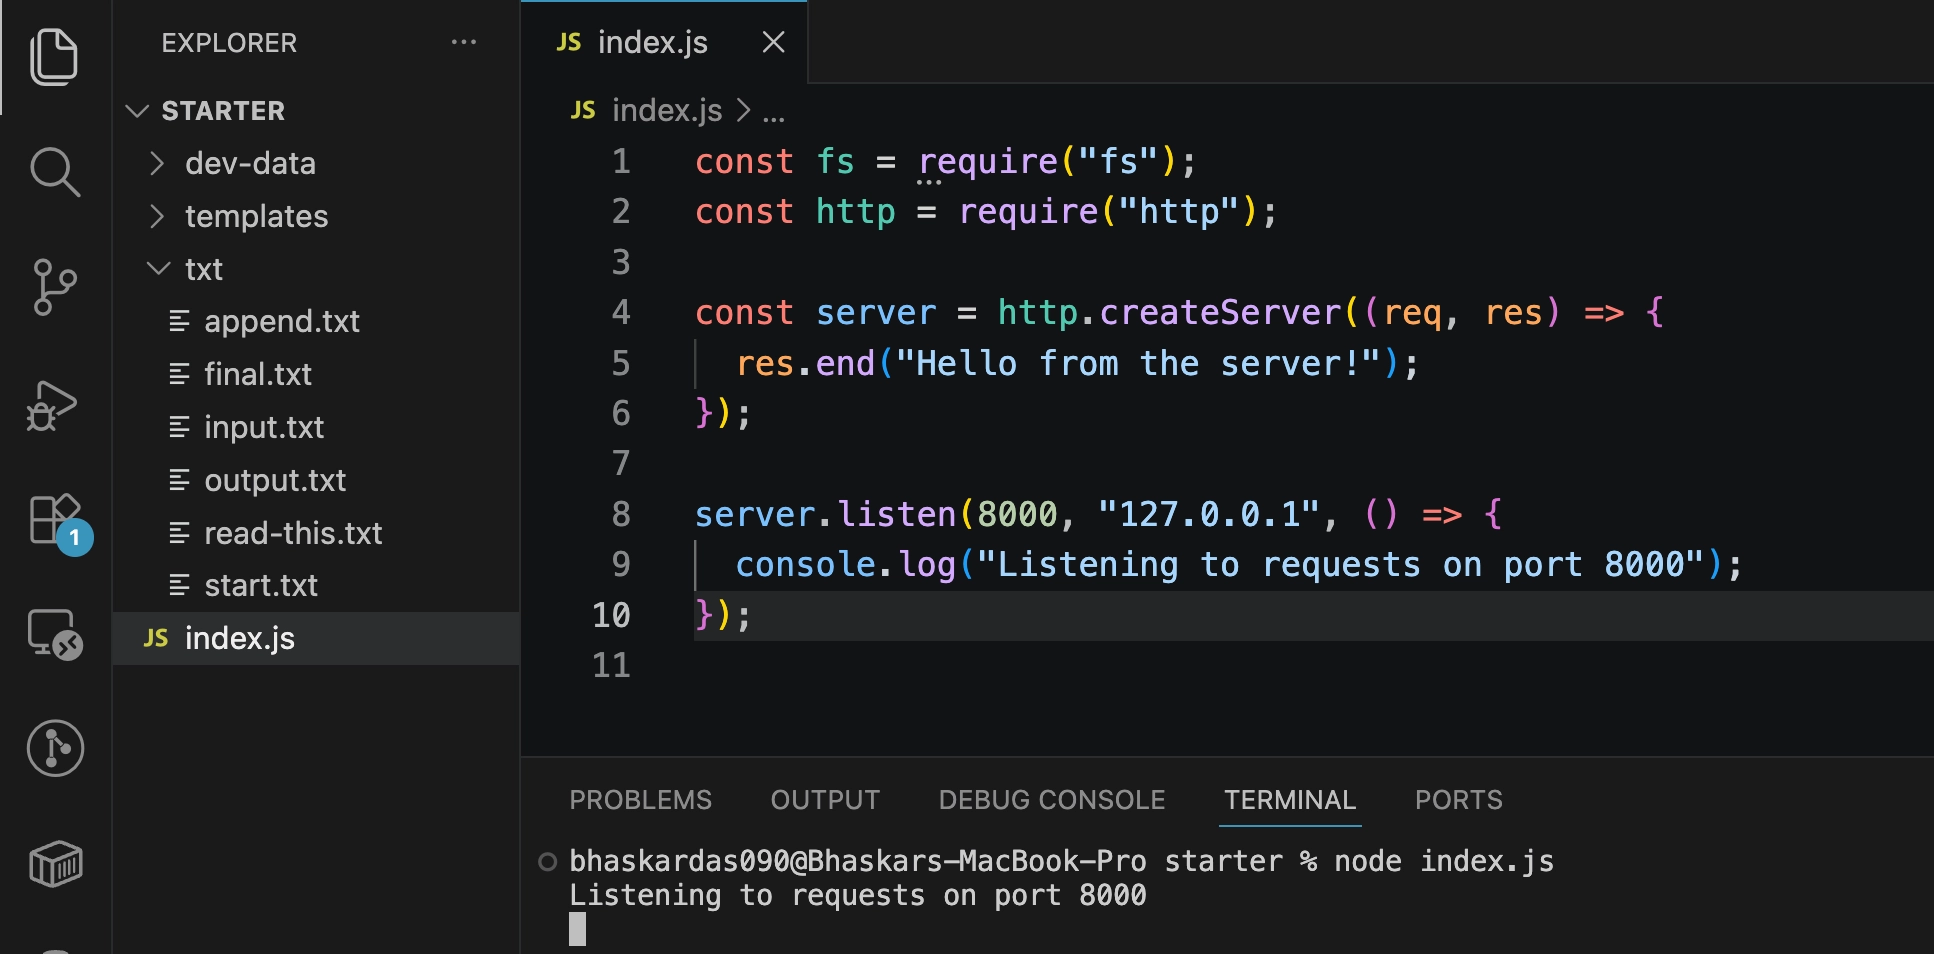
You'll see the log message:
Listening to requests on port 8000Unlike previous scripts, this program does NOT exit automatically — it keeps running.
This is because the server must stay active to keep listening for new requests.
This behavior relates to something called the event loop, which will be explained in more detail later in the course.
🌐 Step 5: Testing the Server in a Browser
Open a browser.
Go to: (host, followed by a colon
:, followed by the port number)localhost:8000 **OR** 127.0.0.1:8000You should see the message:
Hello from the server!
🎉 Congratulations — you now have a real, working web server running on your computer using Node.js!
🛑 Step 6: How to Stop the Server
Unlike the REPL (
Ctrl + D), a running Node script is stopped with:
Ctrl + C(Even on Mac — use Control, not Command.)
This is the standard way to stop any Node script from here on out.
🔍 Step 7: Exploring the Request Object
You can inspect the req (request) object to see what data it contains:
const server = http.createServer((req, res) => {
  console.log(req);
  res.end('Hello from the server!');
});
After making changes to code, remember to:
Stop the server (Ctrl + C)
Restart it (
node index.js)Refresh the browser page to trigger a new request
The
reqobject contains a large amount of data, including:HTTP headers (like
host)Many other properties (too much to display fully in the console)
HTTP headers will be explained in more detail in an upcoming topic.
<div class="infographic-vscodeterm" id="vt">
<style>
.infographic-vscodeterm {
  --ink: #1a1a1a;
  --ink-soft: #5c5c5c;
  --paper: #ffffff;
  --paper-alt: #f0ece4;
  --accent: #2563eb;
  --accent-deep: #1942a8;
  --accent-soft: #e3ebfd;
  --line: #ddd6c9;
  --radius: 8px;
  --display-font: 'Fraunces', Georgia, serif;
  --body-font: 'Inter', system-ui, sans-serif;
  --mono-font: 'IBM Plex Mono', monospace;

  max-width: 880px;
  margin: 0 auto;
  box-sizing: border-box;
  background: transparent;
  color: var(--ink);
  font-family: var(--body-font);
}
.infographic-vscodeterm[data-theme="dark"] {
  --ink: #e8e6e1;
  --ink-soft: #9a968c;
  --paper: #13171f;
  --paper-alt: #1c212b;
  --accent: #5b8def;
  --accent-deep: #8fb4ff;
  --accent-soft: #20293f;
  --line: #2c313d;
}
.infographic-vscodeterm * { box-sizing: border-box; min-width: 0; }

.vt-eyebrow {
  font-family: var(--mono-font); font-size: 0.72rem; letter-spacing: 0.1em;
  text-transform: uppercase; color: var(--accent); margin: 0 0 0.45rem;
  display: flex; align-items: center; justify-content: center; gap: 0.4rem;
}
.vt-eyebrow::before { content: ""; width: 14px; height: 2px; background: var(--accent); display: inline-block; }
.vt-title {
  font-family: var(--display-font); font-size: clamp(1.5rem, 4vw, 2.3rem); text-align: center;
  margin: 0 0 0.5rem; line-height: 1.14; letter-spacing: -0.01em;
}
.vt-sub { color: var(--ink-soft); font-size: 0.95rem; text-align: center; margin: 0 0 1.7rem; }

/* ===== VS Code window — fixed dark theme regardless of page mode ===== */
.vt-window { border-radius: 8px; overflow: hidden; box-shadow: 0 16px 40px -14px rgba(0,0,0,0.45); border: 1px solid #1e1e1e; font-family: var(--mono-font); }
.vt-titlebar { background: #323233; display: flex; align-items: center; padding: 0.5rem 0.8rem; position: relative; }
.vt-dots { display: flex; gap: 0.4rem; }
.vt-dots span { width: 10px; height: 10px; border-radius: 50%; display: block; }
.vt-dots span:nth-child(1) { background: #ff5f56; }
.vt-dots span:nth-child(2) { background: #ffbd2e; }
.vt-dots span:nth-child(3) { background: #27c93f; }
.vt-titlebar-text { position: absolute; left: 50%; transform: translateX(-50%); font-size: 0.72rem; color: #cccccc; }

.vt-body { display: flex; height: 300px; }
.vt-resize-h { width: 5px; cursor: col-resize; background: transparent; flex-shrink: 0; transition: background 0.15s; touch-action: none; }
.vt-resize-h:hover, .vt-resize-h.is-dragging { background: #0078d4; }
.vt-resize-v { height: 5px; cursor: row-resize; background: transparent; flex-shrink: 0; transition: background 0.15s; touch-action: none; }
.vt-resize-v:hover, .vt-resize-v.is-dragging { background: #0078d4; }
.vt-window-resize {
  height: 9px; background: #252526; cursor: row-resize; display: flex; align-items: center;
  justify-content: center; border-top: 1px solid #1e1e1e; touch-action: none;
}
.vt-window-resize span { width: 30px; height: 3px; border-radius: 2px; background: #4a4a52; }
.vt-window-resize:hover span, .vt-window-resize.is-dragging span { background: #0078d4; }
.vt-toggle-btn {
  background: none; border: none; color: #9a9a9a; cursor: pointer; display: flex; align-items: center;
  padding: 0.3rem; border-radius: 3px; flex-shrink: 0;
}
.vt-toggle-btn:hover { background: #2a2d2e; color: #fff; }
.vt-toggle-btn svg { width: 13px; height: 13px; }
.vt-sidebar.is-hidden { width: 0 !important; overflow: hidden; border-right: none; }
.vt-terminal.is-collapsed { height: auto !important; }
.vt-terminal.is-collapsed .vt-term-body { display: none; }
.vt-terminal.is-collapsed .vt-term-toggle svg { transform: rotate(-90deg); }
.vt-activitybar { width: 40px; background: #333333; display: flex; flex-direction: column; align-items: center; padding-top: 0.7rem; gap: 1.1rem; flex-shrink: 0; }
.vt-activitybar svg { width: 18px; height: 18px; opacity: 0.55; }
.vt-activitybar svg.is-on { opacity: 1; }

.vt-sidebar { width: 170px; background: #252526; flex-shrink: 0; overflow-y: auto; border-right: 1px solid #1e1e1e; }
.vt-sidebar-head { font-size: 0.65rem; font-weight: 700; letter-spacing: 0.06em; color: #bbbbbb; padding: 0.6rem 0.8rem 0.3rem; }
.vt-sidebar-root { font-size: 0.74rem; color: #cccccc; padding: 0.2rem 0.7rem; display: flex; align-items: center; gap: 0.3rem; }
.vt-sidebar-folder { font-size: 0.74rem; color: #cccccc; padding: 0.2rem 0.7rem 0.2rem 1.4rem; display: flex; align-items: center; gap: 0.3rem; }
.vt-sidebar-folder.lvl2 { padding-left: 2.6rem; }
.vt-row {
  display: flex; align-items: center; gap: 0.35rem; width: 100%; background: none; border: none;
  color: #cccccc; font: inherit; font-size: 0.74rem; padding: 0.24rem 0.7rem 0.24rem 2.1rem;
  cursor: pointer; text-align: left; border-left: 2px solid transparent;
}
.vt-row.lvl2 { padding-left: 3.4rem; }
.vt-row:hover { background: #2a2d2e; }
.vt-row.is-selected { background: #37373d; border-left-color: #0078d4; }
.vt-badge { width: 15px; height: 15px; border-radius: 3px; flex-shrink: 0; display: flex; align-items: center; justify-content: center; font-size: 0.46rem; font-weight: 700; color: #1a1a1a; background: #29b6f6; }

.vt-main { flex: 1; display: flex; flex-direction: column; min-width: 0; }
.vt-tabbar { display: flex; background: #252526; border-bottom: 1px solid #1e1e1e; overflow-x: auto; }
.vt-tab {
  display: flex; align-items: center; gap: 0.35rem; background: #1e1e1e; color: #808080; font: inherit;
  font-size: 0.72rem; padding: 0.45rem 0.8rem; border: none; border-right: 1px solid #1e1e1e;
  border-top: 2px solid transparent; cursor: pointer; white-space: nowrap;
}
.vt-tab.is-active { color: #d4d4d4; border-top-color: #0078d4; background: #1e1e1e; }
.vt-tab .vt-badge { width: 13px; height: 13px; font-size: 0.42rem; }

.vt-code-wrap { flex: 1; background: #1e1e1e; overflow: auto; padding: 0.85rem 1rem; }
.vt-code-wrap pre { margin: 0; }
.vt-code-wrap code { font-family: var(--mono-font); font-size: 0.72rem; line-height: 1.7; color: #d4d4d8; white-space: pre; }

.tok-kw   { color: #c678dd; }
.tok-tag  { color: #e06c75; }
.tok-type { color: #61afef; }
.tok-attr { color: #d19a66; }
.tok-str  { color: #98c379; }
.tok-expr { color: #56b6c2; }
.tok-punc { color: #6b7280; }
.vt-flash { background: rgba(220,38,38,0.22); }

/* ===== terminal ===== */
.vt-terminal { background: #181818; border-top: 1px solid #2c2c2c; display: flex; flex-direction: column; height: 150px; flex-shrink: 0; }
.vt-term-head { display: flex; align-items: center; gap: 0.4rem; font-size: 0.62rem; letter-spacing: 0.05em; color: #9a9a9a; padding: 0.35rem 0.8rem; border-bottom: 1px solid #262626; text-transform: uppercase; }
.vt-term-body { flex: 1; overflow-y: auto; padding: 0.5rem 0.9rem; font-size: 0.72rem; line-height: 1.65; }
.vt-term-line { color: #d4d4d4; white-space: pre; opacity: 0; transform: translateY(2px); animation: vt-line-in 0.25s ease forwards; }
@keyframes vt-line-in { to { opacity: 1; transform: none; } }
.vt-term-line.is-cmd { color: #7ee787; }
.vt-term-line.is-ok { color: #7ee787; font-weight: 600; }
.vt-term-prompt { color: #7ee787; }
.vt-run-row { display: flex; align-items: center; gap: 0.5rem; margin-top: 0.2rem; }
.vt-run-btn {
  font: inherit; font-size: 0.68rem; font-weight: 600; color: #1a1a1a; background: #7ee787;
  border: none; border-radius: 4px; padding: 0.3rem 0.7rem; cursor: pointer; display: flex; align-items: center; gap: 0.3rem;
}
.vt-run-btn:disabled { opacity: 0.5; cursor: default; }
.vt-run-btn svg { width: 9px; height: 9px; }
.vt-run-hint { color: #6b7280; font-size: 0.68rem; }

@media (max-width: 620px) {
  .vt-sidebar { width: 130px; }
  .vt-body { height: 320px; }
}
@media (max-width: 480px) { .vt-activitybar { display: none; } }

/* ===== browser output ===== */
.vt-output-label {
  font-family: var(--mono-font); font-size: 0.68rem; letter-spacing: 0.1em; text-transform: uppercase;
  color: var(--ink-soft); text-align: center; margin: 1.5rem 0 0.7rem;
}
.vt-browser {
  border: 1px solid var(--line); border-radius: var(--radius); overflow: hidden; max-width: 380px; margin: 0 auto;
  box-shadow: 0 10px 24px -12px rgba(26,26,26,0.18);
  opacity: 0; transform: translateY(8px); transition: opacity 0.4s ease, transform 0.4s ease; pointer-events: none;
}
.vt-browser.is-shown { opacity: 1; transform: none; pointer-events: auto; }
.vt-browser-bar { background: #e9e9e9; padding: 0.5rem 0.7rem; display: flex; align-items: center; gap: 0.5rem; }
.vt-browser-bar .vt-dots span { width: 8px; height: 8px; }
.vt-browser-url { font-family: var(--mono-font); font-size: 0.65rem; color: #555; background: #fff; border-radius: 4px; padding: 0.2rem 0.5rem; flex: 1; }
.vt-browser-page { background: #fff; padding: 1.8rem 1.4rem; text-align: center; }
.vt-browser-page p { font-family: var(--mono-font); font-size: 0.9rem; color: #000; margin: 0; }
.vt-output-placeholder { text-align: center; font-size: 0.82rem; color: var(--ink-soft); }

.vt-takeaway {
  margin-top: 1.7rem; padding: 0.95rem 1.2rem; background: var(--accent-soft); border-left: 3px solid var(--accent);
  border-radius: 4px; font-size: 0.9rem; color: var(--ink); line-height: 1.5; max-width: 620px; margin-left: auto; margin-right: auto;
}
.vt-takeaway b { color: var(--accent-deep); }

@media (prefers-reduced-motion: reduce) {
  .infographic-vscodeterm *, .infographic-vscodeterm *::before, .infographic-vscodeterm *::after {
    transition-duration: 0.001ms !important; animation-duration: 0.001ms !important;
  }
}
</style>

<div class="vt-window">
  <div class="vt-titlebar">
    <div class="vt-dots"><span></span><span></span><span></span></div>
    <div class="vt-titlebar-text">node-server — Visual Studio Code</div>
  </div>
  <div class="vt-body">
    <div class="vt-activitybar">
      <svg class="is-on" viewBox="0 0 24 24" fill="none" aria-hidden="true"><rect x="3" y="4" width="7" height="7" rx="1" stroke="#fff" stroke-width="1.6"/><rect x="14" y="4" width="7" height="7" rx="1" stroke="#fff" stroke-width="1.6"/><rect x="3" y="15" width="7" height="7" rx="1" stroke="#fff" stroke-width="1.6"/><rect x="14" y="15" width="7" height="7" rx="1" stroke="#fff" stroke-width="1.6"/></svg>
      <svg viewBox="0 0 24 24" fill="none" aria-hidden="true"><circle cx="10" cy="10" r="6.5" stroke="#fff" stroke-width="1.6"/><line x1="15" y1="15" x2="20" y2="20" stroke="#fff" stroke-width="1.6" stroke-linecap="round"/></svg>
    </div>

    <div class="vt-sidebar">
      <div class="vt-sidebar-head">EXPLORER</div>
      <div class="vt-sidebar-root">▾ NODE-SERVER</div>
      <button class="vt-row is-selected" data-file="index" type="button"><span class="vt-badge">JS</span><span>index.js</span></button>
    </div>
    <div class="vt-resize-h" id="vtSidebarHandle" title="Drag to resize sidebar"></div>

    <div class="vt-main">
      <div class="vt-tabbar">
        <button class="vt-toggle-btn" id="vtToggleSidebar" type="button" aria-label="Toggle sidebar" title="Toggle sidebar">
          <svg viewBox="0 0 16 16" fill="none" aria-hidden="true"><rect x="1.5" y="2" width="13" height="12" rx="1.5" stroke="currentColor" stroke-width="1.3"/><line x1="6" y1="2" x2="6" y2="14" stroke="currentColor" stroke-width="1.3"/></svg>
        </button>
        <button class="vt-tab is-active" data-file="index" type="button"><span class="vt-badge">JS</span><span>index.js</span></button>
      </div>

      <div class="vt-code-wrap">
        <pre><code id="vtCode"></code></pre>
      </div>

      <div class="vt-resize-v" id="vtTerminalHandle" title="Drag to resize terminal"></div>
      <div class="vt-terminal">
        <div class="vt-term-head">
          <button class="vt-toggle-btn vt-term-toggle" id="vtToggleTerminal" type="button" aria-label="Toggle terminal" title="Toggle terminal">
            <svg viewBox="0 0 16 16" fill="none" aria-hidden="true"><path d="M4 6l4 4 4-4" stroke="currentColor" stroke-width="1.6" stroke-linecap="round" stroke-linejoin="round"/></svg>
          </button>
          <span>Terminal</span>
        </div>
        <div class="vt-term-body">
          <div id="vtTermLines"><div class="vt-term-line" style="animation-delay:0s;"><span class="vt-term-prompt">$</span> </div></div>
          <div class="vt-run-row">
            <button class="vt-run-btn" id="vtRunBtn" type="button">
              <svg viewBox="0 0 12 12" aria-hidden="true"><path d="M2.5 1.5v9l7-4.5z" fill="currentColor"/></svg>
              <span id="vtRunLabel">node index.js</span>
            </button>
            <span class="vt-run-hint" id="vtRunHint">starts the server</span>
          </div>
        </div>
      </div>
    </div>
  </div>
  <div class="vt-window-resize" id="vtWindowHandle" title="Drag to resize window"><span></span></div>
</div>

<div class="vt-output-label">Output</div>
<div id="vtOutputArea">
  <p class="vt-output-placeholder">Run <code style="font-family:var(--mono-font)">node index.js</code> above, then visit the server to see it here.</p>
  <div class="vt-browser" id="vtBrowser">
    <div class="vt-browser-bar">
      <div class="vt-dots"><span></span><span></span><span></span></div>
      <div class="vt-browser-url">127.0.0.1:8000</div>
    </div>
    <div class="vt-browser-page">
      <p>Hello from the server!</p>
    </div>
  </div>
</div>
</div>

<link rel="preconnect" href="https://fonts.googleapis.com">
<link href="https://fonts.googleapis.com/css2?family=Fraunces:wght@500;600&family=Inter:wght@400;500;600;700&family=IBM+Plex+Mono:wght@400;500&display=swap" rel="stylesheet">

<script>
(function () {
  var root = document.getElementById('vt');
  if (!root) return;

  /* --- dark mode detection: body attribute > cookie > postMessage > light --- */
  function applyDark(dark) {
    if (dark) root.setAttribute('data-theme', 'dark');
    else root.removeAttribute('data-theme');
  }
  var bodyAttr = document.body.getAttribute('data-darkmode');
  var dark;
  if (bodyAttr === 'true') dark = true;
  else if (bodyAttr === 'false') dark = false;
  else {
    var match = document.cookie.match(/(?:^|;\s*)darkMode=([^;]+)/);
    dark = match ? match[1] === 'true' : false;
  }
  applyDark(dark);
  window.addEventListener('message', function (e) {
    if (e.data && e.data.type === 'darkMode') applyDark(!!e.data.value);
  });

  /* --- file switching (single file here, kept for template consistency) --- */
  var files = {
    index:
      '<span class="tok-kw">const</span> fs <span class="tok-punc">=</span> require<span class="tok-punc">(</span><span class="tok-str">\'fs\'</span><span class="tok-punc">);</span>\n' +
      '<span class="tok-kw">const</span> http <span class="tok-punc">=</span> require<span class="tok-punc">(</span><span class="tok-str">\'http\'</span><span class="tok-punc">);</span>\n\n' +
      '<span class="tok-punc">////////////////////////////</span>\n' +
      '<span class="tok-punc">//FILES</span>\n\n' +
      '<span class="tok-punc">//Blocking, Synchronous way</span>\n' +
      '<span class="tok-punc">//const textIn = fs.readFileSync(\'./txt/input.txt\', \'utf-8\');</span>\n' +
      '<span class="tok-punc">//console.log(textIn);</span>\n\n' +
      '<span class="tok-punc">//const textOut = `This is what we know about the avocado: ${textIn}.\\nCreated on ${Date.now()}`;</span>\n' +
      '<span class="tok-punc">//fs.writeFileSync(\'./txt/output.txt\', textOut);</span>\n\n' +
      '<span class="tok-punc">//console.log(\'File written!\');</span>\n\n' +
      '<span class="tok-punc">//Non-blocking, Asynchronous way</span>\n' +
      '<span class="tok-punc">// fs.readFile(\'./txt/start.txt\', \'utf8\', (err, data1) => {</span>\n' +
      '<span class="tok-punc">//   fs.readFile(`./txt/${data1}.txt`, \'utf8\', (err, data2) => {</span>\n' +
      '<span class="tok-punc">//     console.log(data2);</span>\n\n' +
      '<span class="tok-punc">//     fs.readFile(\'./txt/append.txt\', \'utf8\', (err, data3) => {</span>\n' +
      '<span class="tok-punc">//       console.log(data2, data3);</span>\n\n' +
      '<span class="tok-punc">//       fs.writeFile(\'./txt/final.txt\', `${data2}\\n${data3}`, \'utf8\', (err) => {</span>\n' +
      '<span class="tok-punc">//         console.log(\'Your file has been written \uD83C\uDF89\');</span>\n' +
      '<span class="tok-punc">//       });</span>\n' +
      '<span class="tok-punc">//     });</span>\n' +
      '<span class="tok-punc">//   });</span>\n' +
      '<span class="tok-punc">// });</span>\n' +
      '<span class="tok-punc">/////////////////////////////</span>\n' +
      '<span class="tok-punc">//SERVER</span>\n' +
      '<span class="tok-kw">const</span> server <span class="tok-punc">=</span> http<span class="tok-punc">.</span><span class="tok-type">createServer</span><span class="tok-punc">((</span>req<span class="tok-punc">,</span> res<span class="tok-punc">) => {</span>\n' +
      '<span class="vt-flash">\tconsole<span class="tok-punc">.</span><span class="tok-type">log</span><span class="tok-punc">(</span>req<span class="tok-punc">);</span></span>\n' +
      '  res<span class="tok-punc">.</span><span class="tok-type">end</span><span class="tok-punc">(</span><span class="tok-str">\'Hello from the server!\'</span><span class="tok-punc">);</span>\n' +
      '<span class="tok-punc">});</span>\n\n' +
      'server<span class="tok-punc">.</span><span class="tok-type">listen</span><span class="tok-punc">(</span><span class="tok-expr">8000</span><span class="tok-punc">,</span> <span class="tok-str">\'127.0.0.1\'</span><span class="tok-punc">, () => {</span>\n' +
      '  console<span class="tok-punc">.</span><span class="tok-type">log</span><span class="tok-punc">(</span><span class="tok-str">\'Listening to requests on port 8000\'</span><span class="tok-punc">);</span>\n' +
      '<span class="tok-punc">});</span>'
  };

  var codeEl = root.querySelector('#vtCode');
  var rows = root.querySelectorAll('.vt-row');
  var tabs = root.querySelectorAll('.vt-tab');

  function selectFile(id) {
    codeEl.innerHTML = files[id];
    rows.forEach(function (r) { r.classList.toggle('is-selected', r.getAttribute('data-file') === id); });
    tabs.forEach(function (t) { t.classList.toggle('is-active', t.getAttribute('data-file') === id); });
  }
  rows.forEach(function (r) { r.addEventListener('click', function () { selectFile(r.getAttribute('data-file')); }); });
  tabs.forEach(function (t) { t.addEventListener('click', function () { selectFile(t.getAttribute('data-file')); }); });
  selectFile('index');

  /* --- terminal run simulation --- */
  var termLines = root.querySelector('#vtTermLines');
  var runBtn = root.querySelector('#vtRunBtn');
  var runLabel = root.querySelector('#vtRunLabel');
  var runHint = root.querySelector('#vtRunHint');
  var browser = root.querySelector('#vtBrowser');
  var placeholder = root.querySelector('.vt-output-placeholder');
  var running = false;

  var lines = [
    { text: '$ node index.js', cls: 'is-cmd', delay: 0 },
    { text: 'Listening to requests on port 8000', cls: 'is-ok', delay: 700 }
  ];

  runBtn.addEventListener('click', function () {
    if (running) return;
    running = true;
    runBtn.disabled = true;
    runLabel.textContent = 'running\u2026';
    browser.classList.remove('is-shown');
    placeholder.style.display = 'block';
    termLines.innerHTML = '';

    lines.forEach(function (line) {
      setTimeout(function () {
        var div = document.createElement('div');
        div.className = 'vt-term-line ' + line.cls;
        div.textContent = line.text;
        termLines.appendChild(div);
      }, line.delay);
    });

    setTimeout(function () {
      placeholder.style.display = 'none';
      browser.classList.add('is-shown');
      runBtn.disabled = false;
      runLabel.textContent = 'node index.js';
      runHint.textContent = 'server running \u2014 rerun anytime';
      running = false;
    }, 1600);
  });

  /* --- resize handles (pointer-capture drag) --- */
  function makeResizable(handle, opts) {
    var dragging = false, startPos = 0, startSize = 0;
    handle.addEventListener('pointerdown', function (e) {
      dragging = true;
      handle.classList.add('is-dragging');
      startPos = opts.axis === 'x' ? e.clientX : e.clientY;
      startSize = opts.target.getBoundingClientRect()[opts.axis === 'x' ? 'width' : 'height'];
      handle.setPointerCapture(e.pointerId);
      e.preventDefault();
    });
    handle.addEventListener('pointermove', function (e) {
      if (!dragging) return;
      var pos = opts.axis === 'x' ? e.clientX : e.clientY;
      var delta = pos - startPos;
      if (opts.invert) delta = -delta;
      var size = Math.min(opts.max, Math.max(opts.min, startSize + delta));
      opts.target.style[opts.prop] = size + 'px';
      if (opts.onResize) opts.onResize(size);
    });
    function stop() { dragging = false; handle.classList.remove('is-dragging'); }
    handle.addEventListener('pointerup', stop);
    handle.addEventListener('pointercancel', stop);
  }

  var sidebar = root.querySelector('.vt-sidebar');
  var sidebarHandle = root.querySelector('#vtSidebarHandle');
  var lastSidebarWidth = sidebar.getBoundingClientRect().width || 170;
  makeResizable(sidebarHandle, {
    axis: 'x', target: sidebar, prop: 'width', min: 100, max: 280, invert: false,
    onResize: function (s) { lastSidebarWidth = s; }
  });

  var terminal = root.querySelector('.vt-terminal');
  var terminalHandle = root.querySelector('#vtTerminalHandle');
  var lastTerminalHeight = terminal.getBoundingClientRect().height || 150;
  makeResizable(terminalHandle, {
    axis: 'y', target: terminal, prop: 'height', min: 60, max: 280, invert: true,
    onResize: function (s) { lastTerminalHeight = s; }
  });

  var vtBody = root.querySelector('.vt-body');
  var windowHandle = root.querySelector('#vtWindowHandle');
  makeResizable(windowHandle, {
    axis: 'y', target: vtBody, prop: 'height', min: 300, max: 600, invert: false
  });

  /* --- show/hide toggles --- */
  var toggleSidebarBtn = root.querySelector('#vtToggleSidebar');
  var sidebarHidden = false;
  toggleSidebarBtn.addEventListener('click', function () {
    sidebarHidden = !sidebarHidden;
    if (sidebarHidden) {
      var w = sidebar.getBoundingClientRect().width;
      if (w > 0) lastSidebarWidth = w;
      sidebar.classList.add('is-hidden');
      sidebarHandle.style.display = 'none';
    } else {
      sidebar.classList.remove('is-hidden');
      sidebar.style.width = lastSidebarWidth + 'px';
      sidebarHandle.style.display = '';
    }
  });

  var toggleTerminalBtn = root.querySelector('#vtToggleTerminal');
  var terminalCollapsed = false;
  toggleTerminalBtn.addEventListener('click', function () {
    terminalCollapsed = !terminalCollapsed;
    if (terminalCollapsed) {
      var h = terminal.getBoundingClientRect().height;
      if (h > 30) lastTerminalHeight = h;
      terminal.classList.add('is-collapsed');
      terminalHandle.style.display = 'none';
    } else {
      terminal.classList.remove('is-collapsed');
      terminal.style.height = lastTerminalHeight + 'px';
      terminalHandle.style.display = '';
    }
  });
})();
</script>
🔄 Recap: What Just Happened
🏗️ We created a server using
http.createServer(), passing in a callback that runs on every incoming request.🚀 We started the server using
server.listen(), specifying the port and host (localhost).🌐 When we visited
localhost:8000in the browser, it triggered a request.⚡ Internally, Node fired an event, which triggered our callback function.
📤 The callback sent back the response:
"Hello from the server!"