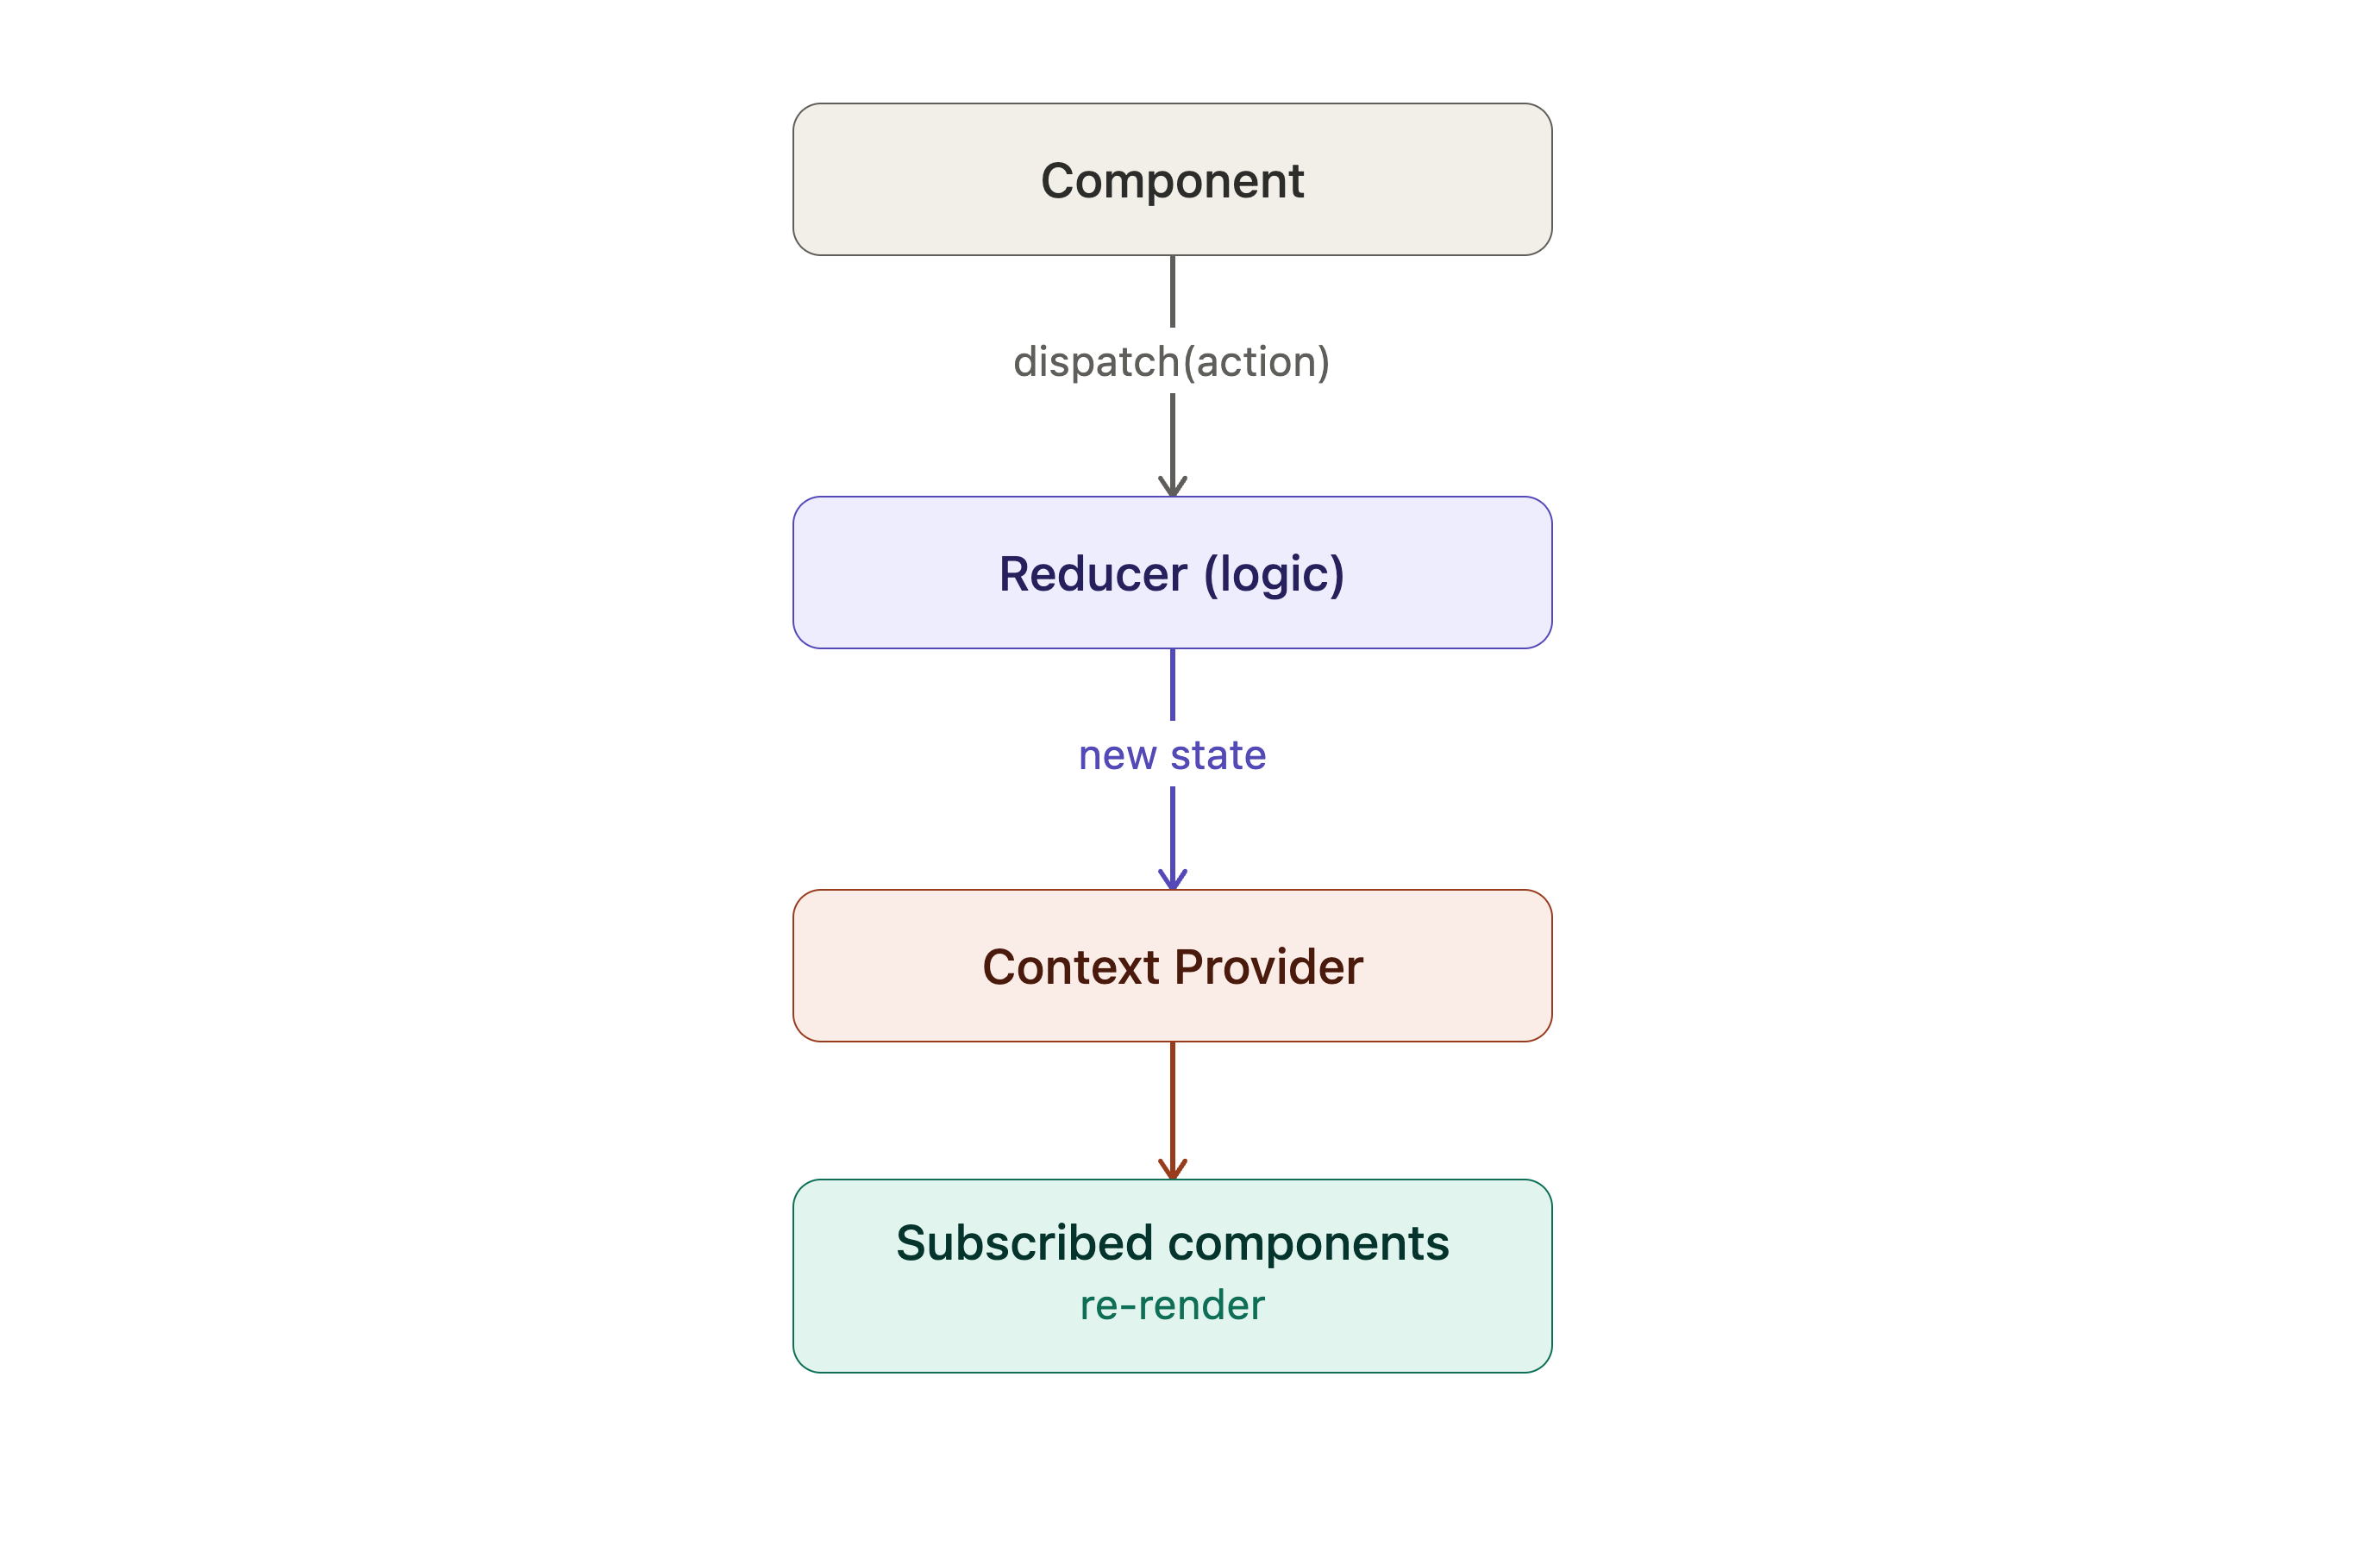
Combining useReducer with the Context API is the standard way to handle complex global state in React without external libraries. It mimics the Redux pattern (Actions -> Reducer → Store) while staying entirely within the React ecosystem.
🧠 Why Combine Them?
Context → global access
Reducer → predictable updates
Clean separation of logic
Perfect for:
Auth
Theme
Cart
User preferences
🧠 The Architecture
In this pattern, the state logic is separated from the UI:
Reducer: A pure function that determines how the state changes based on an action.
Context: A "tunnel" that allows state and dispatch functions to bypass "prop drilling."
Provider: A component that wraps your app and holds the
useReducerhook.
🧐 What Are We Building?
In this step, we’ll create a global authentication state using:
useReducer→ to control how auth state changesContext API → to share auth state across the app
This pattern is commonly used for:
Login / Logout
User session handling
Role-based access
✅ Step-by-Step Implementation
👉 Step 1: Create the Auth Context
Before sharing any global state, we need a Context object.
This context will later hold:
The auth state
The dispatch function
Think of this as a container that other components can subscribe to.
📁 AuthContext.js
import { createContext } from 'react';

export const AuthContext = createContext();
📍At this point:
We are not providing any value
We are just creating the context reference
👉 Step 2: Create the Reducer and Initial State
The reducer defines:
What the auth state looks like
How the state changes in response to actions
Keeping reducer logic in a separate file:
Improves readability
Makes the logic reusable and testable
📁 authReducer.js
export const initialAuthState = {
  user: null,
  isAuthenticated: false,
};

export function authReducer(state, action) {
  switch (action.type) {
    case 'LOGIN':
      return {
        user: action.payload,
        isAuthenticated: true,
      };

    case 'LOGOUT':
      return initialAuthState;

    default:
      return state;
  }
}
👉 Step 3: Create the Context Provider (Core Step)
This is the heart of the implementation.
Here we:
Initialize
useReducerStore
stateanddispatchPass them through
Context.ProviderWrap the app so all children can access auth data
📁 AuthProvider.jsx
import { useReducer } from 'react';
import { AuthContext } from './AuthContext';
import { authReducer, initialAuthState } from './authReducer';

export default function AuthProvider({ children }) {
  const [state, dispatch] = useReducer(authReducer, initialAuthState);

  return (
    <AuthContext.Provider value={{ state, dispatch }}>
      {children}
    </AuthContext.Provider>
  );
}
📌 What’s happening here?
useReducercontrols how state updatesAuthContext.Providercontrols who can access itchildrenensures all nested components get access
👉 Step 4: Wrap the App with the Provider
Context only works for components inside the Provider tree.
Wrapping App ensures:
Every screen can access auth state
No prop drilling needed
📁 App.jsx
import AuthProvider from './AuthProvider';
import Dashboard from './Dashboard';

export default function App() {
  return (
    <AuthProvider>
      <Dashboard />
    </AuthProvider>
  );
}
👉 Step 5: Consume State & Dispatch in Components
Now we use what we built:
Read auth state
Trigger login/logout using
dispatch
This is where business logic meets UI.
📁 Dashboard.jsx
import { useContext } from 'react';
import { AuthContext } from './AuthContext';

export default function Dashboard() {
  const { state, dispatch } = useContext(AuthContext);

  return (
    <>
      {state.isAuthenticated ? (
        <>
          <h2>Welcome, {state.user.name}</h2>
          <button onClick={() => dispatch({ type: 'LOGOUT' })}>
            Logout
          </button>
        </>
      ) : (
        <button
          onClick={() =>
            dispatch({
              type: 'LOGIN',
              payload: { name: 'Bhaskar' },
            })
          }
        >
          Login
        </button>
      )}
    </>
  );
}
📌 What this proves:
Any component can access global state
UI reacts automatically to state changes
Actions drive predictable updates
<div class="infographic-vscodeterm" id="vt">
<style>
.infographic-vscodeterm {
--ink: #1a1a1a;
--ink-soft: #5c5c5c;
--paper: #ffffff;
--paper-alt: #f0ece4;
--accent: #2563eb;
--accent-deep: #1942a8;
--accent-soft: #e3ebfd;
--line: #ddd6c9;
--radius: 8px;
--display-font: 'Fraunces', Georgia, serif;
--body-font: 'Inter', system-ui, sans-serif;
--mono-font: 'IBM Plex Mono', monospace;
max-width: 900px;
margin: 0 auto;
box-sizing: border-box;
background: transparent;
color: var(--ink);
font-family: var(--body-font);
}
.infographic-vscodeterm[data-theme="dark"] {
--ink: #e8e6e1;
--ink-soft: #9a968c;
--paper: #13171f;
--paper-alt: #1c212b;
--accent: #5b8def;
--accent-deep: #8fb4ff;
--accent-soft: #20293f;
--line: #2c313d;
}
.infographic-vscodeterm * { box-sizing: border-box; min-width: 0; }
.vt-eyebrow {
font-family: var(--mono-font); font-size: 0.72rem; letter-spacing: 0.1em;
text-transform: uppercase; color: var(--accent); margin: 0 0 0.45rem;
display: flex; align-items: center; justify-content: center; gap: 0.4rem;
}
.vt-eyebrow::before { content: ""; width: 14px; height: 2px; background: var(--accent); display: inline-block; }
.vt-title {
font-family: var(--display-font); font-size: clamp(1.5rem, 4vw, 2.3rem); text-align: center;
margin: 0 0 0.5rem; line-height: 1.14; letter-spacing: -0.01em;
}
.vt-sub { color: var(--ink-soft); font-size: 0.95rem; text-align: center; margin: 0 0 1.7rem; }
/* ===== VS Code window — fixed dark theme regardless of page mode ===== */
.vt-window { border-radius: 8px; overflow: hidden; box-shadow: 0 16px 40px -14px rgba(0,0,0,0.45); border: 1px solid #1e1e1e; font-family: var(--mono-font); }
.vt-titlebar { background: #323233; display: flex; align-items: center; padding: 0.5rem 0.8rem; position: relative; }
.vt-dots { display: flex; gap: 0.4rem; }
.vt-dots span { width: 10px; height: 10px; border-radius: 50%; display: block; }
.vt-dots span:nth-child(1) { background: #ff5f56; }
.vt-dots span:nth-child(2) { background: #ffbd2e; }
.vt-dots span:nth-child(3) { background: #27c93f; }
.vt-titlebar-text { position: absolute; left: 50%; transform: translateX(-50%); font-size: 0.72rem; color: #cccccc; }
.vt-body { display: flex; height: 320px; }
.vt-resize-h { width: 5px; cursor: col-resize; background: transparent; flex-shrink: 0; transition: background 0.15s; touch-action: none; }
.vt-resize-h:hover, .vt-resize-h.is-dragging { background: #0078d4; }
.vt-resize-v { height: 5px; cursor: row-resize; background: transparent; flex-shrink: 0; transition: background 0.15s; touch-action: none; }
.vt-resize-v:hover, .vt-resize-v.is-dragging { background: #0078d4; }
.vt-window-resize {
height: 9px; background: #252526; cursor: row-resize; display: flex; align-items: center;
justify-content: center; border-top: 1px solid #1e1e1e; touch-action: none;
}
.vt-window-resize span { width: 30px; height: 3px; border-radius: 2px; background: #4a4a52; }
.vt-window-resize:hover span, .vt-window-resize.is-dragging span { background: #0078d4; }
.vt-toggle-btn {
background: none; border: none; color: #9a9a9a; cursor: pointer; display: flex; align-items: center;
padding: 0.3rem; border-radius: 3px; flex-shrink: 0;
}
.vt-toggle-btn:hover { background: #2a2d2e; color: #fff; }
.vt-toggle-btn svg { width: 13px; height: 13px; }
.vt-sidebar.is-hidden { width: 0 !important; overflow: hidden; border-right: none; }
.vt-terminal.is-collapsed { height: auto !important; }
.vt-terminal.is-collapsed .vt-term-body { display: none; }
.vt-terminal.is-collapsed .vt-term-toggle svg { transform: rotate(-90deg); }
.vt-activitybar { width: 40px; background: #333333; display: flex; flex-direction: column; align-items: center; padding-top: 0.7rem; gap: 1.1rem; flex-shrink: 0; }
.vt-activitybar svg { width: 18px; height: 18px; opacity: 0.55; }
.vt-activitybar svg.is-on { opacity: 1; }
.vt-sidebar { width: 175px; background: #252526; flex-shrink: 0; overflow-y: auto; border-right: 1px solid #1e1e1e; }
.vt-sidebar-head { font-size: 0.65rem; font-weight: 700; letter-spacing: 0.06em; color: #bbbbbb; padding: 0.6rem 0.8rem 0.3rem; }
.vt-sidebar-root { font-size: 0.74rem; color: #cccccc; padding: 0.2rem 0.7rem; display: flex; align-items: center; gap: 0.3rem; }
.vt-sidebar-folder { font-size: 0.74rem; color: #cccccc; padding: 0.2rem 0.7rem 0.2rem 1.4rem; display: flex; align-items: center; gap: 0.3rem; }
.vt-row {
display: flex; align-items: center; gap: 0.35rem; width: 100%; background: none; border: none;
color: #cccccc; font: inherit; font-size: 0.73rem; padding: 0.24rem 0.7rem 0.24rem 2.1rem;
cursor: pointer; text-align: left; border-left: 2px solid transparent;
}
.vt-row:hover { background: #2a2d2e; }
.vt-row.is-selected { background: #37373d; border-left-color: #0078d4; }
.vt-badge { width: 15px; height: 15px; border-radius: 3px; flex-shrink: 0; display: flex; align-items: center; justify-content: center; font-size: 0.46rem; font-weight: 700; color: #1a1a1a; background: #29b6f6; }
.vt-main { flex: 1; display: flex; flex-direction: column; min-width: 0; }
.vt-tabbar { display: flex; background: #252526; border-bottom: 1px solid #1e1e1e; overflow-x: auto; }
.vt-tab {
display: flex; align-items: center; gap: 0.35rem; background: #1e1e1e; color: #808080; font: inherit;
font-size: 0.71rem; padding: 0.45rem 0.7rem; border: none; border-right: 1px solid #1e1e1e;
border-top: 2px solid transparent; cursor: pointer; white-space: nowrap;
}
.vt-tab.is-active { color: #d4d4d4; border-top-color: #0078d4; background: #1e1e1e; }
.vt-tab .vt-badge { width: 13px; height: 13px; font-size: 0.42rem; }
.vt-code-wrap { flex: 1; background: #1e1e1e; overflow: auto; padding: 0.85rem 1rem; }
.vt-code-wrap pre { margin: 0; }
.vt-code-wrap code { font-family: var(--mono-font); font-size: 0.71rem; line-height: 1.68; color: #d4d4d8; white-space: pre; }
.tok-kw { color: #c678dd; }
.tok-tag { color: #e06c75; }
.tok-type { color: #61afef; }
.tok-attr { color: #d19a66; }
.tok-str { color: #98c379; }
.tok-punc { color: #6b7280; }
.tok-comment { color: #7f848e; font-style: italic; }
/* ===== terminal ===== */
.vt-terminal { background: #181818; border-top: 1px solid #2c2c2c; display: flex; flex-direction: column; height: 150px; flex-shrink: 0; }
.vt-term-head { display: flex; align-items: center; gap: 0.4rem; font-size: 0.62rem; letter-spacing: 0.05em; color: #9a9a9a; padding: 0.35rem 0.8rem; border-bottom: 1px solid #262626; text-transform: uppercase; }
.vt-term-body { flex: 1; overflow-y: auto; padding: 0.5rem 0.9rem; font-size: 0.72rem; line-height: 1.65; }
.vt-term-line { color: #d4d4d4; white-space: pre; opacity: 0; transform: translateY(2px); animation: vt-line-in 0.25s ease forwards; }
@keyframes vt-line-in { to { opacity: 1; transform: none; } }
.vt-term-line.is-cmd { color: #7ee787; }
.vt-term-line.is-ok { color: #7ee787; font-weight: 600; }
.vt-term-prompt { color: #7ee787; }
.vt-run-row { display: flex; align-items: center; gap: 0.5rem; margin-top: 0.2rem; }
.vt-run-btn {
font: inherit; font-size: 0.68rem; font-weight: 600; color: #1a1a1a; background: #7ee787;
border: none; border-radius: 4px; padding: 0.3rem 0.7rem; cursor: pointer; display: flex; align-items: center; gap: 0.3rem;
}
.vt-run-btn:disabled { opacity: 0.5; cursor: default; }
.vt-run-btn svg { width: 9px; height: 9px; }
.vt-run-hint { color: #6b7280; font-size: 0.68rem; }
@media (max-width: 620px) {
.vt-sidebar { width: 140px; }
.vt-body { height: 340px; }
}
@media (max-width: 480px) { .vt-activitybar { display: none; } }
/* ===== browser output ===== */
.vt-output-label {
font-family: var(--mono-font); font-size: 0.68rem; letter-spacing: 0.1em; text-transform: uppercase;
color: var(--ink-soft); text-align: center; margin: 1.5rem 0 0.7rem;
}
.vt-browser {
border: 1px solid var(--line); border-radius: var(--radius); overflow: hidden; max-width: 380px; margin: 0 auto;
box-shadow: 0 10px 24px -12px rgba(26,26,26,0.18);
opacity: 0; transform: translateY(8px); transition: opacity 0.4s ease, transform 0.4s ease; pointer-events: none;
}
.vt-browser.is-shown { opacity: 1; transform: none; pointer-events: auto; }
.vt-browser-bar { background: #e9e9e9; padding: 0.5rem 0.7rem; display: flex; align-items: center; gap: 0.5rem; }
.vt-browser-bar .vt-dots span { width: 8px; height: 8px; }
.vt-browser-url { font-family: var(--mono-font); font-size: 0.65rem; color: #555; background: #fff; border-radius: 4px; padding: 0.2rem 0.5rem; flex: 1; }
.vt-output-placeholder { text-align: center; font-size: 0.82rem; color: var(--ink-soft); }
.vt-dash-page { padding: 2rem 1.5rem; text-align: center; background: #fff; }
.vt-dash-page h2 { font-size: 1.05rem; margin: 0 0 1rem; color: #000; }
.vt-dash-btn {
font-family: var(--body-font); font-size: 0.85rem; font-weight: 600; color: #fff; background: var(--accent);
border: none; border-radius: 100px; padding: 0.55rem 1.2rem; cursor: pointer; transition: transform 0.15s;
}
.vt-dash-btn:hover { transform: translateY(-1px); }
.vt-dash-btn.btn-logout { background: #dc2626; }
.vt-takeaway {
margin-top: 1.7rem; padding: 0.95rem 1.2rem; background: var(--accent-soft); border-left: 3px solid var(--accent);
border-radius: 4px; font-size: 0.9rem; color: var(--ink); line-height: 1.5; max-width: 660px; margin-left: auto; margin-right: auto;
}
.vt-takeaway b { color: var(--accent-deep); }
.vt-takeaway code { font-family: var(--mono-font); }
@media (prefers-reduced-motion: reduce) {
.infographic-vscodeterm *, .infographic-vscodeterm *::before, .infographic-vscodeterm *::after {
transition-duration: 0.001ms !important; animation-duration: 0.001ms !important;
}
}
</style>
<div class="vt-eyebrow">Context + useReducer</div>
<h1 class="vt-title">Global Auth State, Five Small Files</h1>
<p class="vt-sub">Run the dev server, then log in and out — Dashboard is the only file that touches the DOM.</p>
<div class="vt-window">
<div class="vt-titlebar">
<div class="vt-dots"><span></span><span></span><span></span></div>
<div class="vt-titlebar-text">auth-reducer-demo — Visual Studio Code</div>
</div>
<div class="vt-body">
<div class="vt-activitybar">
<svg class="is-on" viewBox="0 0 24 24" fill="none" aria-hidden="true"><rect x="3" y="4" width="7" height="7" rx="1" stroke="#fff" stroke-width="1.6"/><rect x="14" y="4" width="7" height="7" rx="1" stroke="#fff" stroke-width="1.6"/><rect x="3" y="15" width="7" height="7" rx="1" stroke="#fff" stroke-width="1.6"/><rect x="14" y="15" width="7" height="7" rx="1" stroke="#fff" stroke-width="1.6"/></svg>
<svg viewBox="0 0 24 24" fill="none" aria-hidden="true"><circle cx="10" cy="10" r="6.5" stroke="#fff" stroke-width="1.6"/><line x1="15" y1="15" x2="20" y2="20" stroke="#fff" stroke-width="1.6" stroke-linecap="round"/></svg>
</div>
<div class="vt-sidebar">
<div class="vt-sidebar-head">EXPLORER</div>
<div class="vt-sidebar-root">▾ AUTH-REDUCER-DEMO</div>
<div class="vt-sidebar-folder">▾ src</div>
<button class="vt-row" data-file="authcontext" type="button"><span class="vt-badge">JS</span><span>AuthContext.js</span></button>
<button class="vt-row" data-file="authreducer" type="button"><span class="vt-badge">JS</span><span>authReducer.js</span></button>
<button class="vt-row" data-file="authprovider" type="button"><span class="vt-badge">JS</span><span>AuthProvider.jsx</span></button>
<button class="vt-row" data-file="app" type="button"><span class="vt-badge">JS</span><span>App.jsx</span></button>
<button class="vt-row is-selected" data-file="dashboard" type="button"><span class="vt-badge">JS</span><span>Dashboard.jsx</span></button>
</div>
<div class="vt-resize-h" id="vtSidebarHandle" title="Drag to resize sidebar"></div>
<div class="vt-main">
<div class="vt-tabbar">
<button class="vt-toggle-btn" id="vtToggleSidebar" type="button" aria-label="Toggle sidebar" title="Toggle sidebar">
<svg viewBox="0 0 16 16" fill="none" aria-hidden="true"><rect x="1.5" y="2" width="13" height="12" rx="1.5" stroke="currentColor" stroke-width="1.3"/><line x1="6" y1="2" x2="6" y2="14" stroke="currentColor" stroke-width="1.3"/></svg>
</button>
<button class="vt-tab" data-file="authcontext" type="button"><span class="vt-badge">JS</span><span>AuthContext.js</span></button>
<button class="vt-tab" data-file="authreducer" type="button"><span class="vt-badge">JS</span><span>authReducer.js</span></button>
<button class="vt-tab" data-file="authprovider" type="button"><span class="vt-badge">JS</span><span>AuthProvider.jsx</span></button>
<button class="vt-tab" data-file="app" type="button"><span class="vt-badge">JS</span><span>App.jsx</span></button>
<button class="vt-tab is-active" data-file="dashboard" type="button"><span class="vt-badge">JS</span><span>Dashboard.jsx</span></button>
</div>
<div class="vt-code-wrap">
<pre><code id="vtCode"></code></pre>
</div>
<div class="vt-resize-v" id="vtTerminalHandle" title="Drag to resize terminal"></div>
<div class="vt-terminal">
<div class="vt-term-head">
<button class="vt-toggle-btn vt-term-toggle" id="vtToggleTerminal" type="button" aria-label="Toggle terminal" title="Toggle terminal">
<svg viewBox="0 0 16 16" fill="none" aria-hidden="true"><path d="M4 6l4 4 4-4" stroke="currentColor" stroke-width="1.6" stroke-linecap="round" stroke-linejoin="round"/></svg>
</button>
<span>Terminal</span>
</div>
<div class="vt-term-body">
<div id="vtTermLines"><div class="vt-term-line" style="animation-delay:0s;"><span class="vt-term-prompt">$</span> </div></div>
<div class="vt-run-row">
<button class="vt-run-btn" id="vtRunBtn" type="button">
<svg viewBox="0 0 12 12" aria-hidden="true"><path d="M2.5 1.5v9l7-4.5z" fill="currentColor"/></svg>
<span id="vtRunLabel">npm start</span>
</button>
<span class="vt-run-hint" id="vtRunHint">runs the dev server</span>
</div>
</div>
</div>
</div>
</div>
<div class="vt-window-resize" id="vtWindowHandle" title="Drag to resize window"><span></span></div>
</div>
<div class="vt-output-label">Output</div>
<div id="vtOutputArea">
<p class="vt-output-placeholder">Run <code style="font-family:var(--mono-font)">npm start</code> above to see it here.</p>
<div class="vt-browser" id="vtBrowser">
<div class="vt-browser-bar">
<div class="vt-dots"><span></span><span></span><span></span></div>
<div class="vt-browser-url">localhost:3000</div>
</div>
<div class="vt-dash-page" id="vtDashBody"></div>
</div>
</div>
</div>
<link rel="preconnect" href="https://fonts.googleapis.com">
<link href="https://fonts.googleapis.com/css2?family=Fraunces:wght@500;600&family=Inter:wght@400;500;600;700&family=IBM+Plex+Mono:wght@400;500&display=swap" rel="stylesheet">
<script>
(function () {
var root = document.getElementById('vt');
if (!root) return;
/* --- dark mode detection: body attribute > cookie > postMessage > light --- */
function applyDark(dark) {
if (dark) root.setAttribute('data-theme', 'dark');
else root.removeAttribute('data-theme');
}
var bodyAttr = document.body.getAttribute('data-darkmode');
var dark;
if (bodyAttr === 'true') dark = true;
else if (bodyAttr === 'false') dark = false;
else {
var match = document.cookie.match(/(?:^|;\s*)darkMode=([^;]+)/);
dark = match ? match[1] === 'true' : false;
}
applyDark(dark);
window.addEventListener('message', function (e) {
if (e.data && e.data.type === 'darkMode') applyDark(!!e.data.value);
});
/* --- file switching --- */
var files = {
authcontext:
'<span class="tok-kw">import</span> <span class="tok-punc">{</span> createContext <span class="tok-punc">}</span> <span class="tok-kw">from</span> <span class="tok-str">\'react\'</span><span class="tok-punc">;</span>\n\n' +
'<span class="tok-kw">export</span> <span class="tok-kw">const</span> <span class="tok-type">AuthContext</span> <span class="tok-punc">=</span> createContext<span class="tok-punc">();</span>',
authreducer:
'<span class="tok-kw">export</span> <span class="tok-kw">const</span> initialAuthState <span class="tok-punc">=</span> <span class="tok-punc">{</span>\n' +
' <span class="tok-attr">user</span><span class="tok-punc">:</span> <span class="tok-kw">null</span><span class="tok-punc">,</span>\n' +
' <span class="tok-attr">isAuthenticated</span><span class="tok-punc">:</span> <span class="tok-kw">false</span><span class="tok-punc">,</span>\n' +
'<span class="tok-punc">};</span>\n\n' +
'<span class="tok-kw">export</span> <span class="tok-kw">function</span> authReducer<span class="tok-punc">(</span>state<span class="tok-punc">,</span> action<span class="tok-punc">) {</span>\n' +
' <span class="tok-kw">switch</span> <span class="tok-punc">(</span>action.type<span class="tok-punc">) {</span>\n' +
' <span class="tok-kw">case</span> <span class="tok-str">\'LOGIN\'</span><span class="tok-punc">:</span>\n' +
' <span class="tok-kw">return</span> <span class="tok-punc">{</span>\n' +
' <span class="tok-attr">user</span><span class="tok-punc">:</span> action.payload<span class="tok-punc">,</span>\n' +
' <span class="tok-attr">isAuthenticated</span><span class="tok-punc">:</span> <span class="tok-kw">true</span><span class="tok-punc">,</span>\n' +
' <span class="tok-punc">};</span>\n\n' +
' <span class="tok-kw">case</span> <span class="tok-str">\'LOGOUT\'</span><span class="tok-punc">:</span>\n' +
' <span class="tok-kw">return</span> initialAuthState<span class="tok-punc">;</span>\n\n' +
' <span class="tok-kw">default</span><span class="tok-punc">:</span>\n' +
' <span class="tok-kw">return</span> state<span class="tok-punc">;</span>\n' +
' <span class="tok-punc">}</span>\n' +
'<span class="tok-punc">}</span>',
authprovider:
'<span class="tok-kw">import</span> <span class="tok-punc">{</span> useReducer <span class="tok-punc">}</span> <span class="tok-kw">from</span> <span class="tok-str">\'react\'</span><span class="tok-punc">;</span>\n' +
'<span class="tok-kw">import</span> <span class="tok-punc">{</span> <span class="tok-type">AuthContext</span> <span class="tok-punc">}</span> <span class="tok-kw">from</span> <span class="tok-str">\'./AuthContext\'</span><span class="tok-punc">;</span>\n' +
'<span class="tok-kw">import</span> <span class="tok-punc">{</span> authReducer<span class="tok-punc">,</span> initialAuthState <span class="tok-punc">}</span> <span class="tok-kw">from</span> <span class="tok-str">\'./authReducer\'</span><span class="tok-punc">;</span>\n\n' +
'<span class="tok-kw">export</span> <span class="tok-kw">default</span> <span class="tok-kw">function</span> <span class="tok-type">AuthProvider</span><span class="tok-punc">({</span> children <span class="tok-punc">}) {</span>\n' +
' <span class="tok-kw">const</span> <span class="tok-punc">[</span>state<span class="tok-punc">,</span> dispatch<span class="tok-punc">]</span> <span class="tok-punc">=</span> useReducer<span class="tok-punc">(</span>authReducer<span class="tok-punc">,</span> initialAuthState<span class="tok-punc">);</span>\n\n' +
' <span class="tok-kw">return</span> <span class="tok-punc">(</span>\n' +
' <span class="tok-punc"><</span><span class="tok-type">AuthContext</span><span class="tok-punc">.</span><span class="tok-tag">Provider</span> <span class="tok-attr">value</span><span class="tok-punc">={{</span> state<span class="tok-punc">,</span> dispatch <span class="tok-punc">}}></span>\n' +
' <span class="tok-punc">{</span>children<span class="tok-punc">}</span>\n' +
' <span class="tok-punc"></</span><span class="tok-type">AuthContext</span><span class="tok-punc">.</span><span class="tok-tag">Provider</span><span class="tok-punc">></span>\n' +
' <span class="tok-punc">);</span>\n' +
'<span class="tok-punc">}</span>',
app:
'<span class="tok-kw">import</span> <span class="tok-type">AuthProvider</span> <span class="tok-kw">from</span> <span class="tok-str">\'./AuthProvider\'</span><span class="tok-punc">;</span>\n' +
'<span class="tok-kw">import</span> <span class="tok-type">Dashboard</span> <span class="tok-kw">from</span> <span class="tok-str">\'./Dashboard\'</span><span class="tok-punc">;</span>\n\n' +
'<span class="tok-kw">export</span> <span class="tok-kw">default</span> <span class="tok-kw">function</span> <span class="tok-type">App</span><span class="tok-punc">() {</span>\n' +
' <span class="tok-kw">return</span> <span class="tok-punc">(</span>\n' +
' <span class="tok-punc"><</span><span class="tok-type">AuthProvider</span><span class="tok-punc">></span>\n' +
' <span class="tok-punc"><</span><span class="tok-type">Dashboard</span> <span class="tok-punc">/></span>\n' +
' <span class="tok-punc"></</span><span class="tok-type">AuthProvider</span><span class="tok-punc">></span>\n' +
' <span class="tok-punc">);</span>\n' +
'<span class="tok-punc">}</span>',
dashboard:
'<span class="tok-kw">import</span> <span class="tok-punc">{</span> useContext <span class="tok-punc">}</span> <span class="tok-kw">from</span> <span class="tok-str">\'react\'</span><span class="tok-punc">;</span>\n' +
'<span class="tok-kw">import</span> <span class="tok-punc">{</span> <span class="tok-type">AuthContext</span> <span class="tok-punc">}</span> <span class="tok-kw">from</span> <span class="tok-str">\'./AuthContext\'</span><span class="tok-punc">;</span>\n\n' +
'<span class="tok-kw">export</span> <span class="tok-kw">default</span> <span class="tok-kw">function</span> <span class="tok-type">Dashboard</span><span class="tok-punc">() {</span>\n' +
' <span class="tok-kw">const</span> <span class="tok-punc">{</span> state<span class="tok-punc">,</span> dispatch <span class="tok-punc">}</span> <span class="tok-punc">=</span> useContext<span class="tok-punc">(</span><span class="tok-type">AuthContext</span><span class="tok-punc">);</span>\n\n' +
' <span class="tok-kw">return</span> <span class="tok-punc">(</span>\n' +
' <span class="tok-punc"><></span>\n' +
' <span class="tok-punc">{</span>state.isAuthenticated <span class="tok-punc">? (</span>\n' +
' <span class="tok-punc"><></span>\n' +
' <span class="tok-punc"><</span><span class="tok-tag">h2</span><span class="tok-punc">></span>Welcome<span class="tok-punc">,</span> <span class="tok-punc">{</span>state.user.name<span class="tok-punc">}</</span><span class="tok-tag">h2</span><span class="tok-punc">></span>\n' +
' <span class="tok-punc"><</span><span class="tok-tag">button</span> <span class="tok-attr">onClick</span><span class="tok-punc">={()</span> <span class="tok-punc">=></span> dispatch<span class="tok-punc">({</span> <span class="tok-attr">type</span><span class="tok-punc">:</span> <span class="tok-str">\'LOGOUT\'</span> <span class="tok-punc">})}></span>\n' +
' Logout\n' +
' <span class="tok-punc"></</span><span class="tok-tag">button</span><span class="tok-punc">></span>\n' +
' <span class="tok-punc"></></span>\n' +
' <span class="tok-punc">) : (</span>\n' +
' <span class="tok-punc"><</span><span class="tok-tag">button</span>\n' +
' <span class="tok-attr">onClick</span><span class="tok-punc">={()</span> <span class="tok-punc">=></span>\n' +
' dispatch<span class="tok-punc">({</span>\n' +
' <span class="tok-attr">type</span><span class="tok-punc">:</span> <span class="tok-str">\'LOGIN\'</span><span class="tok-punc">,</span>\n' +
' <span class="tok-attr">payload</span><span class="tok-punc">:</span> <span class="tok-punc">{</span> <span class="tok-attr">name</span><span class="tok-punc">:</span> <span class="tok-str">\'Bhaskar\'</span> <span class="tok-punc">},</span>\n' +
' <span class="tok-punc">})</span>\n' +
' <span class="tok-punc">}></span>\n' +
' Login\n' +
' <span class="tok-punc"></</span><span class="tok-tag">button</span><span class="tok-punc">></span>\n' +
' <span class="tok-punc">)}</span>\n' +
' <span class="tok-punc"></></span>\n' +
' <span class="tok-punc">);</span>\n' +
'<span class="tok-punc">}</span>'
};
var codeEl = root.querySelector('#vtCode');
var rows = root.querySelectorAll('.vt-row');
var tabs = root.querySelectorAll('.vt-tab');
function selectFile(id) {
codeEl.innerHTML = files[id];
rows.forEach(function (r) { r.classList.toggle('is-selected', r.getAttribute('data-file') === id); });
tabs.forEach(function (t) { t.classList.toggle('is-active', t.getAttribute('data-file') === id); });
}
rows.forEach(function (r) { r.addEventListener('click', function () { selectFile(r.getAttribute('data-file')); }); });
tabs.forEach(function (t) { t.addEventListener('click', function () { selectFile(t.getAttribute('data-file')); }); });
selectFile('dashboard');
/* --- terminal run simulation --- */
var termLines = root.querySelector('#vtTermLines');
var runBtn = root.querySelector('#vtRunBtn');
var runLabel = root.querySelector('#vtRunLabel');
var runHint = root.querySelector('#vtRunHint');
var browser = root.querySelector('#vtBrowser');
var placeholder = root.querySelector('.vt-output-placeholder');
var running = false;
var lines = [
{ text: '$ npm start', cls: 'is-cmd', delay: 0 },
{ text: 'Starting the development server\u2026', cls: '', delay: 500 },
{ text: 'Compiled successfully!', cls: 'is-ok', delay: 1350 },
{ text: 'You can now view auth-reducer-demo in the browser.', cls: '', delay: 1600 },
{ text: ' Local: http://localhost:3000', cls: '', delay: 1850 }
];
runBtn.addEventListener('click', function () {
if (running) return;
running = true;
runBtn.disabled = true;
runLabel.textContent = 'running\u2026';
browser.classList.remove('is-shown');
placeholder.style.display = 'block';
termLines.innerHTML = '';
lines.forEach(function (line) {
setTimeout(function () {
var div = document.createElement('div');
div.className = 'vt-term-line ' + line.cls;
div.textContent = line.text;
termLines.appendChild(div);
}, line.delay);
});
setTimeout(function () {
placeholder.style.display = 'none';
browser.classList.add('is-shown');
runBtn.disabled = false;
runLabel.textContent = 'npm start';
runHint.textContent = 'server running \u2014 rerun anytime';
running = false;
renderDash();
}, 2300);
});
/* --- resize handles (pointer-capture drag) --- */
function makeResizable(handle, opts) {
var dragging = false, startPos = 0, startSize = 0;
handle.addEventListener('pointerdown', function (e) {
dragging = true;
handle.classList.add('is-dragging');
startPos = opts.axis === 'x' ? e.clientX : e.clientY;
startSize = opts.target.getBoundingClientRect()[opts.axis === 'x' ? 'width' : 'height'];
handle.setPointerCapture(e.pointerId);
e.preventDefault();
});
handle.addEventListener('pointermove', function (e) {
if (!dragging) return;
var pos = opts.axis === 'x' ? e.clientX : e.clientY;
var delta = pos - startPos;
if (opts.invert) delta = -delta;
var size = Math.min(opts.max, Math.max(opts.min, startSize + delta));
opts.target.style[opts.prop] = size + 'px';
if (opts.onResize) opts.onResize(size);
});
function stop() { dragging = false; handle.classList.remove('is-dragging'); }
handle.addEventListener('pointerup', stop);
handle.addEventListener('pointercancel', stop);
}
var sidebar = root.querySelector('.vt-sidebar');
var sidebarHandle = root.querySelector('#vtSidebarHandle');
var lastSidebarWidth = sidebar.getBoundingClientRect().width || 175;
makeResizable(sidebarHandle, {
axis: 'x', target: sidebar, prop: 'width', min: 120, max: 300, invert: false,
onResize: function (s) { lastSidebarWidth = s; }
});
var terminal = root.querySelector('.vt-terminal');
var terminalHandle = root.querySelector('#vtTerminalHandle');
var lastTerminalHeight = terminal.getBoundingClientRect().height || 150;
makeResizable(terminalHandle, {
axis: 'y', target: terminal, prop: 'height', min: 60, max: 280, invert: true,
onResize: function (s) { lastTerminalHeight = s; }
});
var vtBody = root.querySelector('.vt-body');
var windowHandle = root.querySelector('#vtWindowHandle');
makeResizable(windowHandle, {
axis: 'y', target: vtBody, prop: 'height', min: 320, max: 620, invert: false
});
/* --- show/hide toggles --- */
var toggleSidebarBtn = root.querySelector('#vtToggleSidebar');
var sidebarHidden = false;
toggleSidebarBtn.addEventListener('click', function () {
sidebarHidden = !sidebarHidden;
if (sidebarHidden) {
var w = sidebar.getBoundingClientRect().width;
if (w > 0) lastSidebarWidth = w;
sidebar.classList.add('is-hidden');
sidebarHandle.style.display = 'none';
} else {
sidebar.classList.remove('is-hidden');
sidebar.style.width = lastSidebarWidth + 'px';
sidebarHandle.style.display = '';
}
});
var toggleTerminalBtn = root.querySelector('#vtToggleTerminal');
var terminalCollapsed = false;
toggleTerminalBtn.addEventListener('click', function () {
terminalCollapsed = !terminalCollapsed;
if (terminalCollapsed) {
var h = terminal.getBoundingClientRect().height;
if (h > 30) lastTerminalHeight = h;
terminal.classList.add('is-collapsed');
terminalHandle.style.display = 'none';
} else {
terminal.classList.remove('is-collapsed');
terminal.style.height = lastTerminalHeight + 'px';
terminalHandle.style.display = '';
}
});
/* --- real behavior: an actual authReducer driving Dashboard --- */
var initialAuthState = { user: null, isAuthenticated: false };
function authReducer(state, action) {
switch (action.type) {
case 'LOGIN':
return { user: action.payload, isAuthenticated: true };
case 'LOGOUT':
return initialAuthState;
default:
return state;
}
}
var authState = initialAuthState;
var dashBody = root.querySelector('#vtDashBody');
function dispatch(action) {
authState = authReducer(authState, action);
renderDash();
}
function renderDash() {
dashBody.innerHTML = '';
if (authState.isAuthenticated) {
var h2 = document.createElement('h2');
h2.textContent = 'Welcome, ' + authState.user.name;
var logoutBtn = document.createElement('button');
logoutBtn.className = 'vt-dash-btn btn-logout';
logoutBtn.type = 'button';
logoutBtn.textContent = 'Logout';
logoutBtn.addEventListener('click', function () { dispatch({ type: 'LOGOUT' }); });
dashBody.appendChild(h2);
dashBody.appendChild(logoutBtn);
} else {
var loginBtn = document.createElement('button');
loginBtn.className = 'vt-dash-btn';
loginBtn.type = 'button';
loginBtn.textContent = 'Login';
loginBtn.addEventListener('click', function () {
dispatch({ type: 'LOGIN', payload: { name: 'Bhaskar' } });
});
dashBody.appendChild(loginBtn);
}
}
})();
</script>🧠 Final Mental Model
🧐 When to Use vs. Zustand/Redux
Feature | Context + useReducer | Zustand / Redux |
|---|---|---|
Setup | Built-in to React (No extra bytes) | Requires library installation |
Performance | Can cause "bulk" re-renders if not split | Highly optimized selective re-renders |
Persistence | Manual (must use | Built-in middleware |
Complexity | Best for mid-sized apps | Best for massive, complex states |
Key Differences
Boilerplate: Context requires creating the Provider and wrapping the app; Zustand is a simple hook.
State Location: Context state lives in the React Component Tree; Zustand lives in an external store outside the React lifecycle.