🖼️ What you're building
<div class="infographic-albarch">
<style>
.infographic-albarch {
  --ink:        #1a1a1a;
  --ink-soft:   #5c5c5c;
  --paper:      #ffffff;
  --paper-alt:  #f0ece4;
  --accent:     #2563eb;
  --accent-soft:#e3ebfd;
  --line:       #ddd6c9;
  --display-font: 'Fraunces', Georgia, serif;
  --body-font: 'Inter', system-ui, sans-serif;

  font-family: var(--body-font);
  color: var(--ink);
  background: var(--paper);
  max-width: 640px;
  margin: 0 auto;
  padding: clamp(1.25rem, 5vw, 3rem);
  box-sizing: border-box;
  line-height: 1.5;
}
.infographic-albarch[data-theme="dark"] {
  --ink:        #e8e6e1;
  --ink-soft:   #9a968c;
  --paper:      #121212;
  --paper-alt:  #1e1e26;
  --accent:     #5b8def;
  --accent-soft:#202942;
  --line:       #2c313d;
}
.infographic-albarch * { box-sizing: border-box; }

.aa-title {
  font-family: var(--display-font); font-size: clamp(1.3rem, 3.4vw, 1.7rem);
  margin: 0 0 1.25rem; line-height: 1.15; text-align: center;
}

.aa-controls { display: flex; gap: 0.75rem; align-items: center; justify-content: center; margin-bottom: 1.75rem; }
.aa-ctrl-btn {
  width: 40px; height: 40px; display: inline-flex; align-items: center; justify-content: center;
  background: var(--accent); color: #fff; border: none; cursor: pointer; padding: 0; border-radius: 2px;
}
.aa-ctrl-btn.aa-restart { background: none; color: var(--ink-soft); border: 1px solid var(--line); }
.aa-ctrl-btn svg { width: 16px; height: 16px; }
.aa-ctrl-btn .icon-pause { display: none; }
.aa-ctrl-btn.is-running .icon-play { display: none; }
.aa-ctrl-btn.is-running .icon-pause { display: block; }

.aa-diagram { width: 100%; height: auto; overflow: visible; }
.aa-line { stroke-width: 2; fill: none; stroke-dasharray: 3 5; stroke: var(--accent); opacity: 0.75; }
.aa-line.aa-anim { animation: aa-flow 0.7s linear infinite; animation-play-state: paused; }
.infographic-albarch.is-active .aa-line.aa-anim { animation-play-state: running; }
@keyframes aa-flow { to { stroke-dashoffset: -16; } }
.aa-label { font-family: var(--body-font); font-size: 13px; font-weight: 600; fill: var(--ink); }
.aa-hub-ring { fill: var(--paper-alt); stroke: var(--accent); stroke-width: 2; }
.aa-icon-mark { stroke: var(--accent); stroke-width: 2; fill: none; }
.aa-instance { fill: var(--paper-alt); stroke: var(--ink-soft); stroke-width: 1.5; }
.aa-person path, .aa-person circle { fill: var(--ink-soft); }

@media (prefers-reduced-motion: reduce) {
  .infographic-albarch *, .infographic-albarch *::before, .infographic-albarch *::after {
    animation-duration: 0.001ms !important; transition-duration: 0.001ms !important;
  }
}
</style>

<link rel="preconnect" href="https://fonts.googleapis.com">
<link href="https://fonts.googleapis.com/css2?family=Fraunces:opsz,wght@9..144,500;9..144,600&family=Inter:wght@400;500;600&display=swap" rel="stylesheet">

<h2 class="aa-title">Application Load Balancer</h2>

<div class="aa-controls">
  <button type="button" class="aa-ctrl-btn aa-toggle" aria-label="Play or pause">
    <svg class="icon-play" viewBox="0 0 24 24" fill="currentColor"><path d="M8 5v14l11-7z"/></svg>
    <svg class="icon-pause" viewBox="0 0 24 24" fill="currentColor"><path d="M6 5h4v14H6zM14 5h4v14h-4z"/></svg>
  </button>
  <button type="button" class="aa-ctrl-btn aa-restart" aria-label="Restart">
    <svg viewBox="0 0 24 24" fill="none" stroke="currentColor" stroke-width="2.5" stroke-linecap="round" stroke-linejoin="round"><path d="M1 4v6h6"/><path d="M3.5 15a9 9 0 1 0 2-9.5L1 10"/></svg>
  </button>
</div>

<svg class="aa-diagram" viewBox="0 0 460 220" xmlns="http://www.w3.org/2000/svg" role="img" aria-label="Users connect to an Application Load Balancer, which routes traffic to two EC2 instances">
  <defs>
    <marker id="aa-arrow" viewBox="0 0 10 10" refX="8" refY="5" markerWidth="6" markerHeight="6" orient="auto-start-reverse">
      <path d="M0,0 L10,5 L0,10 Z" fill="var(--accent)" />
    </marker>
  </defs>

  <!-- users -->
  <g class="aa-person" transform="translate(48,110)">
    <circle cy="-10" r="9" />
    <path d="M -16 18 C -16 3, 16 3, 16 18 L 16 23 L -16 23 Z" />
  </g>
  <text class="aa-label" x="48" y="150" text-anchor="middle">Users</text>

  <!-- users -> ALB -->
  <path class="aa-line aa-anim" marker-end="url(#aa-arrow)" d="M 78 110 L 168 110" />

  <!-- ALB hub -->
  <circle class="aa-hub-ring" cx="200" cy="110" r="32" />
  <rect class="aa-icon-mark" x="192" y="90" width="16" height="11" rx="1.5" />
  <line class="aa-icon-mark" x1="200" y1="101" x2="200" y2="110" />
  <line class="aa-icon-mark" x1="184" y1="110" x2="216" y2="110" />
  <line class="aa-icon-mark" x1="184" y1="110" x2="184" y2="118" />
  <line class="aa-icon-mark" x1="216" y1="110" x2="216" y2="118" />
  <rect class="aa-icon-mark" x="176" y="118" width="16" height="10" rx="1.5" />
  <rect class="aa-icon-mark" x="208" y="118" width="16" height="10" rx="1.5" />
  <text class="aa-label" x="200" y="160" text-anchor="middle">ALB</text>

  <!-- ALB -> instances -->
  <path class="aa-line aa-anim" marker-end="url(#aa-arrow)" d="M 232 100 L 372 60" />
  <path class="aa-line aa-anim" marker-end="url(#aa-arrow)" d="M 232 120 L 372 160" />

  <!-- EC2 #1 -->
  <g transform="translate(400,60)">
    <line class="aa-icon-mark" x1="-12" y1="-24" x2="-12" y2="-18"/><line class="aa-icon-mark" x1="0" y1="-24" x2="0" y2="-18"/><line class="aa-icon-mark" x1="12" y1="-24" x2="12" y2="-18"/>
    <line class="aa-icon-mark" x1="-12" y1="24" x2="-12" y2="18"/><line class="aa-icon-mark" x1="0" y1="24" x2="0" y2="18"/><line class="aa-icon-mark" x1="12" y1="24" x2="12" y2="18"/>
    <line class="aa-icon-mark" x1="-24" y1="-8" x2="-18" y2="-8"/><line class="aa-icon-mark" x1="-24" y1="8" x2="-18" y2="8"/>
    <line class="aa-icon-mark" x1="24" y1="-8" x2="18" y2="-8"/><line class="aa-icon-mark" x1="24" y1="8" x2="18" y2="8"/>
    <rect class="aa-instance" x="-18" y="-18" width="36" height="36" rx="3" />
  </g>
  <text class="aa-label" x="400" y="102" text-anchor="middle">EC2 #1</text>

  <!-- EC2 #2 -->
  <g transform="translate(400,160)">
    <line class="aa-icon-mark" x1="-12" y1="-24" x2="-12" y2="-18"/><line class="aa-icon-mark" x1="0" y1="-24" x2="0" y2="-18"/><line class="aa-icon-mark" x1="12" y1="-24" x2="12" y2="-18"/>
    <line class="aa-icon-mark" x1="-12" y1="24" x2="-12" y2="18"/><line class="aa-icon-mark" x1="0" y1="24" x2="0" y2="18"/><line class="aa-icon-mark" x1="12" y1="24" x2="12" y2="18"/>
    <line class="aa-icon-mark" x1="-24" y1="-8" x2="-18" y2="-8"/><line class="aa-icon-mark" x1="-24" y1="8" x2="-18" y2="8"/>
    <line class="aa-icon-mark" x1="24" y1="-8" x2="18" y2="-8"/><line class="aa-icon-mark" x1="24" y1="8" x2="18" y2="8"/>
    <rect class="aa-instance" x="-18" y="-18" width="36" height="36" rx="3" />
  </g>
  <text class="aa-label" x="400" y="202" text-anchor="middle">EC2 #2</text>
</svg>

</div>

<script>
(function () {
  var wrapper = document.currentScript.closest('.infographic-albarch')
    || document.querySelector('.infographic-albarch');
  var bodyAttr = document.body.getAttribute('data-darkmode');
  var dark;
  if (bodyAttr === 'true') {
    dark = true;
  } else if (bodyAttr === 'false') {
    dark = false;
  } else {
    var match = document.cookie.match(/(?:^|;\s*)darkMode=([^;]+)/);
    dark = match ? match[1] === 'true' : false;
  }
  if (dark) wrapper.setAttribute('data-theme', 'dark');

  var toggleBtn = wrapper.querySelector('.aa-toggle');
  var restartBtn = wrapper.querySelector('.aa-restart');
  var isRunning = false;

  toggleBtn.addEventListener('click', function () {
    isRunning = !isRunning;
    toggleBtn.classList.toggle('is-running', isRunning);
    wrapper.classList.toggle('is-active', isRunning);
  });

  restartBtn.addEventListener('click', function () {
    isRunning = false;
    toggleBtn.classList.remove('is-running');
    wrapper.classList.remove('is-active');
  });
})();
</script>
.demo {
font-family: system-ui, sans-serif;
padding: 16px;
}
.demo h1 {
color: #2563eb;
margin: 0 0 8px;
}
.demo p {
color: #4b5563;
margin: 0;
}document.querySelector('.demo h1')?.addEventListener('click', () => {
alert('Hello from live preview!');
});One entry point Application Load Balancer (the ALB) spreads traffic across two servers.
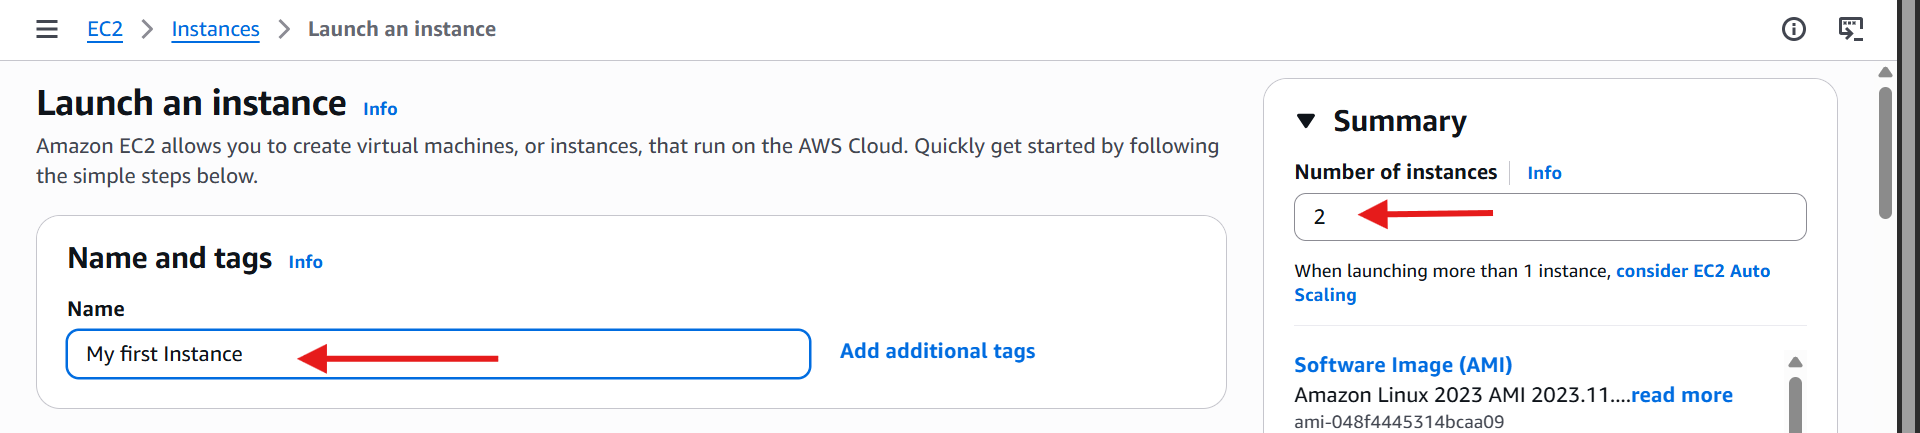
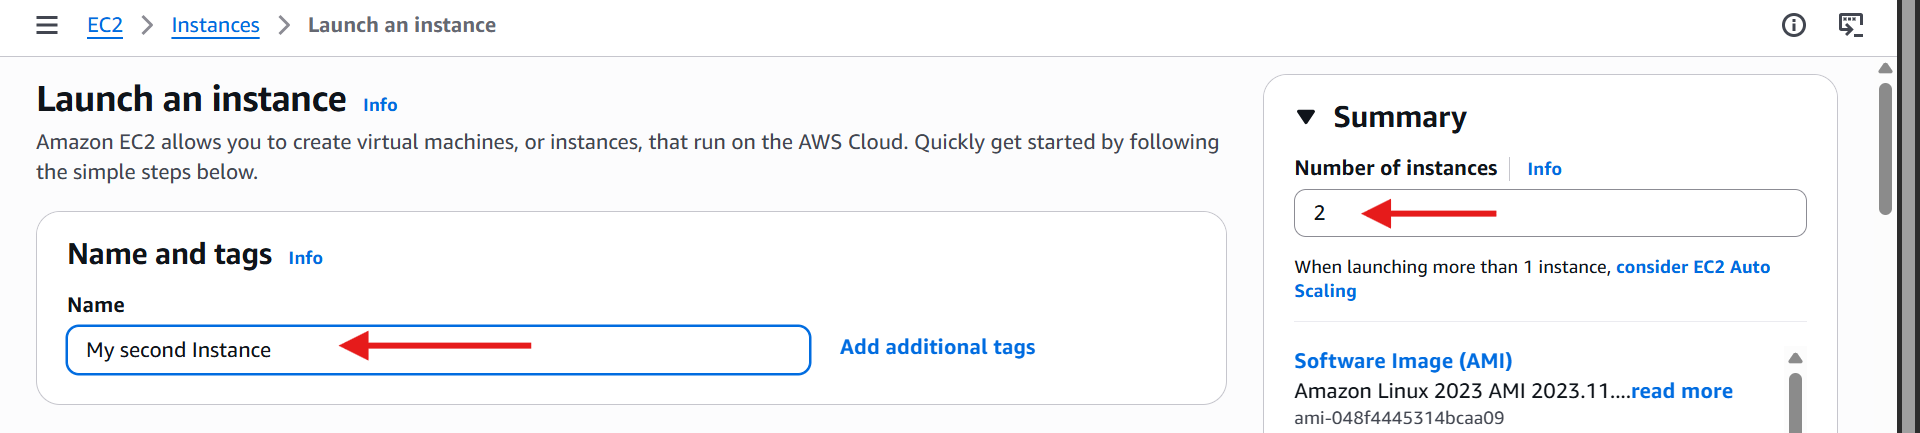
1️⃣ Launch two EC2 instances
Instances: 2 (name them "My first Instance", "My second Instance")
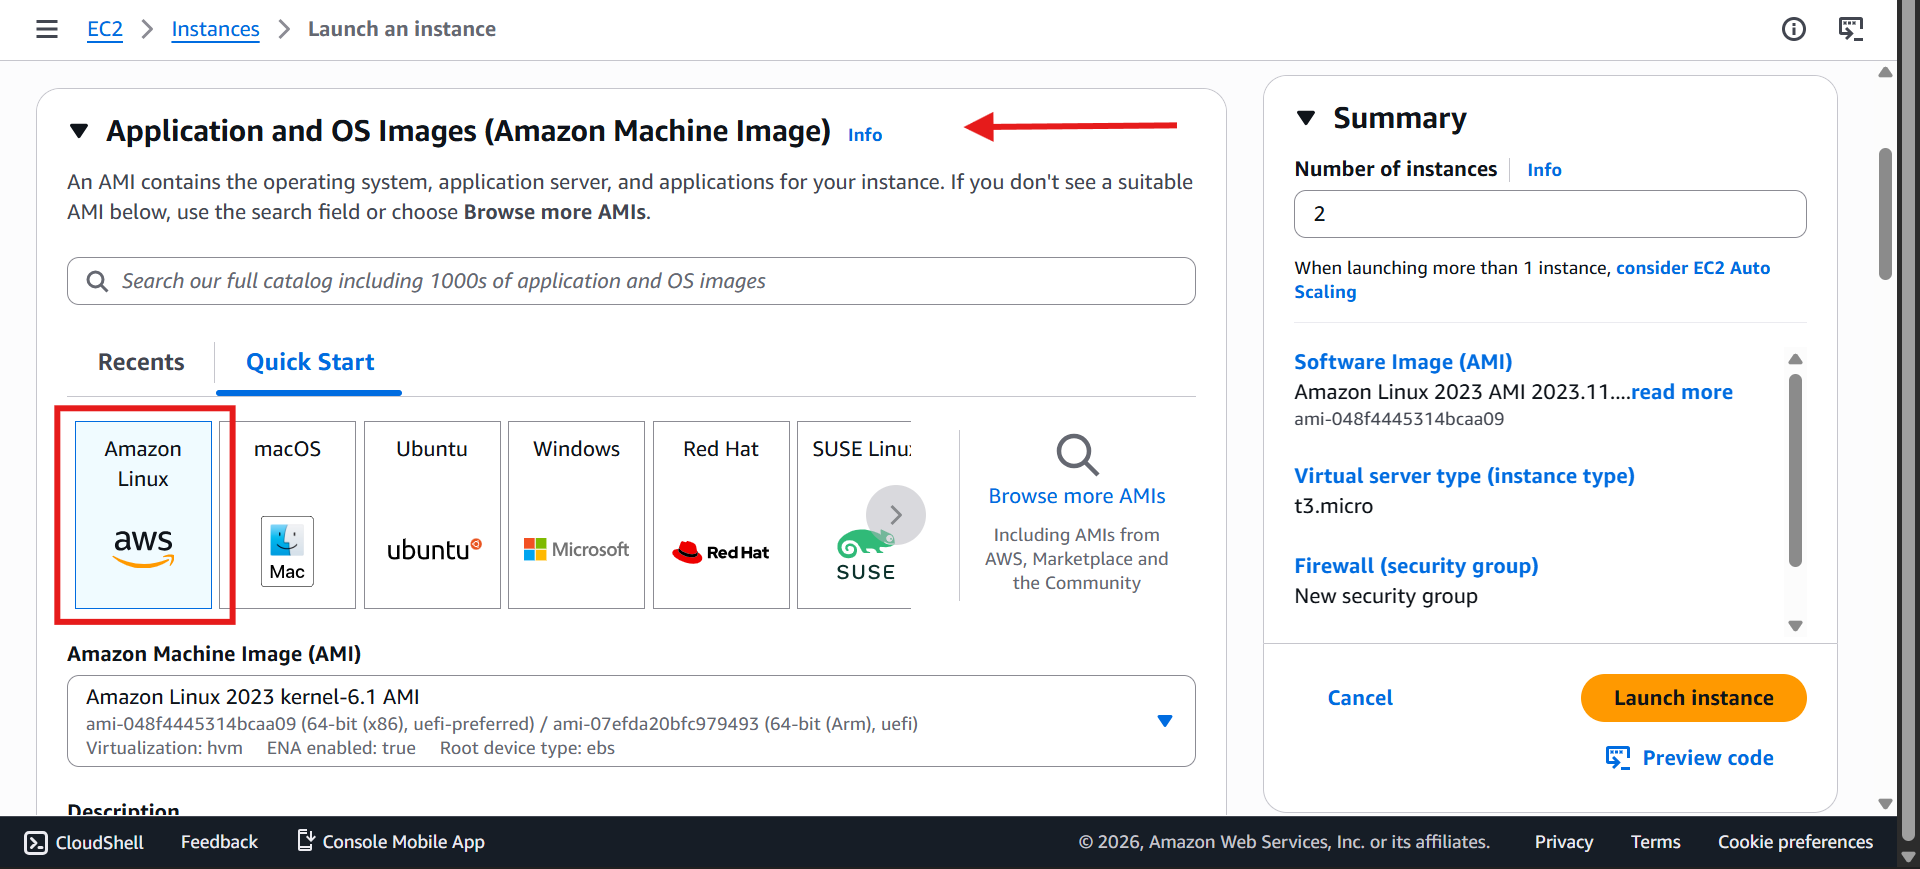
AMI: Amazon Linux 2 🐧
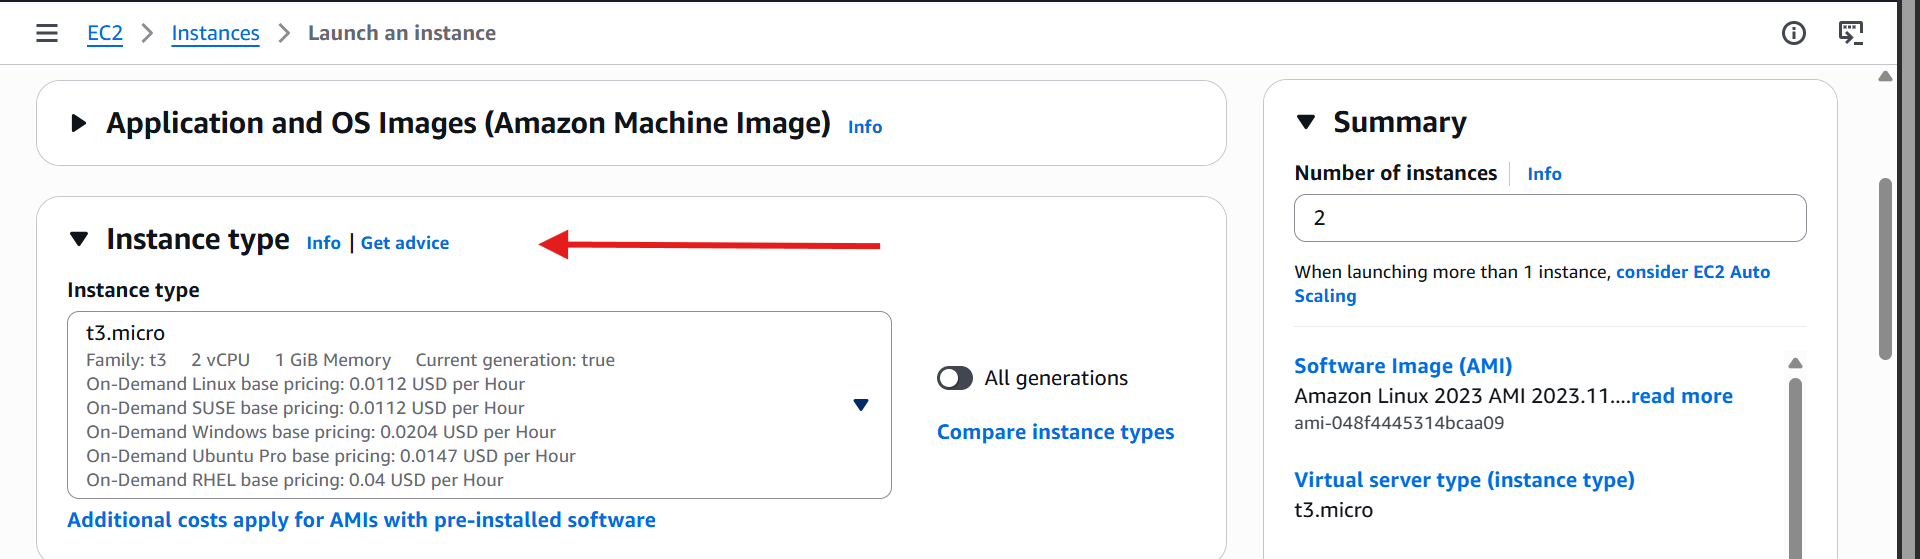
Type: t3.micro or t2.micro (Free Tier) 💸
Key pair: None ❌ ( Because we don't need SSH access for this)

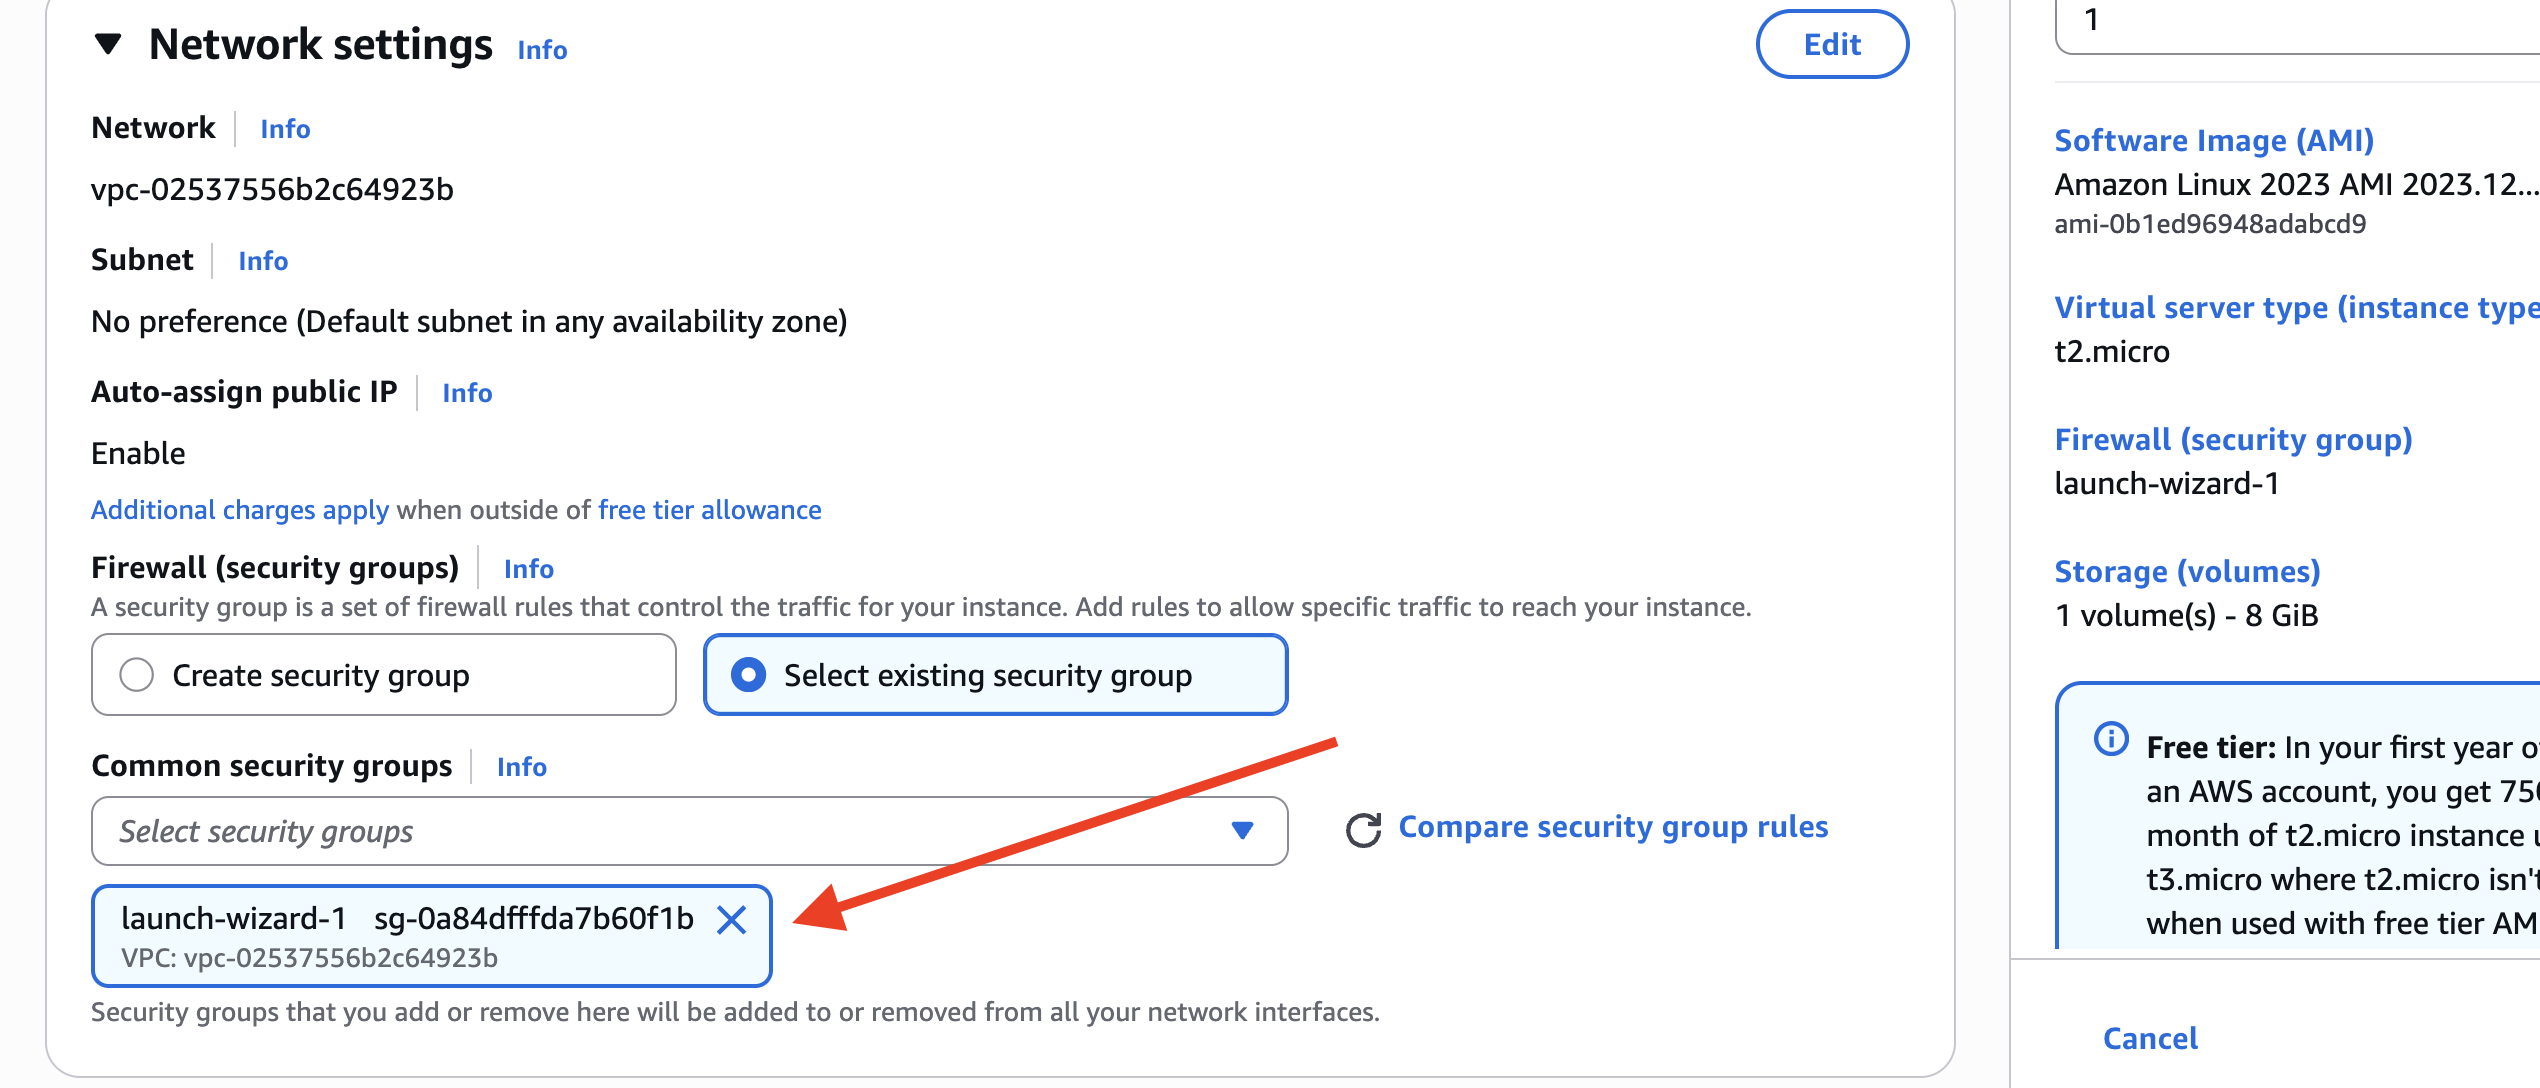
Security group: Select Existing Security Group
Add a user data script at launch — it runs automatically and makes each instance serve a "Hello World" page over HTTP, no manual setup needed.
#!/bin/bash
# Use this for your user data (script from top to bottom)
# install httpd (Linux 2 version)
yum update -y yum install -y httpd systemctl start httpd
systemctl enable httpd
echo "<h1>Hello World from $(hostname -f)</h1>" > /var/www/html/index.html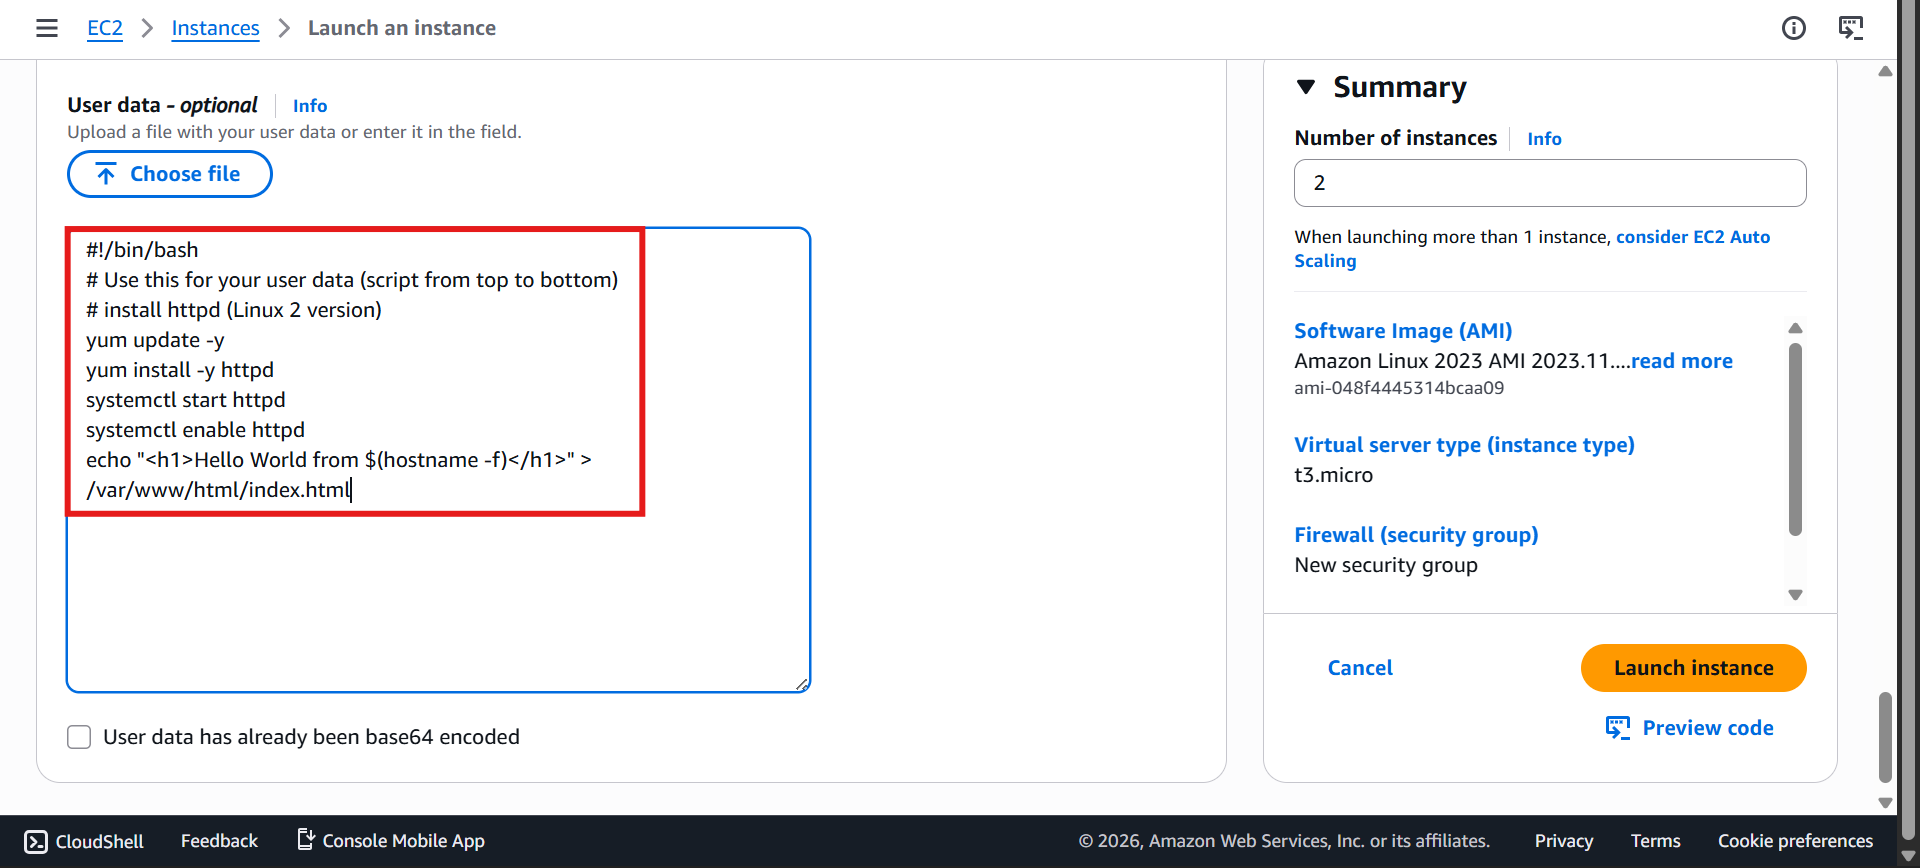
Verify: open each instance's public IPv4 in your browser. You should see:
💡 Ensure the URL uses
http://, nothttps://. Timeout or 503 errors are often caused by this, so please double-check.
Hello World from Instance X2️⃣ Create the Application Load Balancer
Go To EC2 → Load Balancing → Load Balancers → Click Create load balancer
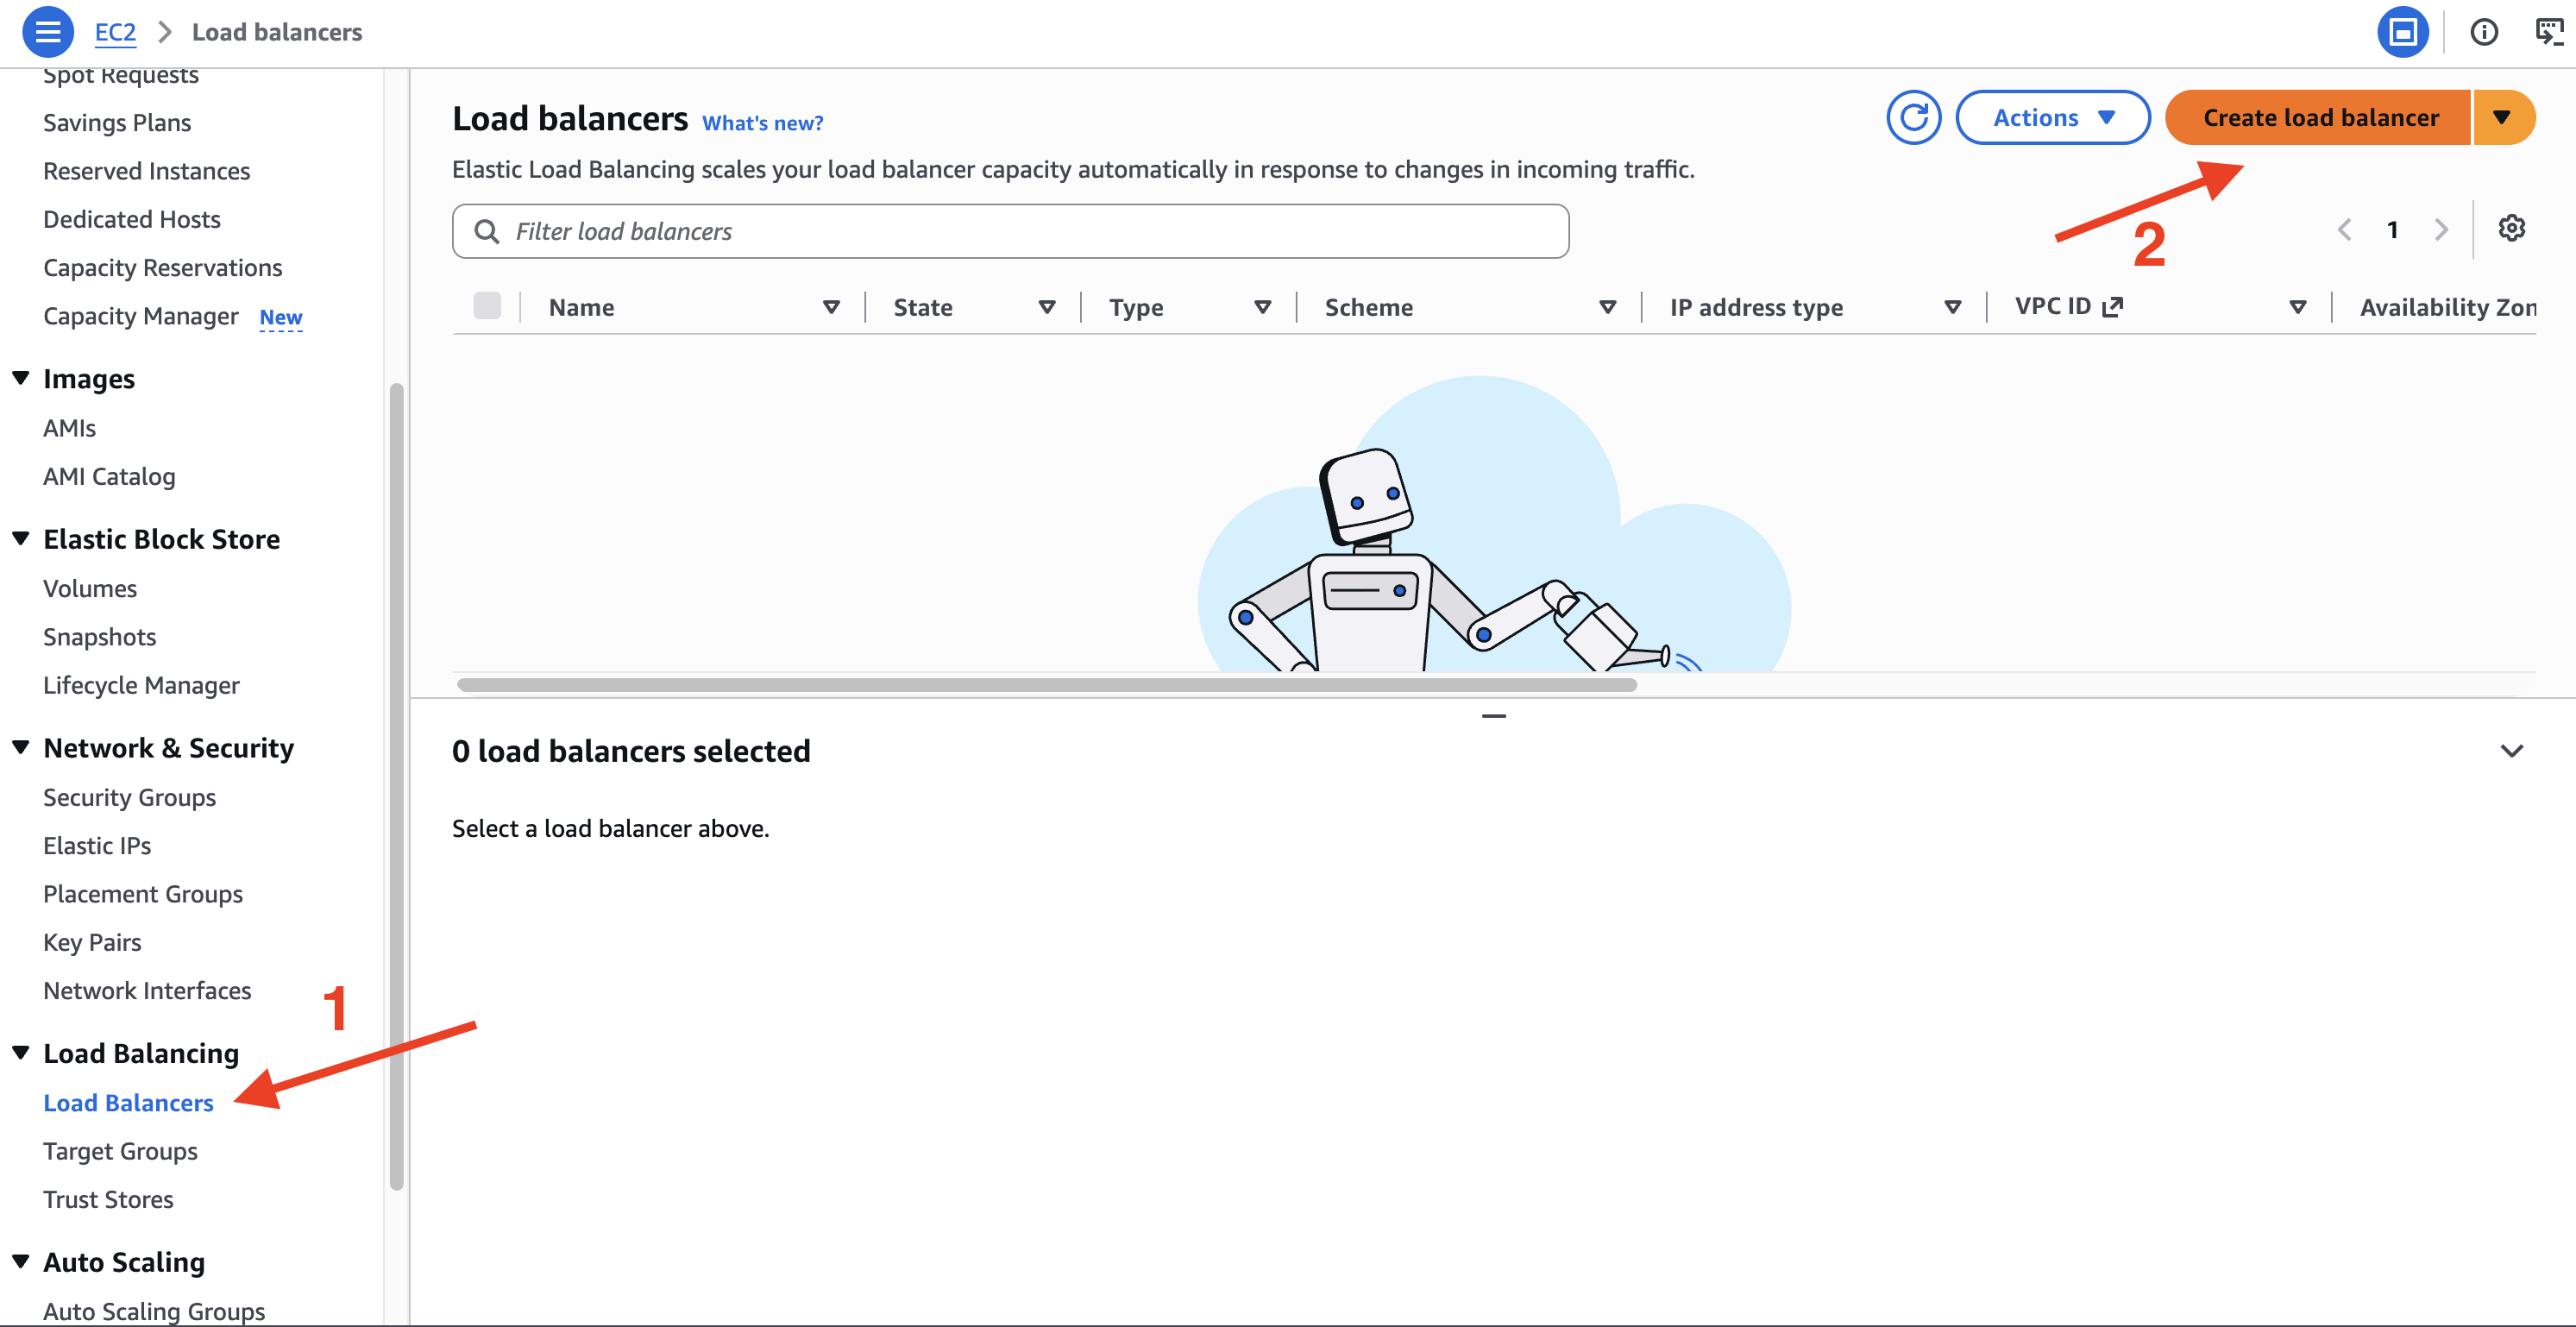
Click Create button under Application Load Balancer (ALB)
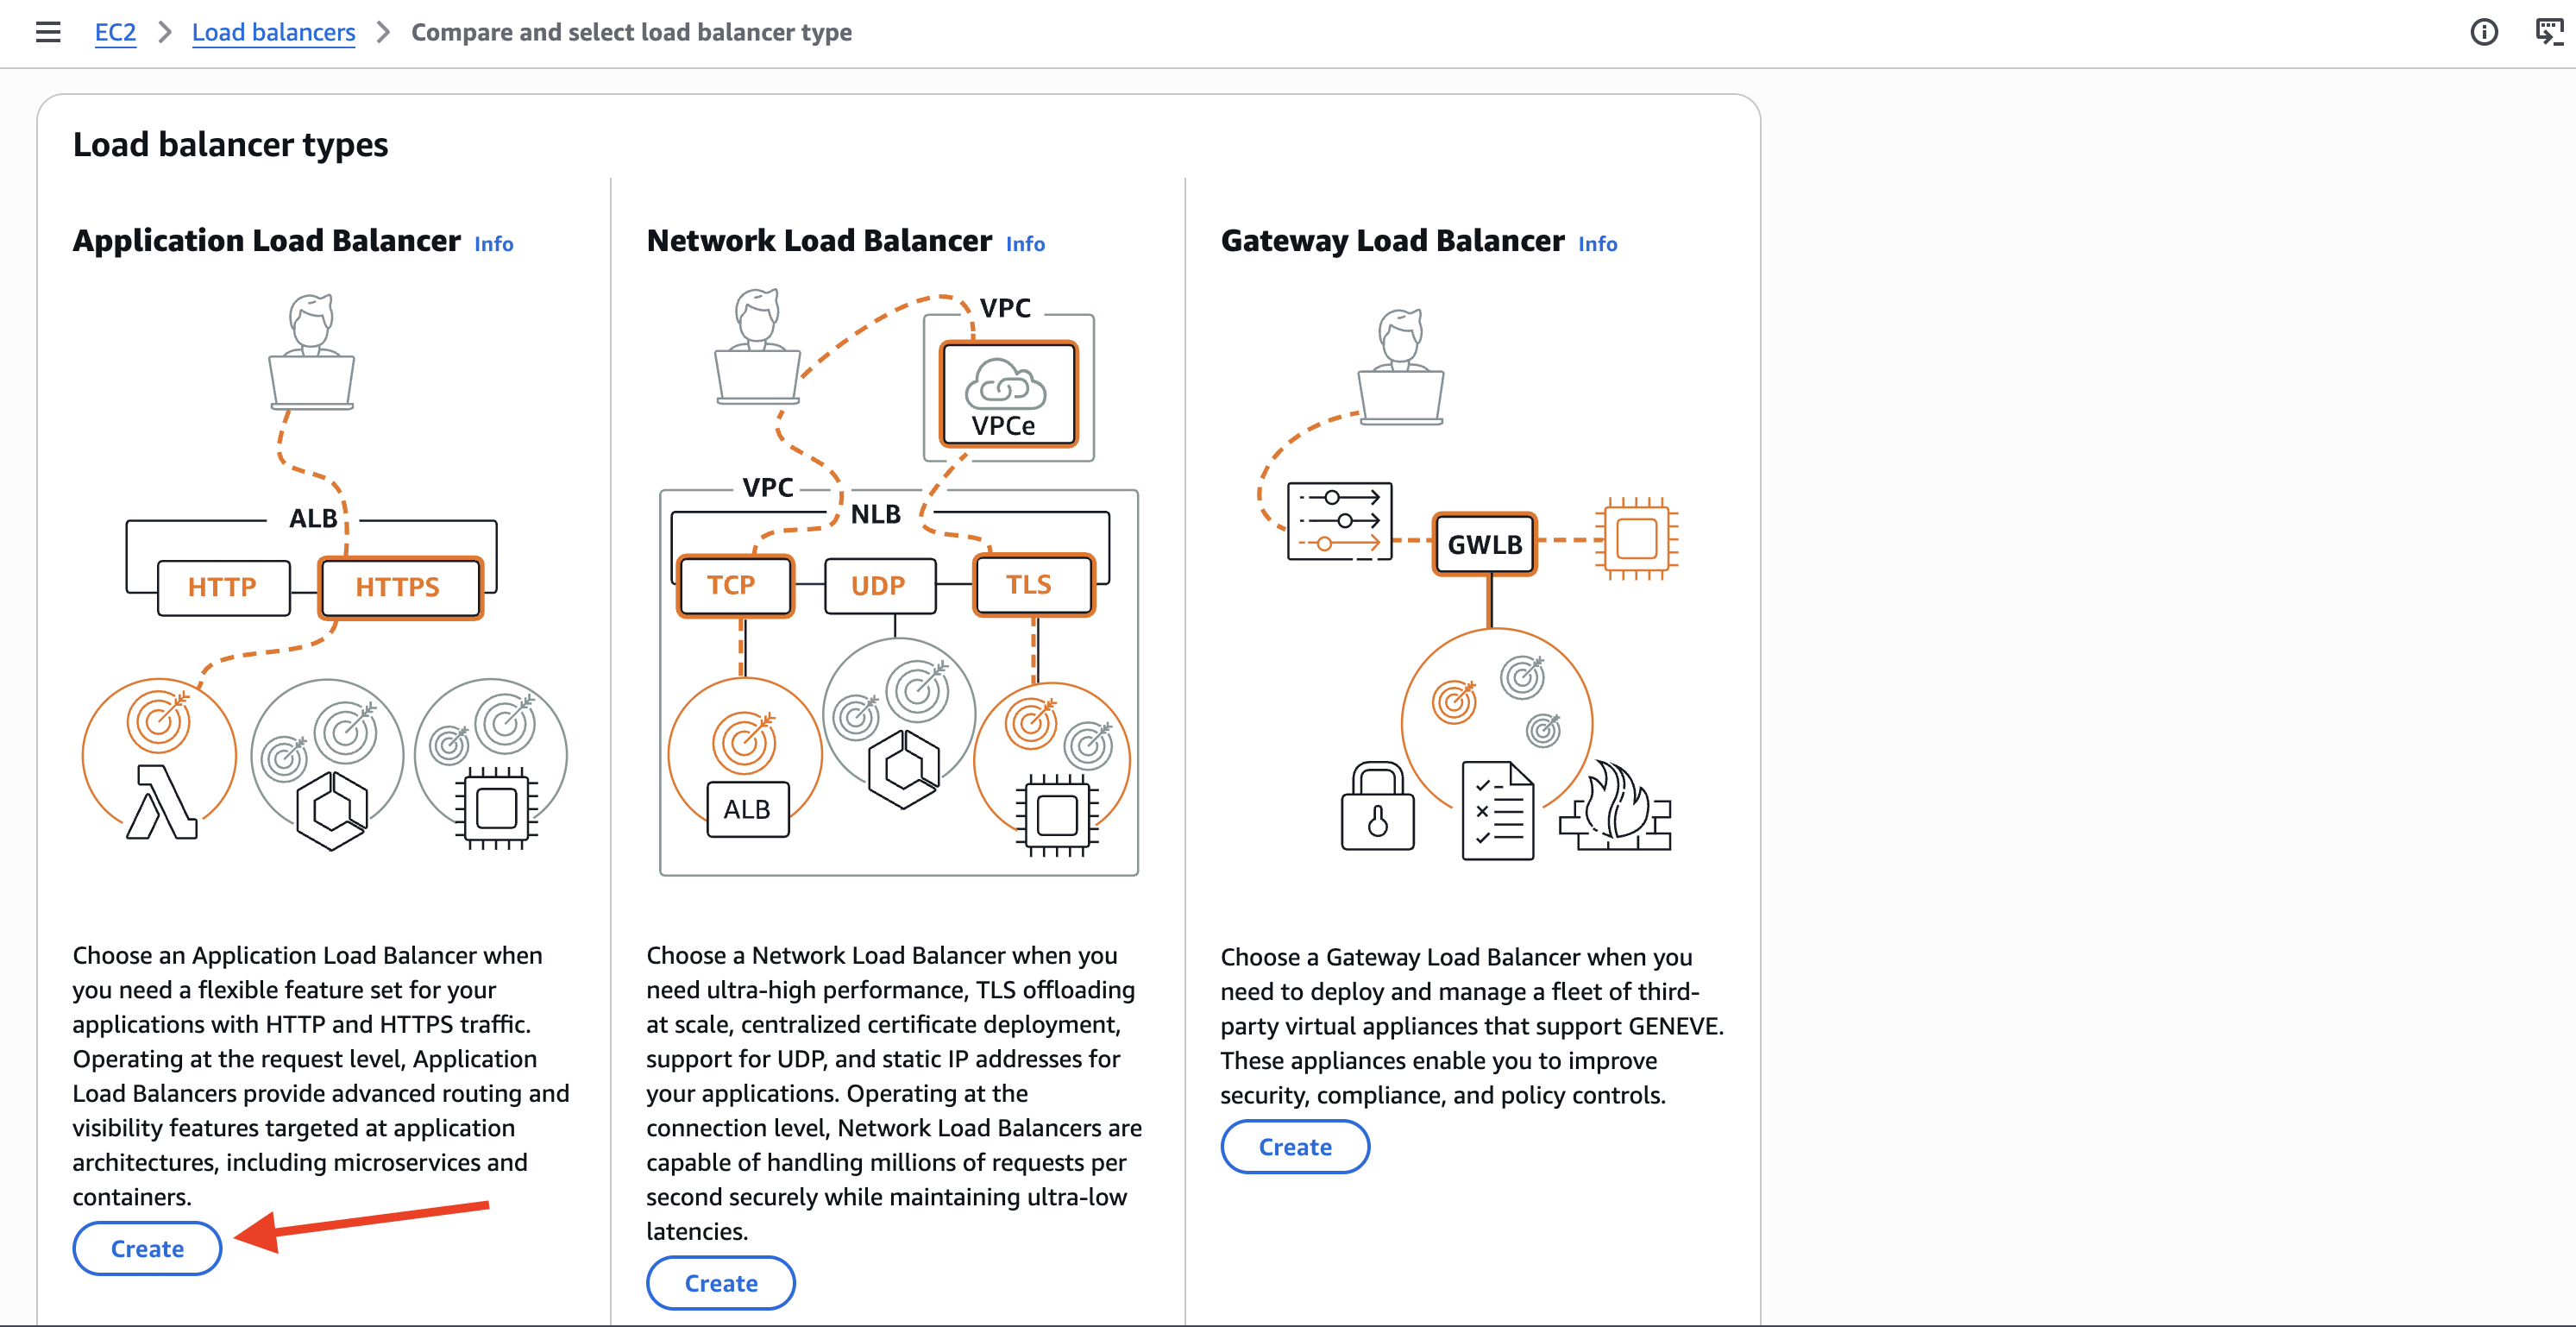
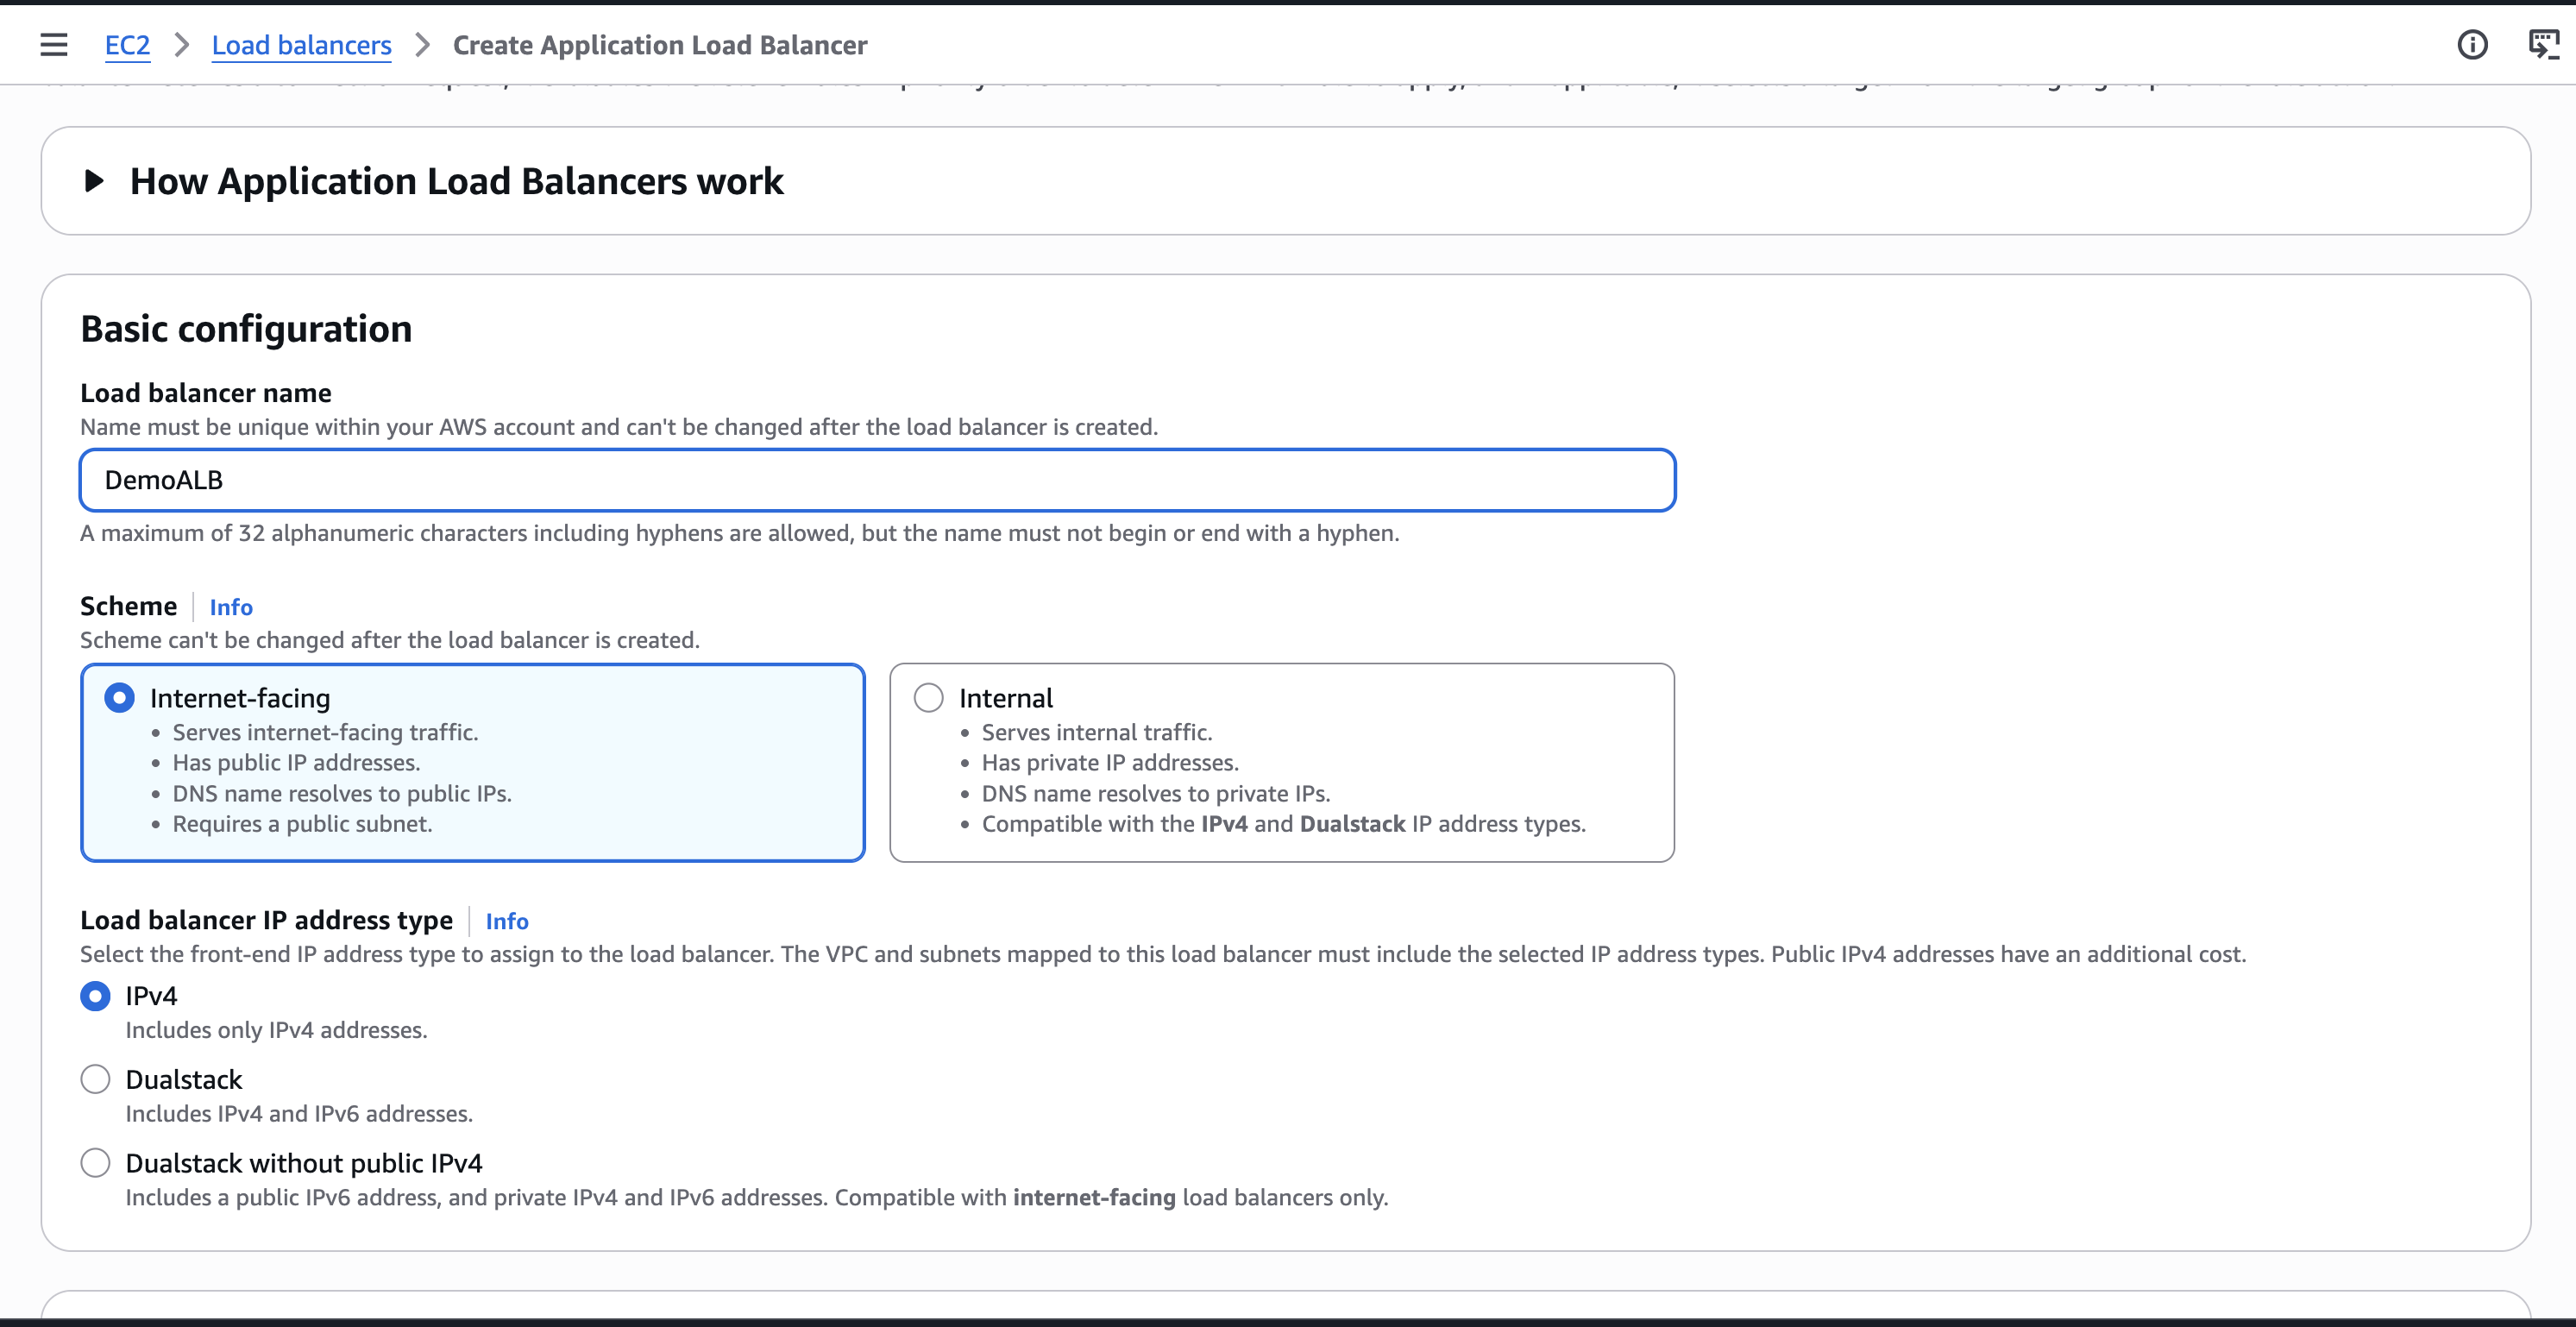
Name:
DemoALBScheme: Internet-facing 🌍
IP type: IPv4
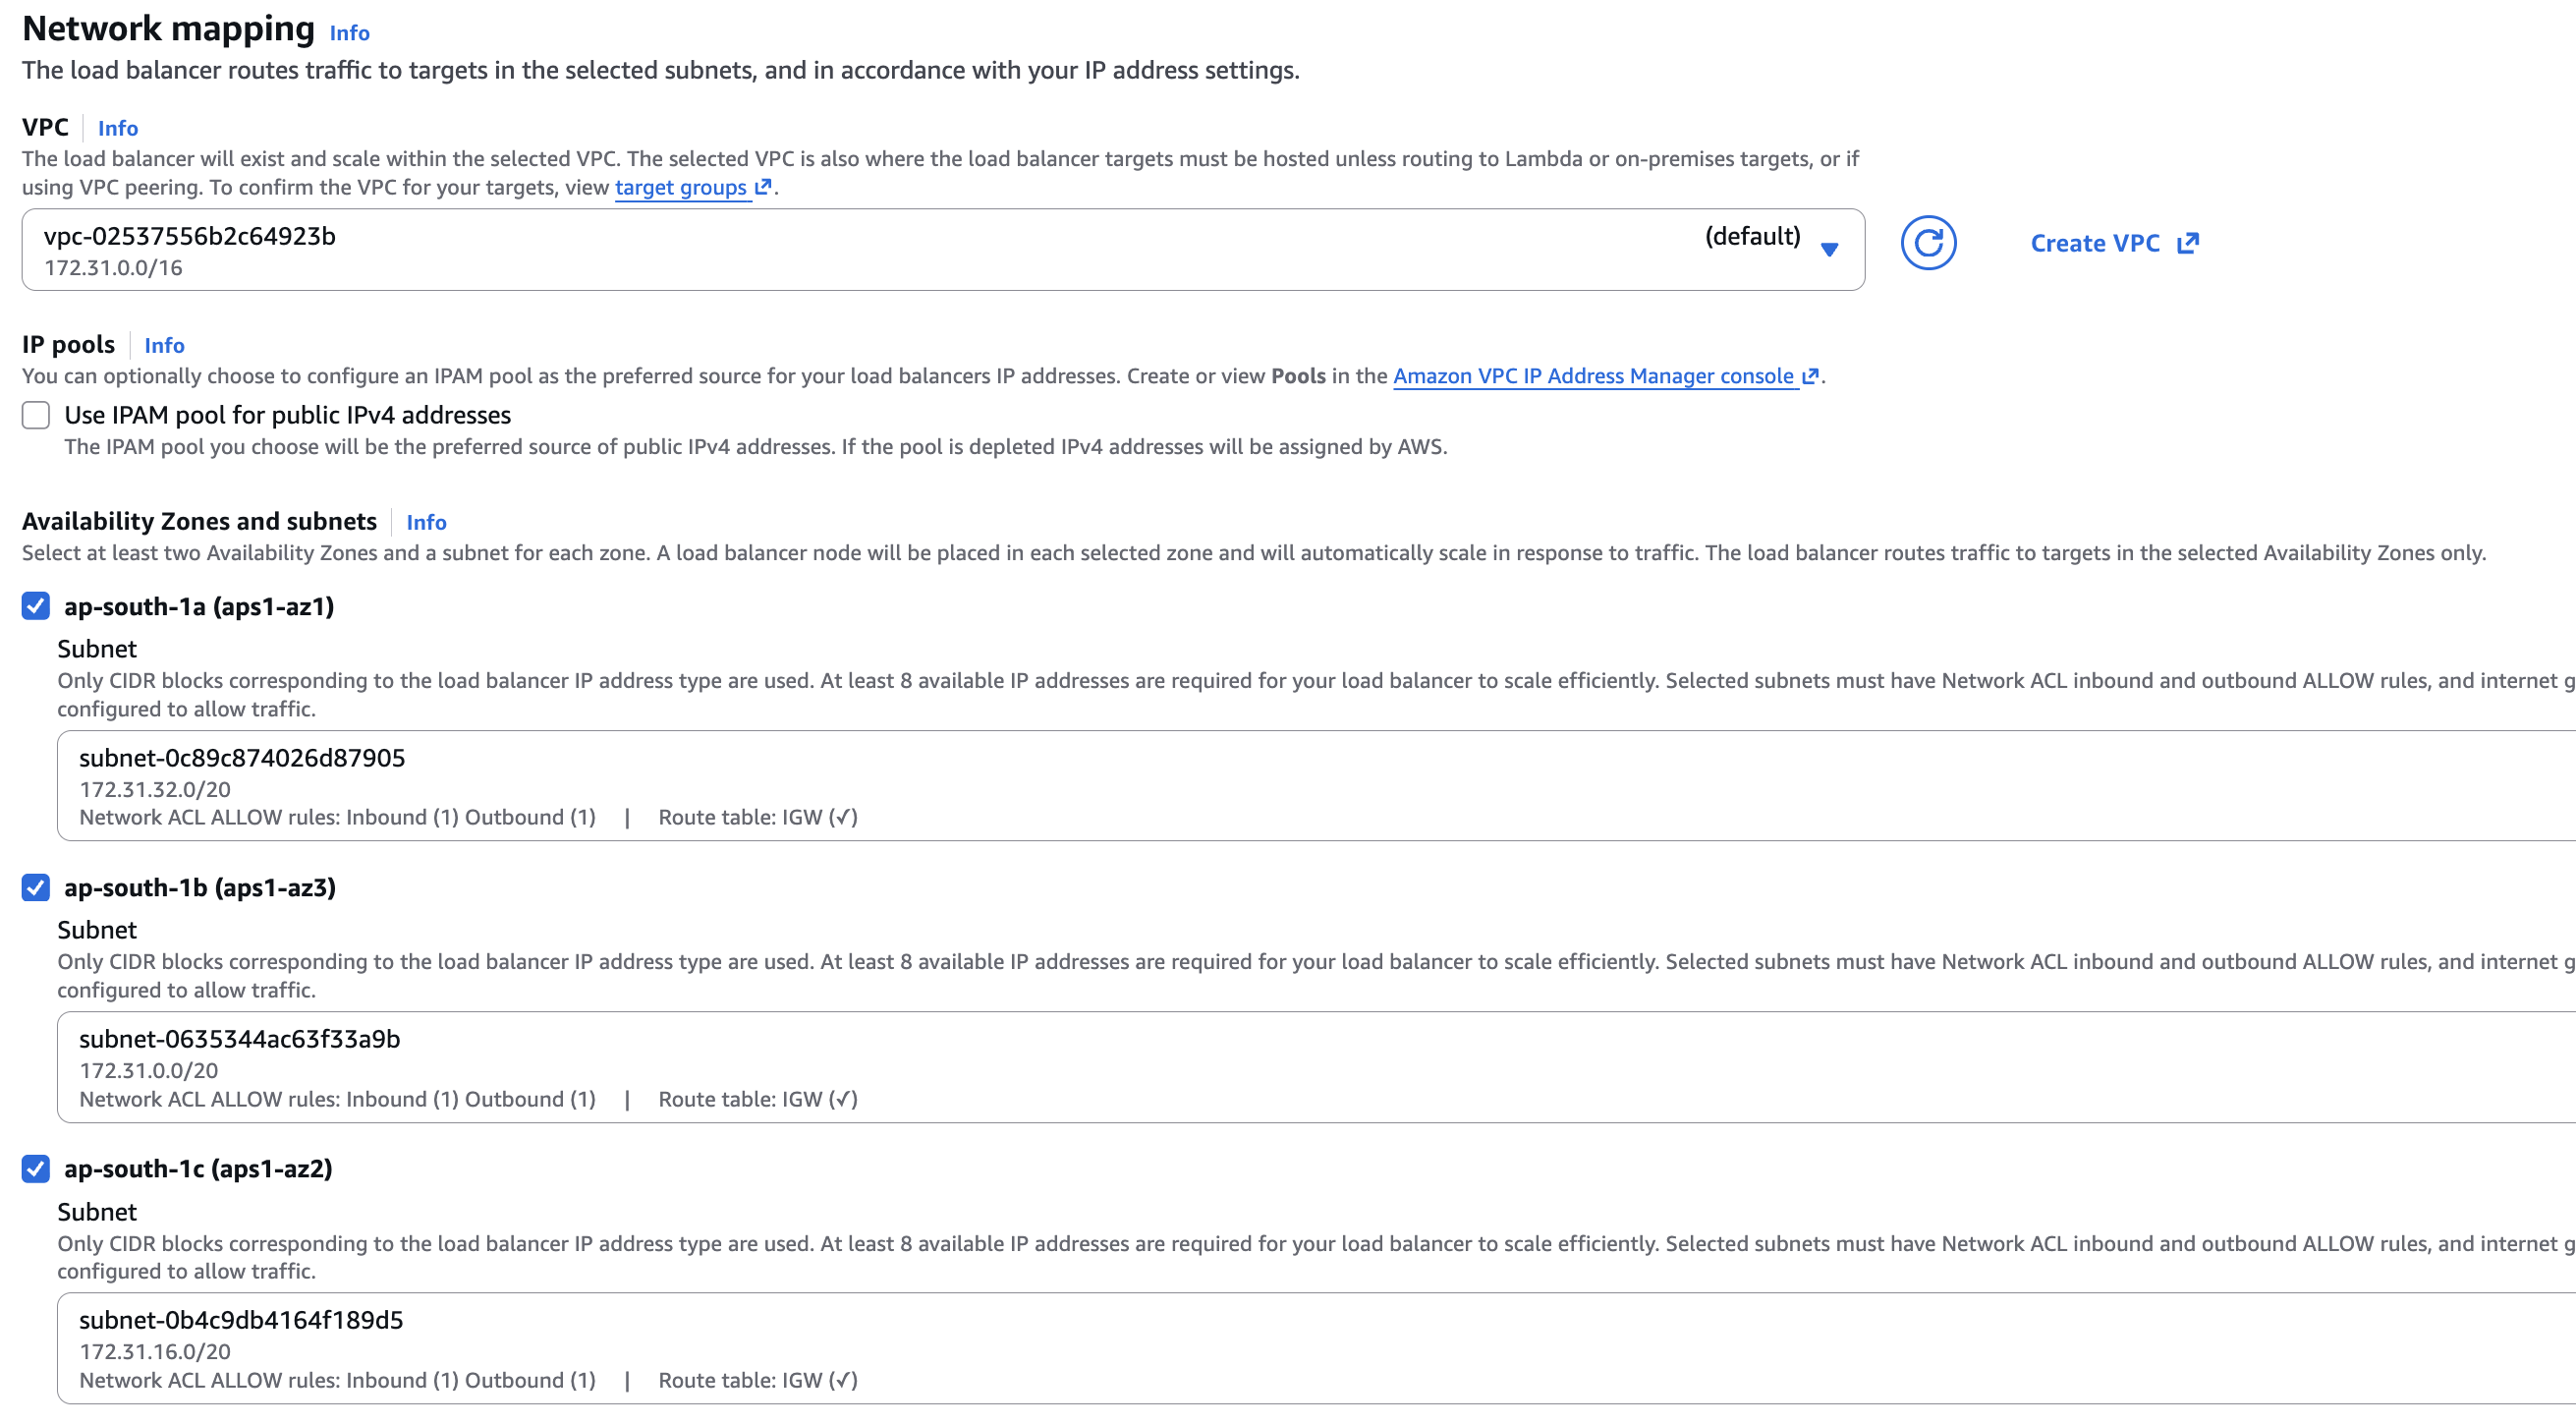
Availability Zones: Select all — enables high availability in Network Mapping
Security group: New:
demo-sg-load-balancer, allow HTTP (80) from anywhere
Reload Security Group and Add the newly created security group
3️⃣ Create a target group
A target group is just the set of instances that receive traffic from the ALB.
Name:
demo-tg-albTarget type: Instances 💻
Protocol / Port: HTTP / 80
Register both EC2 instances as targets. Confirm both show up in the group.
4️⃣ Connect the ALB to the target group
Add a listener: HTTP (port 80) → target group.
ALB ⚖️ → EC2 Instances 💻5️⃣ Launch and test
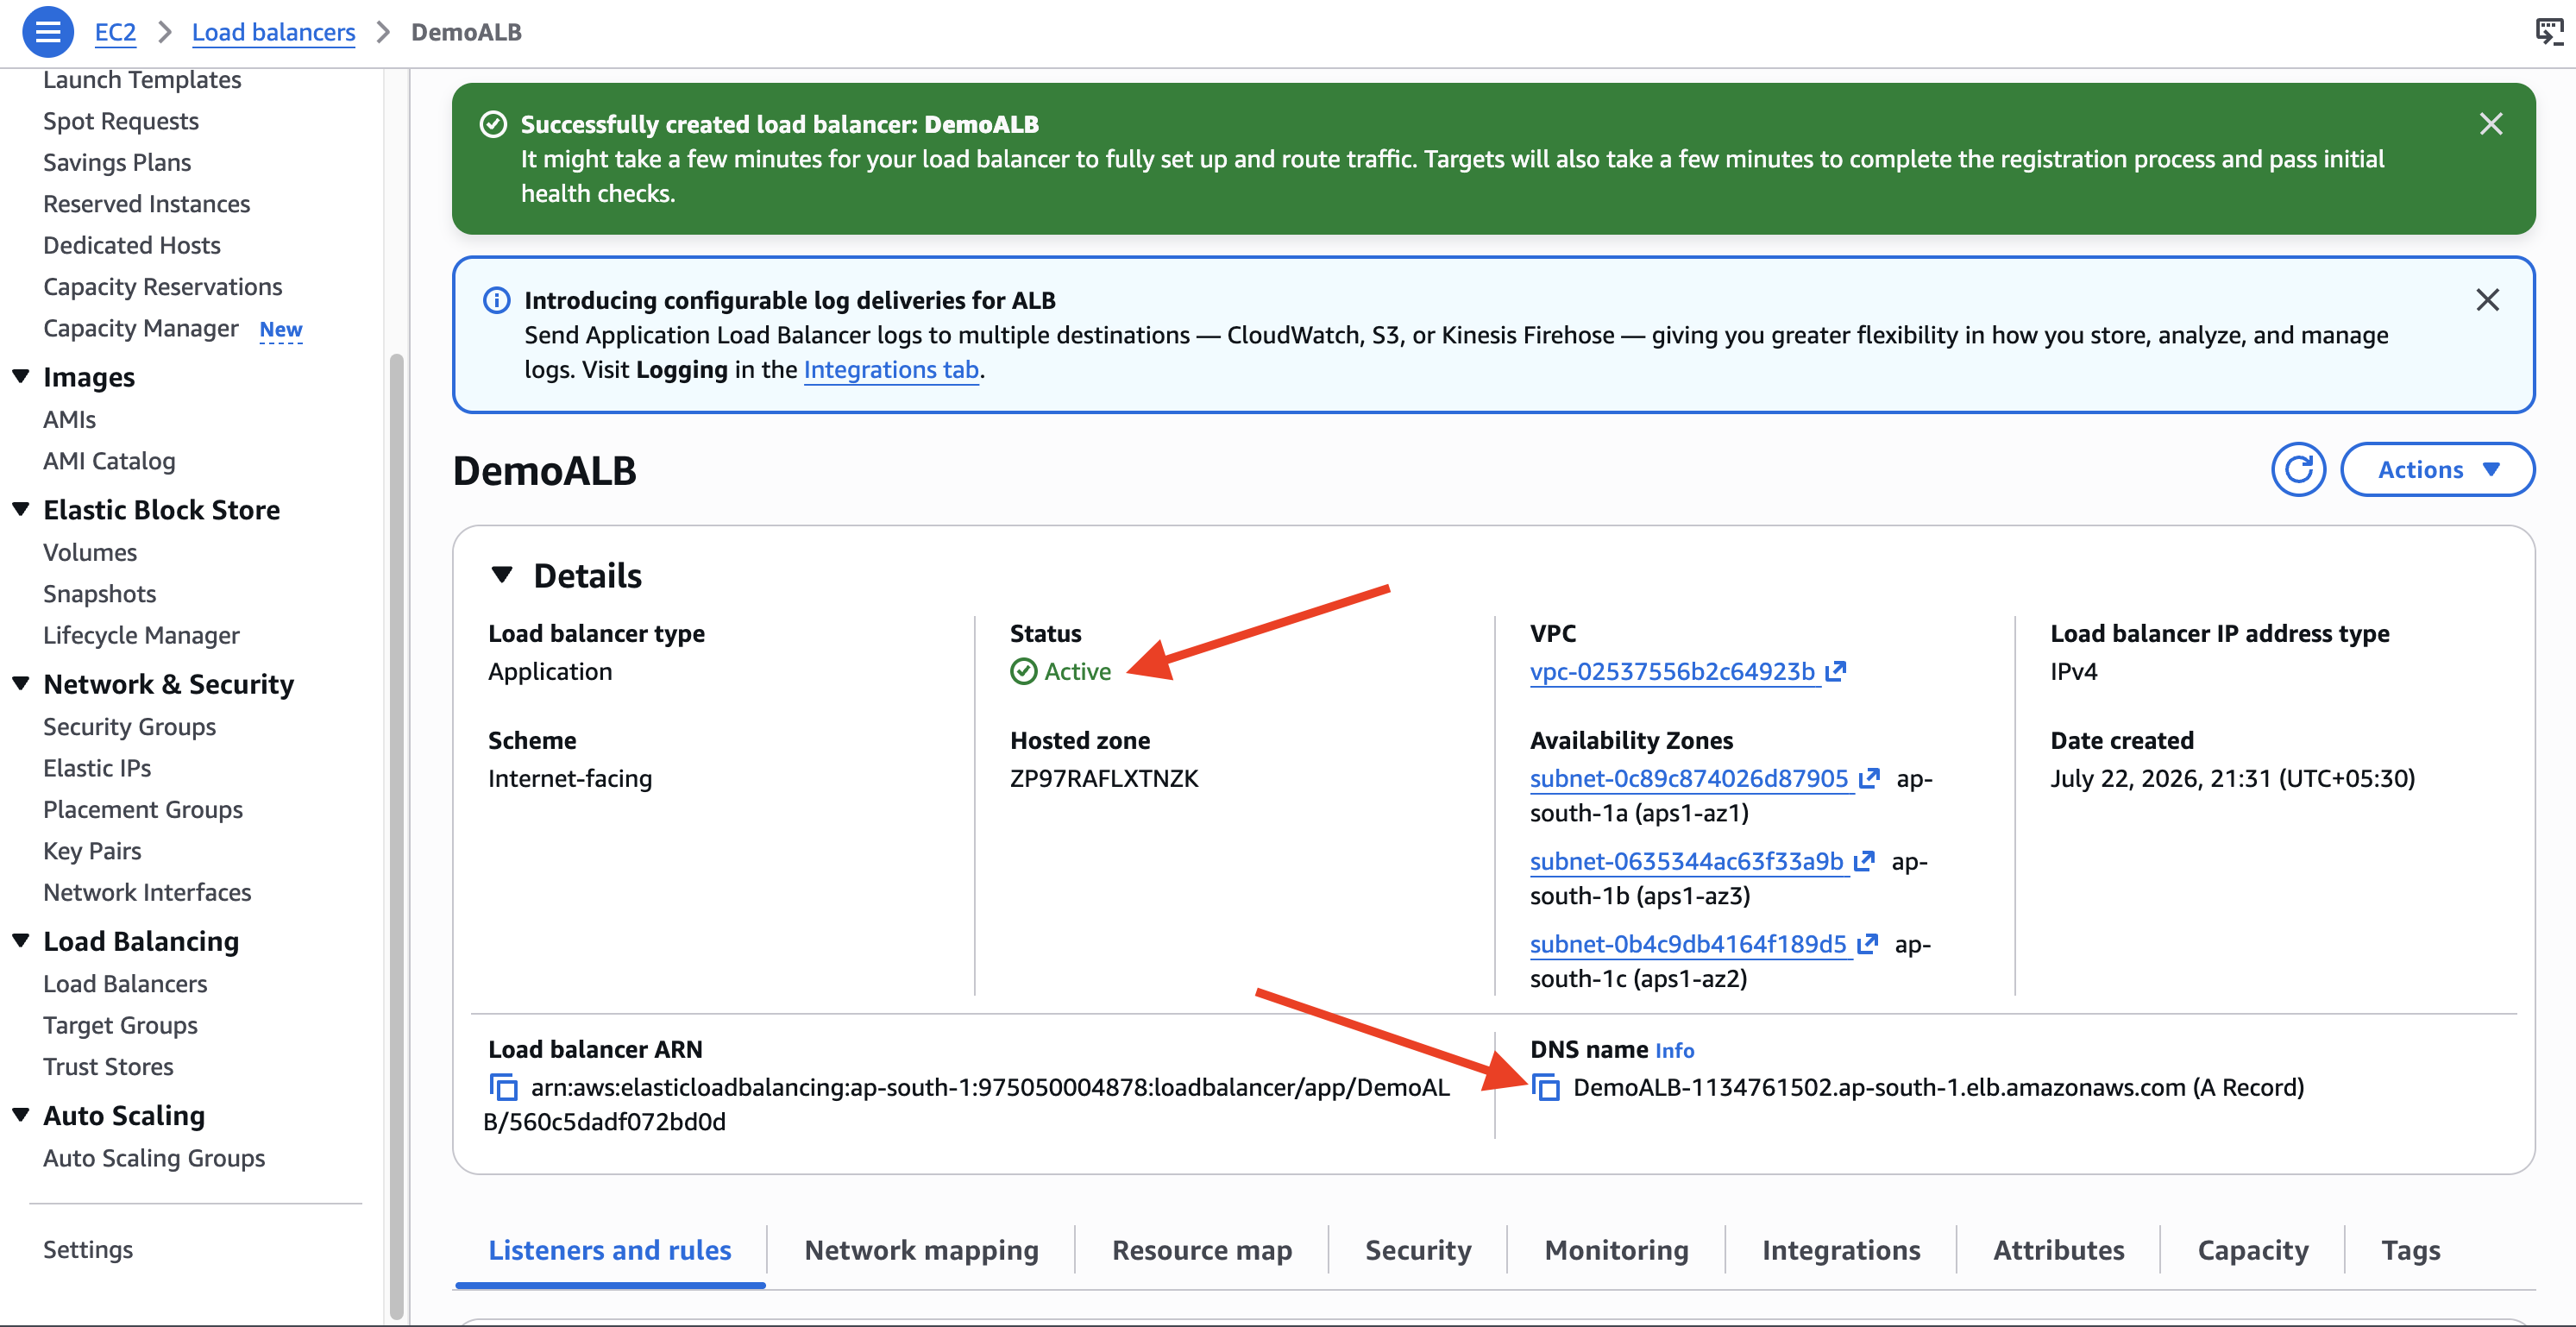
Wait for the ALB status to go from Provisioning to Active. (It might take few minutes)
Copy the ALB's DNS name and open it in your browser.
Refresh a few times — you'll see the response alternate:
Hello World from Instance 1
Hello World from Instance 2
💡 Ensure the DNS URL uses
http://, nothttps://. Timeout or 503 errors are often caused by this, so please double-check.
✅ That alternation is the load balancer working.
6️⃣ Health checks
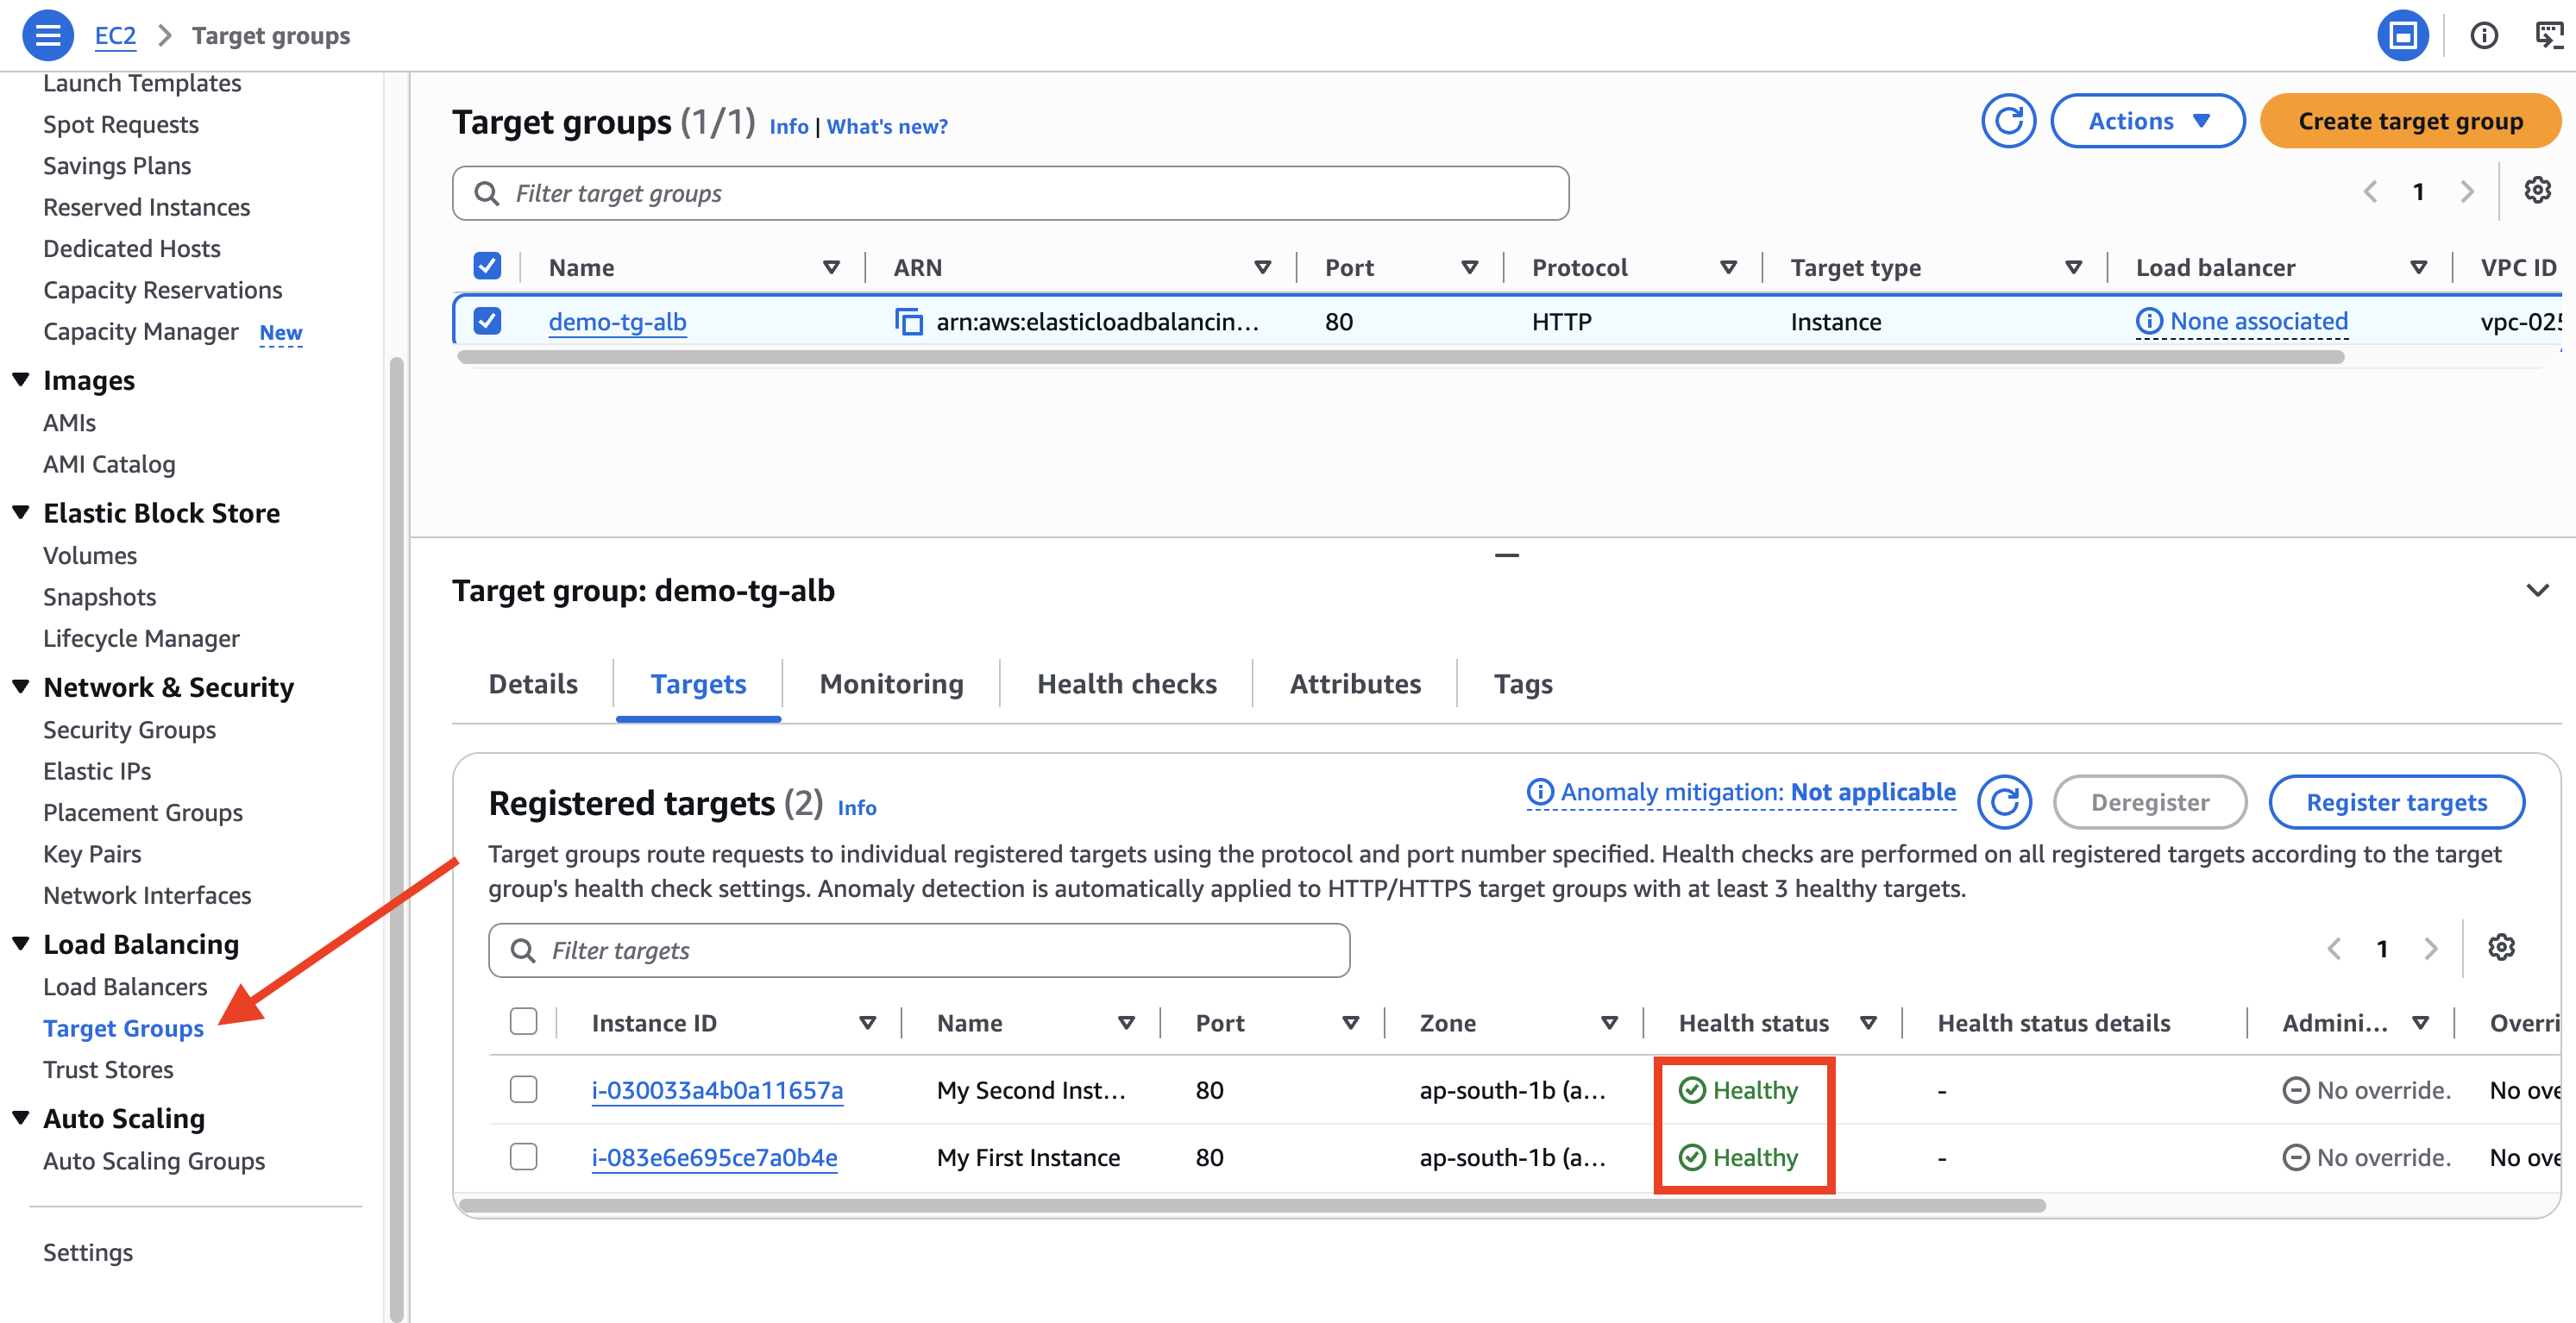
The ALB continuously checks each instance and only routes traffic to the ones that are healthy.
Try it — simulate a failure:
Stop Instance 1 in the EC2 console.
In the target group, its status flips to Unhealthy / Unused.
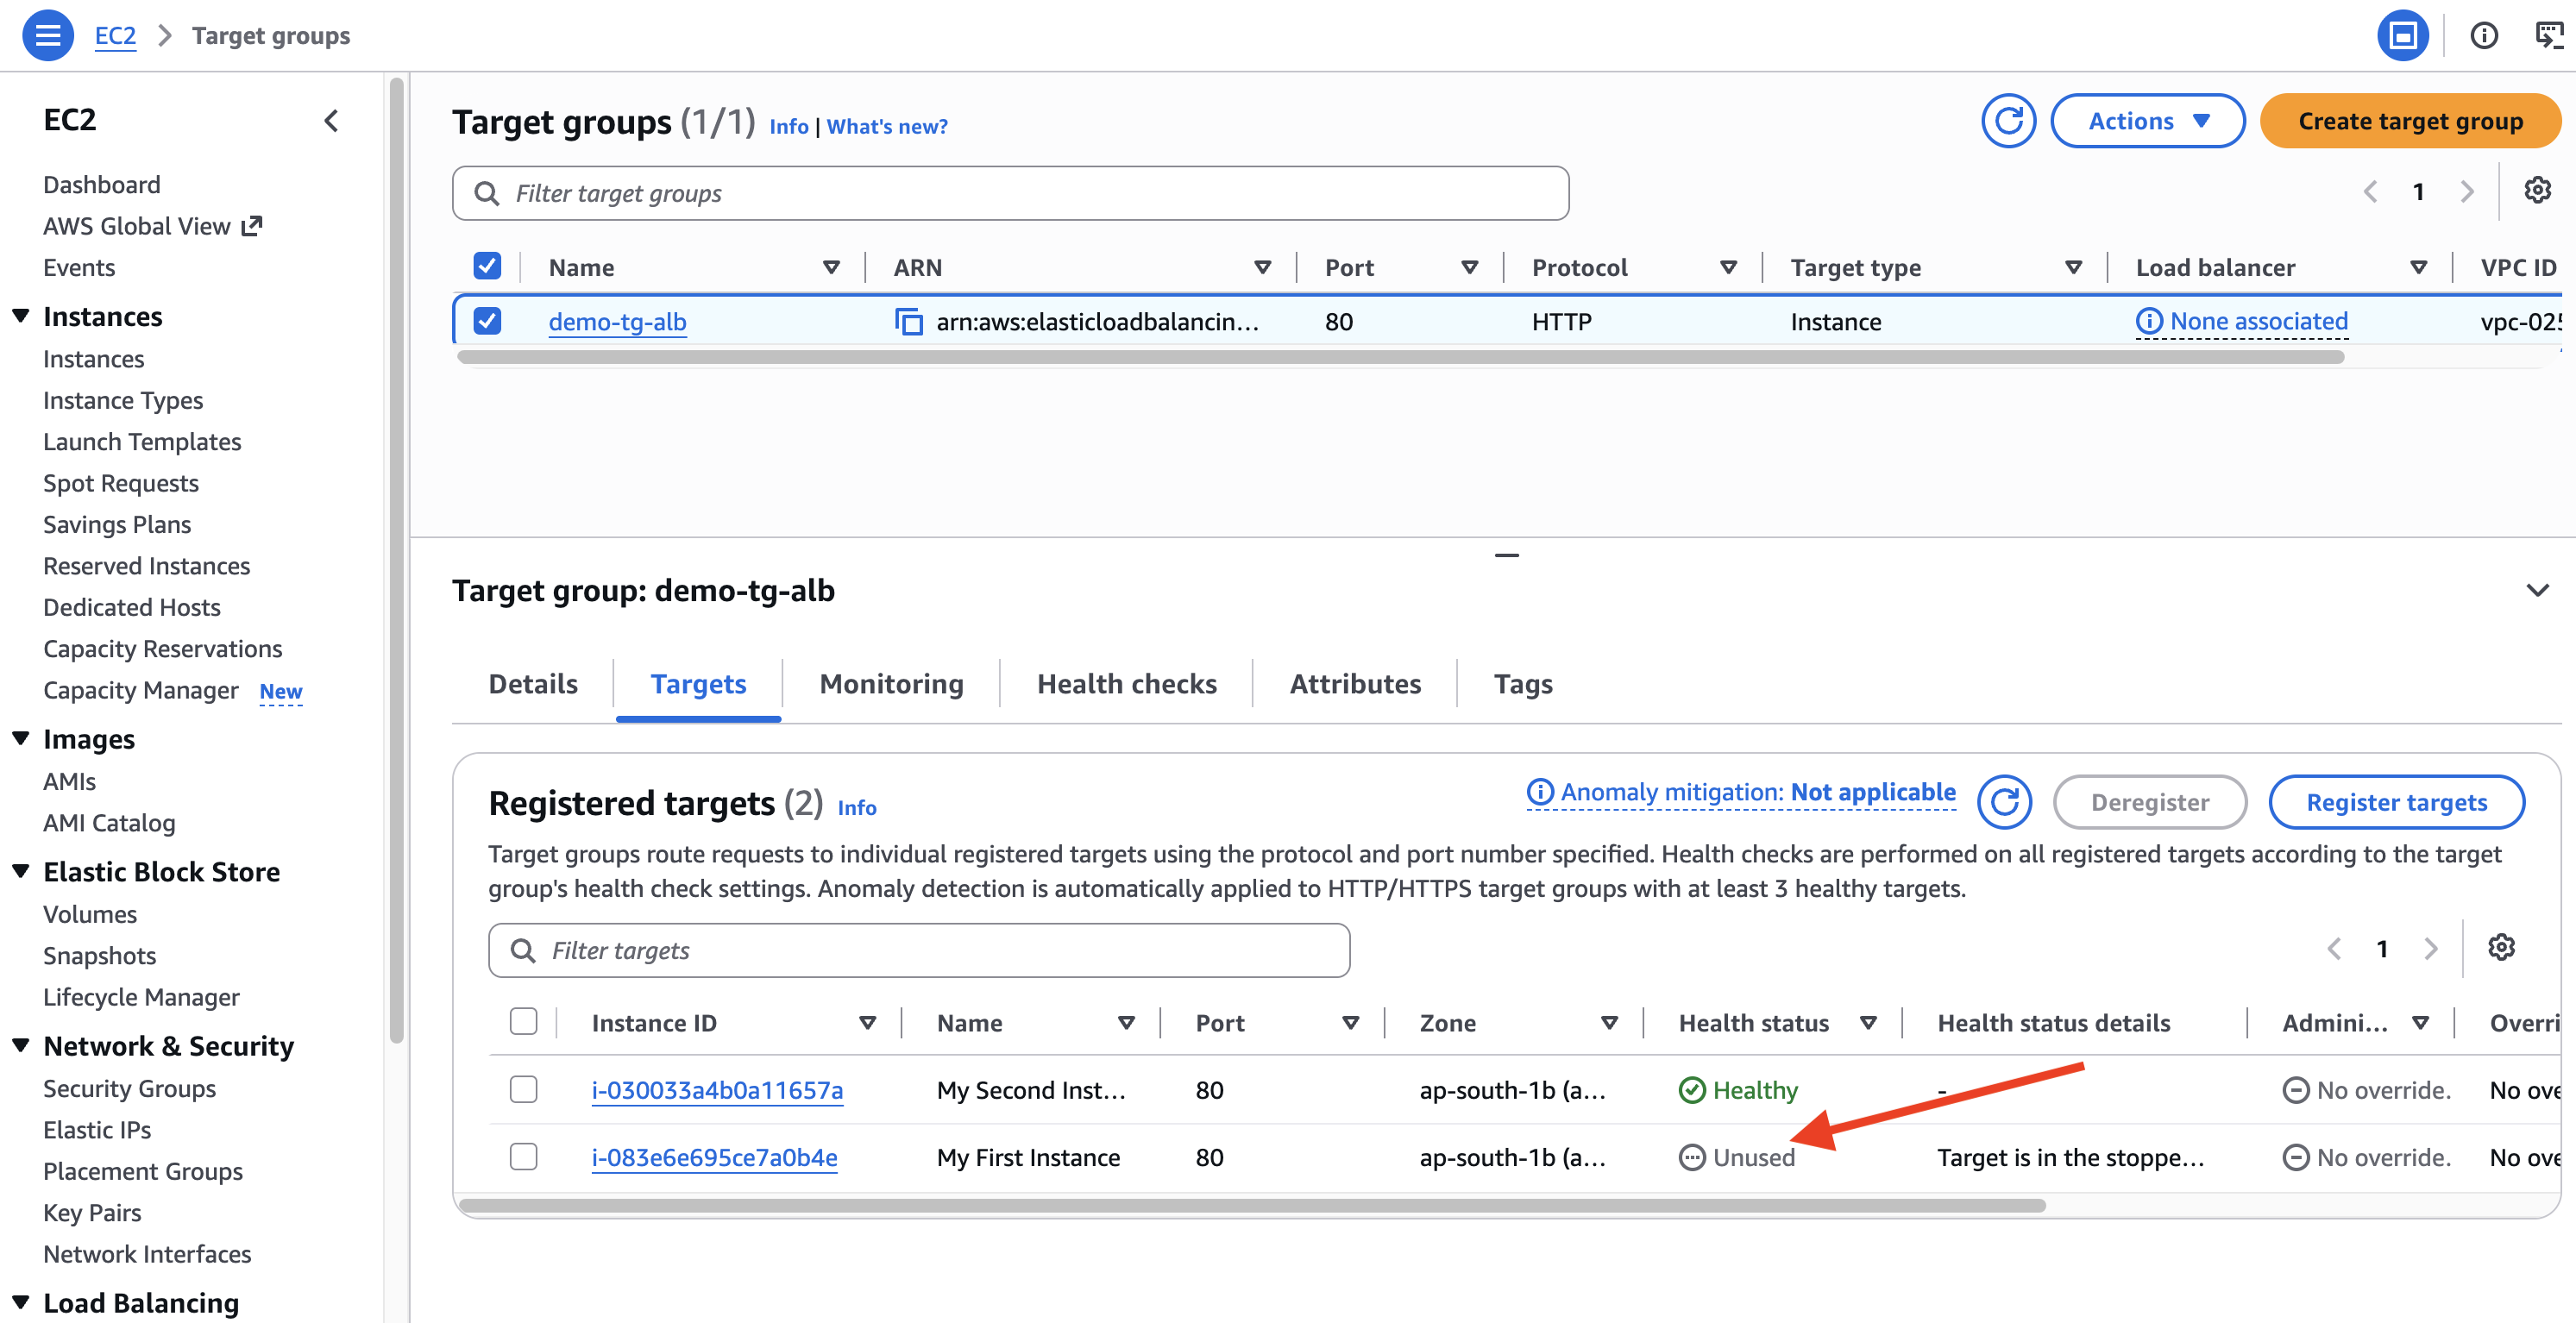
Refresh the ALB's DNS — only Instance 2 responds now. Failure handled automatically.( No Instance 1 ip)
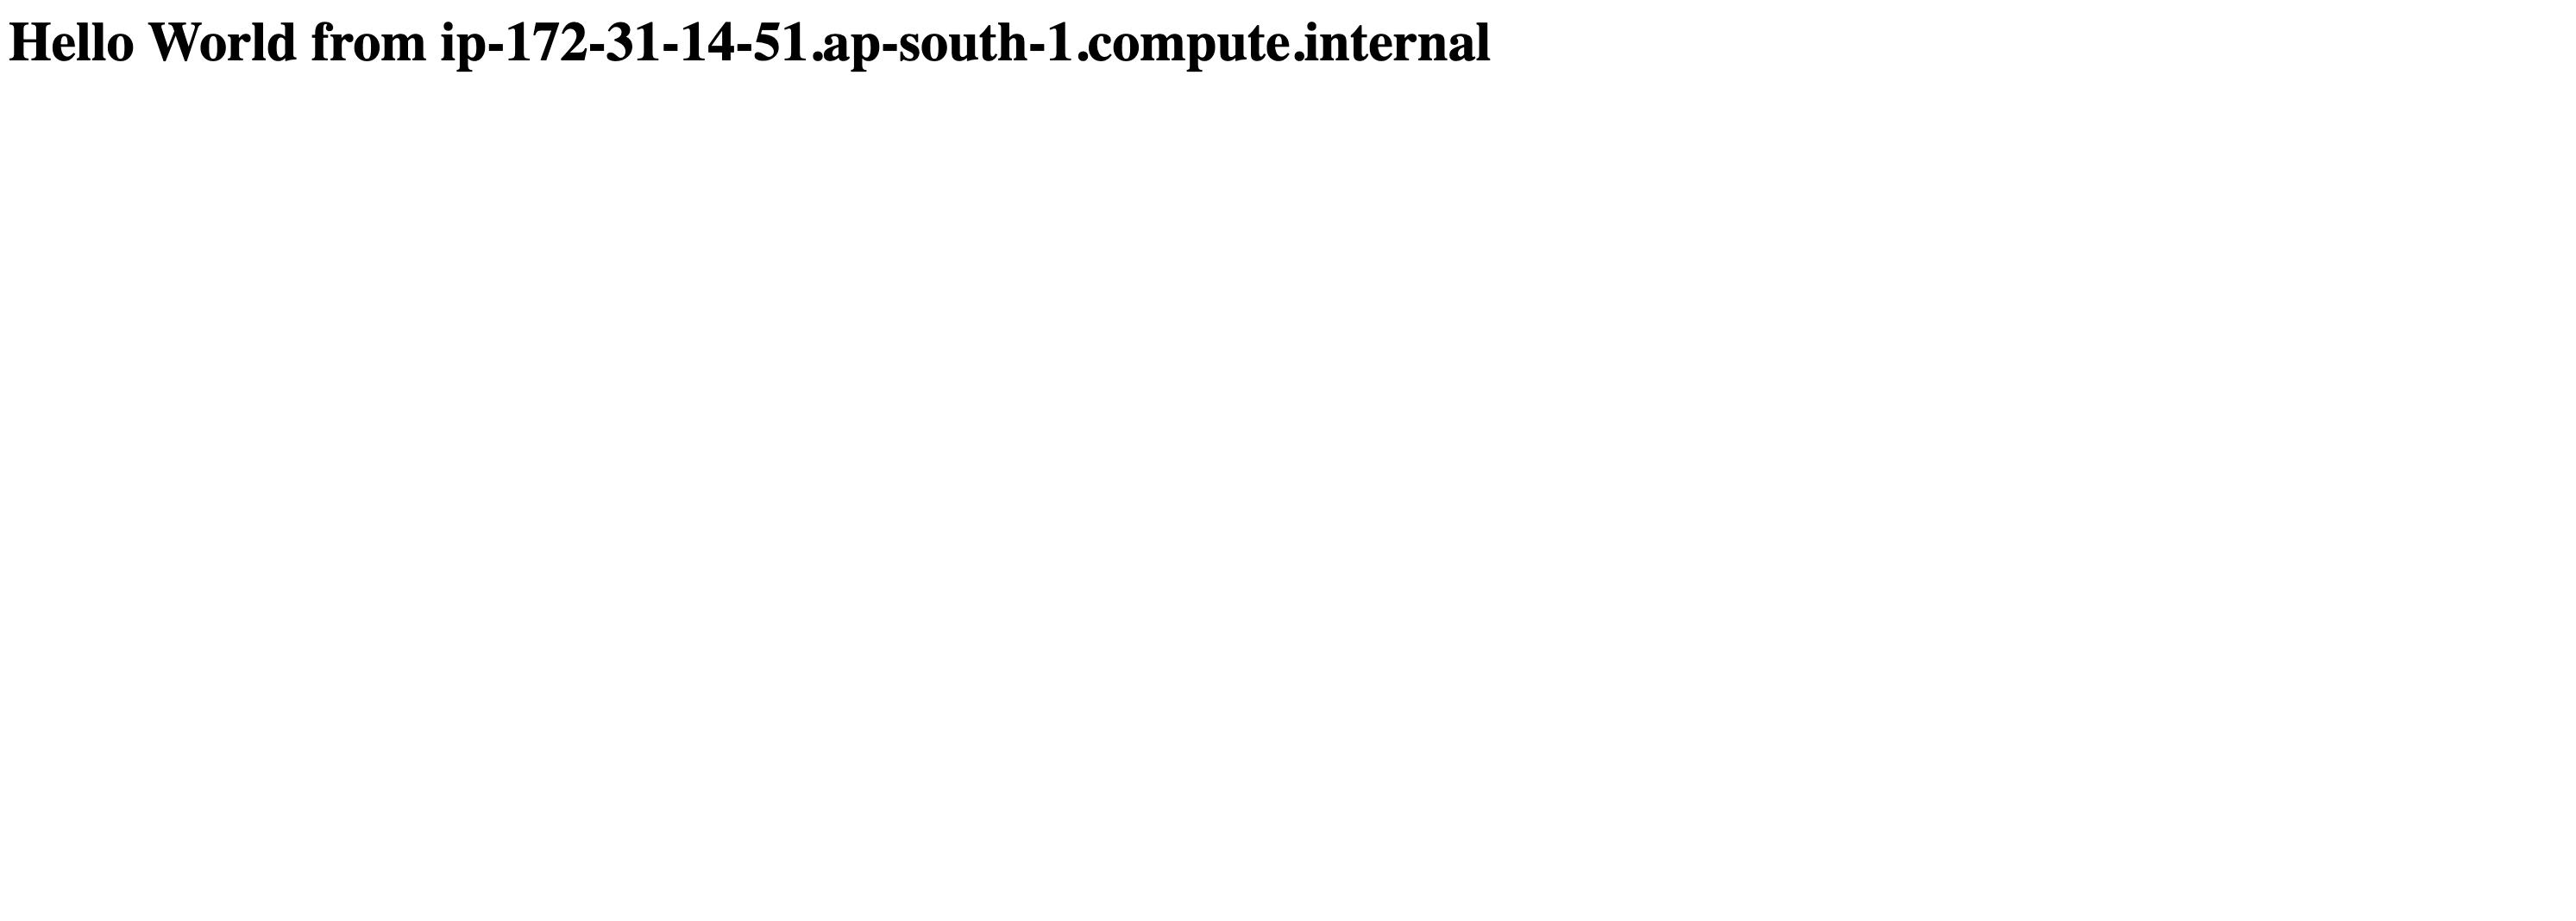
Recovery: (Do It Yourself)
Start Instance 1 again.
Wait for its status to go Initial → Healthy.
Refresh — both instances respond again.
🧐 What you just practiced
Load balancing: spreads traffic across multiple instances
High availability: the app survives a single instance failing
Health checks: unhealthy instances are removed from rotation automatically
Single entry point: one DNS name in front of many servers
🤫 Exam tips
ALB = HTTP/HTTPS, Layer 7 🌐
A target group = the EC2 instances behind the ALB 💻
Health checks handle failure automatically 🛡️
Spanning multiple AZs = high availability 🌍
🔥 Takeaway
You built a system that distributes traffic, survives failures, stays highly available, and scales easily — the foundation of modern cloud architecture.